NewsletterAp[ril 2011Newsletter Editor: In This Issue:
Meeting information
Future Meetings: (subject to change)
Do not forget to bring your used ink cartridges. Minutes of the March MeetingBy Susan Prescott, MAGIC Secretary The Macintosh User Appreciation Group of Island County (MAGIC) met at 4 p.m. at the Deer Lagoon Grange Hall on Bayview Road on Wednesday, March 16, 2011. The meeting began with a Q&A session coordinated by President Robert Elphick. Business meeting: the meeting was called to order about 5 p.m. by President Elphick. A collection hat was passed around for meeting dues at the suggested amount of $2 per person. Treasurer's report: There was no treasurer's report, since the treasurer was absent. Newsletter article: iLife just came out with an update to iPhoto to improve how photos are emailed. Robert asked to be reminded to include it in the next newsletter. Officer descriptions: Secretary Prescott has collected feedback from all but two of the officers describing their duties. She will edit them and create a uniform and concise description for the board to review. iDevice user group: Noting there is a difference between OS desktop and laptop computers and iOS devices such as iPad, iPhone and iPods, Robert suggested we set up separate venues. One option would be to have a separate meeting on a different Wednesday. Another option is to add an additional half hour to the regular meeting for iOS program and questions. The general will of the meeting was to continue a single monthly meeting, extending the time an additional half hour, starting with the Wednesday, May 18 meeting. The board will consider creating a separate newsletter for iOS or a column in the MAGIC newsletter. A section about iOS will be added to the "Tips & Tricks" section of the MAGIC website. April meeting, new location: The next meeting is 4 to 6 p.m. on Wednesday, April 20 at the Useless Bay Country Club (UBCC). UBCC member Ron Norman, MAGIC's vice president for programs, has made arrangements for nonmembers to stay and order dinner after the meeting. Directions, the menu and a price list will be posted on the MAGIC website including a link to make reservations. Please contact Ron before hand, if you plan to stay for dinner. Whidbey Telecom's Freeland Building: Several members of the board and interested members will tour the new Whidbey Telecom building at 1 p.m., Thursday, March 17. Robert plans to take his electric scooter through to test its accessibility. The purpose of the tour is to evaluate the facility for future meetings and classroom use. Education program evaluation: Robert announced the resignation of Tom Baxter, vice president of education. Tom had developed an multiuser program arrangement with Lyndadotcom so that MAGIC members could take classes online. The board members felt the program was not cost effective for beginners. The MAGIG board will hold a meeting to reevaluate the education program at 1 p.m. on Saturday, March 26 at the home of Vi Fredricks. Program: Ron Norman demonstrated photo editing using both iPhoto and Adobe Photoshop Elements, available on Amazon for $69. He used his remarkable photos to demonstrate how to merge several photos into a panorama. Also how to incorporate several different exposures of the same photo in camera raw to improve the overall contrast and quality of the photo. Tech Note: As promised, Ron Norman announced he would be offering one new technology tip each meeting. He described Intel's new, speedy Thunderbolt, "a revolutionary I/O technology for data transfers among multiple devices and device types." Visit www.intel.com/technology/io/thunderbolt/index.htm. The meeting ended at 6 p.m. Respectfully submitted by Prescott, secretary MAGIC Momentsby RYE, a self appointed wizard of the very best kind! Education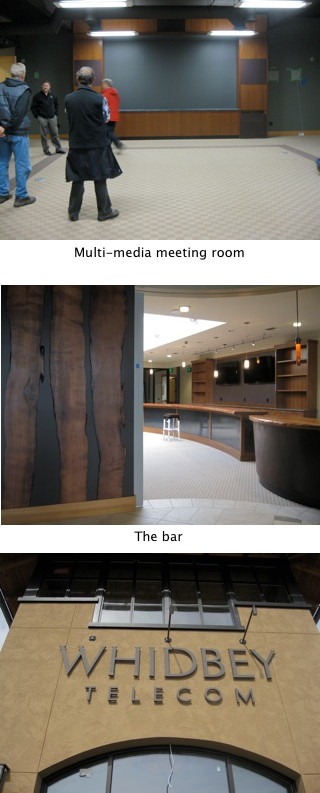
The MAGIC Board of Directors held a meeting on 26 March. At that meeting a plan was devised that will provide a beginners Mac class starting on September 10. The style of the class will be hands on teaching and will be led by the President with the help of several board of directors members. The board also agreed that MAGIC would pursue a long term education program with Whidbey Telecom. WhidbeyTel have indicated their interest in working with MAGIC to provide Mac expertise, training, and education. A new VP of Education will be chosen as part of that effort. Whidbey Telecom FacilitySeveral members visited the new Facility in Freeland that Whidbey Telecom are finishing. We were all impressed with the layout and the facilities that will be available to qualified clients. It included a large room with excellent multimedia capabilities, meeting and work rooms, computer repair facilities, a coffee bar, and a wet bar. Board members agreed that it would be a great place to hold future monthly meeting and also to run our education program as it develops. The building is likely to be open for business in the June / July timeframe and we are continuing discussions with Whidbey Telecom to use the facility when it is ready. I am optimistic about the outcome. Whidbey Telecom Mac SupportIt the February meeting during Tom Gill's excellent presentation we learned that Whidbey Telecom support Apple products and now have three Apple Certified Macintosh Technicians. These numbers can be used to contact them:Whidbey Telecom Tech Support: (360) 321-8324 or (360) 678-1900 Computer Repair Center: (360) 321-8281 For Sale and Wanted PageDo not forget to have a look at our Swap page from time to time where Apple items are listed for sale. Also there is a list of wanted items. There are some good deals to be had. Check it out. SOFTWARE UPDATESNote: This Software Update section of the newsletter lists the most relevant Apple updates. Not all updates are listed for all products. Additionally, I'll add other pertinent updates on occasion. Apple releases Mac OS X 10.6.7by Lex Friedman, Macworld.com 
If you thought your old friend Snow Leopard was getting a little long in the tooth, fear not: Apple has released Mac OS X 10.6.7, the latest update to the venerable feline. In addition to providing the standard enhancements for stability, compatibility, and security, 10.6.7 improves the reliability of Back to My Mac, resolves an issue with transferring files to SMB servers, and makes minor updates to the Mac App Store. In addition, the update incorporates a number of security fixes to Snow Leopard, which are also available separately as Security Update 2011-001. Other fixes packed into the update include additional RAW image compatibility for digital cameras, an issue with MacBook Air (Mid 2010) kernel panics, and AirPort driver issues. In addition, brightness on external displays and projectors is improved, as is a DVD Player playback issue on 64-bit Macs. Also fixed is a rare issue in Mac OS X 10.6.5 that could cause user accounts to disappear from the Login window and System Preferences after putting the system to sleep. Mac OS X 10.6.7 is available in both server and client editions via Software Update and directly from Apple's Website. For the full list of fixes, read on.
Editors note: See the article below about possible font problems. Apple Releases Supplemental Update for 13" MacBook Airby Ben Bonaccio, smalldog  March 30, 2011, Apple released Mac OS X 10.6.7 Supplemental Update for 13" MacBook Air. The update—released exclusively for the 2010 model of 13" MacBook Air—focuses solely on an issue causing machines to freeze while running iTunes. The support document accompanying the update states: This update addresses an issue that makes the system unresponsive when using iTunes. It is recommended for all 13" MacBook Air (Late 2010) users running Mac OS X v10.6.7. The update requires a mere 461 KB of disk space and a late 2010 model 13" MacBook Air running Mac OS X 10.6.7. The update is available through Software Update or via direct download here. As always, we recommend you backup your machine prior to installing any updates. Apple updates Boot Camp for new MacBook Prosby David Chartier, MacWorld All right you Thunderbolt-wielding, Boot-Camp-installing MacBook Pro owners, it's time to fire up Software Update. Apple has released a Boot Camp 3.2 update specifically for owners of the new, early 2011 MacBook Pros. It tackles a handful of unspecified issues with shutting down and Japanese and Korean keyboards. The update weighs 21.55MB and you should be able to download it under Windows with Apple's Software Update tool. You can also manually download it from Apple's support doc. Apple releases iOS 4.3.1 with bug fixesby Dan Moren, Macworld.com Apple on Friday, Mar 25, released iOS 4.3.1, the latest update to its mobile operating system. The update includes a handful of bug fixes and security patches for iOS devices. Headlining the update are a pair of graphics-related fixes: one for an occasional glitch on the 4th-generation iPod touch and one for flickering problems when using the Apple Digital AV Adapter with some TVs. iOS 4.3.1 also resolves a problem with authenticating some enterprise Web services and some bugs experienced when activating and connecting to cellular networks. The update is recommended for all users of the GSM iPhone 4, iPhone 3GS, iPad, iPad 2, and the third- and fourth-generation iPod touches. To download and install it, connect your device to your Mac or PC and click Check for Updates in iTunes. Apple TV Software Update Addresses Recent Issuesby Ben Bonaccio, smalldog 
March 23, Apple released software version 4.2.1 for the popular second generation Apple TV. The device, which had been experiencing somewhat widespread issues following the 4.2 update, should now operate more reliably. Arriving less than two weeks after the release of 4.2, Apple clearly listened to user feedback and expedited development of the patch. According to the support document accompanying the release, the following issues have been addressed: TV compatibility: Wake from sleep: Audio: Stability and performance: The bug affecting the greatest number of Apple TV owners was intermittent screen flickering. Last week this issue was traced to older HDTVs attempting to convert the Apple TV's 720p output to 1080i. Early feedback seems to indicate the update resolves this problem. Apple TV users can download the update from their devices directly. Using the Apple Remote, simply navigate to: Settings-> General-> Update Software. News, Info and StoriesOpenType PostScript Fonts Troublesome in 10.6.7by Adam C. Engst, tidbits.com 
As the bugs targeted by minor releases to Mac OS X 10.6 Snow Leopard become increasingly specific, it's easy to become complacent about the possibility of an update introducing a new problem. That, however, is precisely what has happened with last week's release of Mac OS X 10.6.7 (21 March 2011), which, among much else, fixes security vulnerabilities related to font handling. In a nutshell, font rendering with 10.6.7 is breaking when certain types of fonts are used. In particular, people are reporting errors when printing using certain fonts from Word and Pages, among other programs. Others are experiencing problems when creating PDF documents using OpenType PostScript fonts. (These PDF files work correctly in Preview, but may cause problems in Adobe Reader and Adobe Acrobat on the Mac and in Windows.) We've even seen reports of font problems when developing in Flash Professional. That said, the bug will affect all Mac applications that rely on Mac OS X's mechanism for rendering fonts; programs like InDesign that have their own rendering engines are immune. According to my sources, the problem is that each font used in a PDF has a description of how the glyphs are encoded, and a change in 10.6.7 resulted in PDFs ending up with an incorrect encoding definition. Since Mac OS X uses PDF as the print spool format, that accounts for both PDF files and print jobs showing the problem. The Flash Professional authoring tool relies on the platform's font rendering, which explains why it's having trouble too. As for why affected PDFs work fine in Preview but not in other programs, that's a side effect of the fact that Preview doesn't pay attention to the entire PDF specification (for instance, it also ignores color spaces, thus avoiding problems with badly structured PDFs that manifest themselves in Adobe Reader and Acrobat Professional). Be careful here, since PDFs with OpenType PostScript fonts created in 10.6.7 will have this problem forever, which could result in problems well into the future. The problem seems to be restricted to OpenType PostScript fonts. As Sharon Zardetto explains in "Take Control of Fonts in Snow Leopard," OpenType isn't so much a font technology as it is a font format, created by Adobe and Microsoft. The OpenType standard supports using either a PostScript or TrueType font description, with OpenType PostScript fonts generally using the .otf extension and OpenType TrueType fonts generally using either .ttf or .ttc (occasionally they use .otf for backward compatibility reasons). An easier way to determine if a particular font is an OpenType PostScript font is to view the font info in Font Book (choose Preview->Show Font Info) and look in the Kind field. (Myriad Pro, which I used in the screenshot, is commonly cited in reports of people who have been having trouble.) 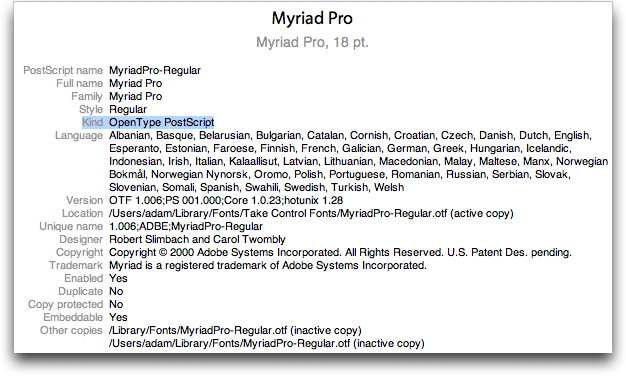
The easiest workaround is of course to use a different font that's not in the OpenType PostScript format, but that may not be possible given institutional font requirements (or just the desire to use a particular font). Short of that, the only solution appears to be to reinstall Mac OS X 10.6 Snow Leopard from DVD, and then apply the Mac OS X 10.6.6 Update Combo to return to the most recent release of Snow Leopard before this problem appeared. And of course, if you rely on OpenType PostScript fonts for your work and you haven't yet updated to 10.6.7, I recommend holding off until Apple resolves the situation. It should be an easy fix, but there's no telling how soon we'll see it. Click here for complete article. Digital certificate theft shines spotlight on Safari limitationby Marco Tabini, Macworld.com The recent theft of a small number of digital certificates, used by Web browsers to verify the identity of secure Websites, has put Safari users at potential risk, according to security developer and research firm Intego. The security developer says itʼs due to a limitation in the way Apple's browser handles the validation of online identities. 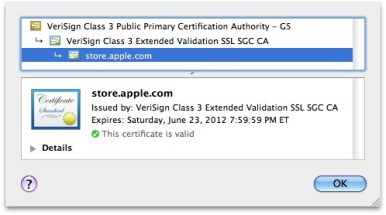
Several days ago, hackers managed to successfully request fraudulent digital certificates for various popular Websites—including Google, Yahoo, Skype, and others—from an affiliate of Comodo, which is one of several companies that issues digital certificates. Digital certificates are used by browsers to verify that the site on the other end of a secure connection is who they purport to be. In other words, when you visit your bank online or shop at Amazon, certificates make sure that it really is your bank or Amazon. Those certificates are issued by a certificate authority, like Comodo; as long as the browser trusts the issuer, it implicitly trusts the certificates itʼs given out. (In Safari, you can view the certificate of a secure site by clicking on the padlock icon in the top right corner of the window or on the company name in the location field.) The security breach threw a monkey wrench in this process, by allowing hackers to essentially pretend that a site of their own creation was in fact Google, Yahoo, or Skype. Backed by the fraudulent certificates, these fake sites could be used to trick people into giving up all sorts of personal information. 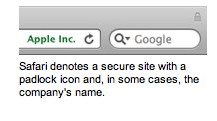
Luckily, certificate authorities can revoke those digital certificates, rendering them useless to the would-be hackers—but it only works if your browser knows the certificates have been revoked. This process doesnʼt happen automatically in all browsers. Safari, in particular, relies on the built-in security management features of Mac OS Xʼs Keychain Manager—and Keychain Managerʼs validation feature is off by default. Fortunately, as Intego mentions in its blog post, it only takes a couple of clicks to make Safari safe from this potential vulnerability again. All you need to do is run Keychain Access (found in your /Applications/Utilities folder, or by just typing its name into Spotlight) and then make sure that the various certificate-revocation protocols are enabled in the appʼs settings panel. Visit the link above for full instructions. However, itʼs worth noting that enabling these options can slow down your browsing process. Despite the potential seriousness of this problem, it is important to note a couple of things. The first is that actually exploiting those fraudulent certificates requires a lot of things to go just right for the would-be attackers—they'd have to create perfect replicas of the Websites in question and convince users to visit them. Itʼs also worth pointing out that the above solution only pertains to Safari. Other popular Mac browsers, like Chrome or Firefox, rely on a different certificate validation mechanism, but they ought to be safe as long as you keep them up-to-date. Click here for complete article. Identifying faces faster in iPhotoby Christopher Breen, Macworld.com Macworld forum visitor skfx4 faces the daunting job of identifying faces. He writes: I just upgraded to iPhoto 11 and now have the dubious task of assigning face names to 24,000 faces in my iPhoto library. Does anyone know of any shortcuts to this process? iPhotoʼs magical powers go only so far. But that doesnʼt mean that when identifying faces in your images you have to click every single image and name it. It works like this: After youʼve imported your images, iPhoto will set about identifying faces in your library. It obviously canʼt assign names at this point, but it can separate human faces from random patterns on a tortilla. Select Faces in iPhotoʼs Library pane and you can watch it work through your images, displaying faces it finds as it goes. When itʼs completed the job, youʼll see a collection of faces on a cork-board background with "Unnamed" appearing beneath each image. Highlight one of these fields and enter the name of the person in the image. Repeat for the other images on the cork-board. If you like, click Show More Faces and youʼll see other faces from your library. Enter their names as well. When youʼre ready for serious naming, click Continue to Faces. This screen will show one picture of each face youʼve identified. Double-click on one of those faces and youʼll see the entire image the face came from. Now, hereʼs where the shortcut comes into play. At the bottom of the window youʼll see a Bubba May Be in 46 Additional Photos entry (where Bubba is only Bubba if you know and have named a Bubba). Click the Confirm Additional Faces button at the bottom of the window. This is where the magic happens. iPhoto has made its best guess about which of your images contain Bubbaʼs mug. At the top of the window is the one image youʼve named and confirmed. Below are unconfirmed faces. Beneath each is a Click to Confirm entry. If you were to click each of 24,000 images, you would set yourself on the short path to insanity. So donʼt. Instead, click and drag across contiguous images of Bubba. When you do so, each image is assigned that name. If iPhotoʼs done its job properly (and honestly, itʼs pretty good), far more faces will be Bubbaʼs than another personʼs. Alternatively, if nearly all the faces are Bubba's drag across all the images and then just click those that aren't Bubba to reject them. If you've chosen the first method, before clicking Done, be sure to Option-click those faces that donʼt belong to Bubba. This helps with iPhotoʼs identification as well. If you find an incorrectly named face that youʼd like to name, Control (right) click on the image, choose Name from the menu, and enter the correct name. If youʼve already named this person, their name should appear when youʼve typed the first couple of letters. When you click Done, youʼll return to Bubbaʼs page where you'll likely see another entry at the bottom indicating that Bubba may be in additional photos. Your first training has helped iPhoto identify subsequent images of Bubba. Click Confirm Additional Faces and repeat the previous process. You may find that you have to do this a few times before youʼre no longer prompted to identify Bubba in other images. 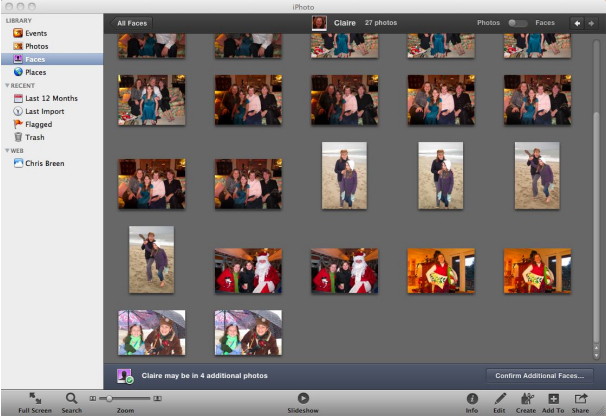
Once youʼve finished with Bubba, continue on with other faces. I understand that this sounds like a tedious process, but when you invoke the power of selecting multiple images, the job gets a heck of alot easier. And itʼs not something you need to do in one sitting. In those minutes when your Mac is tied up doing other things—downloading a movie from the iTunes Store or processing iPhoto thumbnails in iMovie—dash over to iPhoto and spend a few minutes identifying faces. A few of these sessions and your work will be done. Click here for complete article. Wall Street Journal offering single issue downloads for the iPadDanny Gallagher, Macworld.com  The Wall Street Journal has announced it will begin selling single issues via its free iPad app, starting Wednesday. Single issues will cost $2 each and include access to all the stories and features in that dayʼs print edition. Readers can also opt for $18 per month Now Edition that also includes regular daily updates to the dayʼs news or a Digital Bundle for $4 a week that also includes access to the Journalʼs Website as well as via mobile device apps for iPhone, iPad, Android tablets, and BlackBerries. Those users who choose not to pony up can still get access to the same limited content as always. Of course, the Journal isnʼt the only major player to get in the digital subscription game. Last week, The New York Times announced its lineup of digital content subscriptions, though many critics have dinged the Gray Ladyʼs approach for being disproportionately expensive compared to its print offerings, which will now bundle digital access. And News Corpʼs recently launched iPad-only magazine, The Daily, has also begun selling subscriptions for $1 a week or $40 for year. Click here for complete article. Customizing Finder Windowsby Ben Bonaccio, smalldog.com
Finder windows are among the most commonly accessed components of OS X's graphical user interface (GUI). These windows are used to organize and locate files, browse and store applications, conduct searches, and connect to external drives. While most users have, at some point, experimented with customizing the Finder's iTunes-esque sidebar to best suit their needs, many users fail to realize the application's full potential for customization. If there's a void of gray space to the right of the gear-shaped icon in the toolbar at the top of the window, you may be one of these users. Like many OS X applications, the Finder's toolbar can be tweaked and customized. This can be accomplished by selecting "View" from the Menu Bar and clicking "Customize Toolbar…" The ensuing drop-down menu gives you about 17 different icons that can be dragged onto the toolbar. If you go a bit too crazy, you can always drag the default set of icons back to the toolbar from this menu as well. Though the Customize Toolbar… menu affords plenty of options for Finder customization, it is merely the beginning. Depending on the size of the window—which is partially determined by screen size—the Finder's toolbar can house tons of additional shortcuts. Ranging from files and folders to applications, nearly anything can be dragged onto it. As these shortcuts remain present while you browse through the Finder, the toolbar is a great place to store frequently accessed folders or applications. If you're looking to slim down your dock, it's easy to move semi-frequently used applications that are crowding dock space into the Finder toolbar. If you'd like to reorganize shortcuts or remove them from the toolbar, simply hold Command and click and drag to rearrange, or drag shortcuts outside of the Finder window to remove them entirely. Happy customization! Click here for complete article. iPad 2 Setup IssuesMarius Masalar, mac.appstorm.net 
iPad 2 is here! Most of what we've heard from our customers is very positive, and people absolutely love their new toy. As with any new device, however, we occasionally get a call from someone who can't get their iPad to work with their computer. Most of the time, the issue falls into one of the following categories. USB port: iPad, as with other recent devices, requires connection to a USB 2.0 port to sync with iTunes. If your system has legacy USB 1.x ports, iTunes won't see the device. If you're not sure, check System Profiler (Mac) or Device Manager (Windows). Another thing to watch for is if you're plugging the device into an unpowered USB hub; the device will turn on and show the Connect to iTunes graphic, but it won't appear under Devices in iTunes. Plug it directly into the computer to ensure there is enough power to detect the device. Non-current version of iTunes: All current iDevices require iTunes 10, but for iPad 2 you must have at least 10.2. If you use a Windows system, click Help > About iTunes to find out if you're up to date. On a Mac, click iTunes > About iTunes. If you have an earlier version than 10.2.1, check that same menu for a Check for Updates selection and see if a new version is available. If so, download and install it, then try your device again. Your system doesn't support iTunes 10: Depending on the version of the OS you have, you may not be able to install iTunes 10. Your only option here is to upgrade your operating system. For Windows, you must have XP Service Pack 3. For Mac OS X, you need 10.5.8 or higher. Also keep in mind that iTunes 10 may need more memory than your system has installed - you can get by with 512MB RAM, but to take full advantage of the content, you should have 1GB or more. Click here for complete article. Do Not Trackby Ron Sharp, MAGIC Some web sites track your shopping habits which helps retailers target ads. The new ads then show up on web sites you visit. Some people think that's a little creepy so a few browsers like Mozilla's Firefox 4 has a preference option that says "Do Not Track." Although it's a nice option it is only a request. Retail advertisers just see a flag and then can choose to comply, some aren't sure how to comply. So until more is done with this feature the best way to avoid tracking and ensure anonymity is to use private browsing, clear your cookies and turn off or don't allow cookies and clear browsing history. Of course, then some web sites will not work properly, forms will not work and secure sites you log in to will not work. I personally don't have a problem with targeted ads. Yet. It takes me long enough to find what I want online, so if ads target my needs, ok. Become a Stickies Ninja: Tips, Tricks & SecretsMarius Masalar, mac.appstorm.net 
With the Mac App Store open and business booming for Apple developers, it's easy to get into the habit of grabbing a bunch of useful third-party applications to handle your computing needs. While there's nothing wrong with doing this, you may find yourself surprised at just how powerful some of OS X's built-in tools are. The next stop on our quest to help you make the best of your Mac is Stickies, the surprisingly powerful built-in notes application that you may not be using to the full potential, if at all! Let's fix that, shall we? The Basics You'll notice that the notes themselves look a lot like basic post-its, and for those of us who used to swear by sticking post-its to our monitors to remember things, it's gratifying to see the same eye-catching look making its way to the digital equivalent. Feeling Sticky? In any event, Stickies notes are a lot more robust than their paper counterparts, so let's walk through some of the basic features to start with: Text Wrangling Flexible Notes Sticky Shrinking and Info If you want to then get a quick sense of when you made each sticky and when you last modified it, without having to bring it back up to size, you need only hover your mouse over it and a window will appear giving you all the details. This also works when the sticky is maximized, of course.
Translucent Stickies You can also access this function through the menu via Note->Translucent Window, and if you've set up your sticky to be just the way you need it, then you can hit "Use As Default" in that same menu to ensure that all your new stickies conform to those settings. Floating To get a note to float like this, simply select it and hit Command + Option + F. Alternatively, you can use the top menu by going to Note->Floating Window. Cycle Through Stickies Other File Types 
Plays Well With Others There is, of course, a shortcut for that, so if you want to save yourself some needless clicking then simply select your text and press Command + Shift + Y. Works with all sorts of things, so give it a try and save yourself some copy/pasting time! More Fancy Features and Tricks If you're yawning at the basic functionality above, then read on for a look at some of the more clever things that can be accomplished with Stickies. Roll up your sleeves though, because a few of these tricks require you to get your hands dirty… Linking To Emails They'll show up as a link (with the subject line as the text) and you can add any additional notes that you need. That way, when you're ready to deal with the email, your sticky will not only remind you and tell you what kind of response you were thinking of, it will also give you a handy link straight to the email so you don't have to hunt it down manually. Start Stickies on Startup You'll find this list in System Preferences->Accounts. Just select the "Login Items" tab and hit the little plus button, then find and add Stickies to the list and the next time you log in with that account, Stickies will start automatically for you. 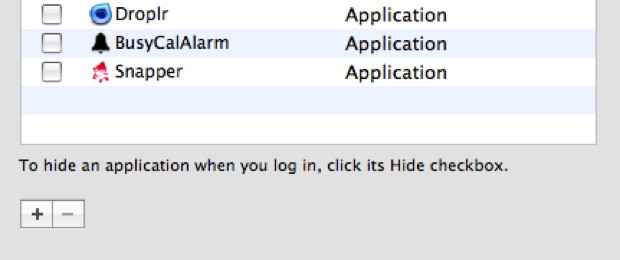
Stickies, Meet Dropbox The method is identical to the one described in previous articles on the subject, but for those unfamiliar with the process, we're going to essentially move the real Stickies database file to our Dropbox folder and then create a symbolic link to it (kind of like a more powerful alias) in its original location. It's not overly complicated, but it requires a bit more work. You can do this manually using the Terminal, but if you'd rather not have to do that each time you need to make a symbolic link, we recommend grabbing this set of Automator actions. To use them, open the package and open Automator. Go to File->Import Actions and select the "Create Symbolic Link" action from the root of the disk image. Then simply navigate to the Sample Workflows folder on the disk image and double-click "Create Symbolic Link" to open it in Automator. The last step is to go to File->Save As Plugin and give it a name (I called it "Create Symbolic Link"). Now whenever you need to create a symbolic link, simply right click the file, select More->Automator, and the menu will now have "Create Symbolic Link" (or whatever you called it) as an option! With that out of the way, setting up sync is easy. Go into your User/Library folder, grab the "StickiesDatabase" file, and drop it wherever you want in your Dropbox folder. Once it's in there, right click it, select Create Symbolic Link as described above via the Automator menu, and point it right back to the User/Library folder. Name it "StickiesDatabase" and click Continue to place the symbolic link. That's it! 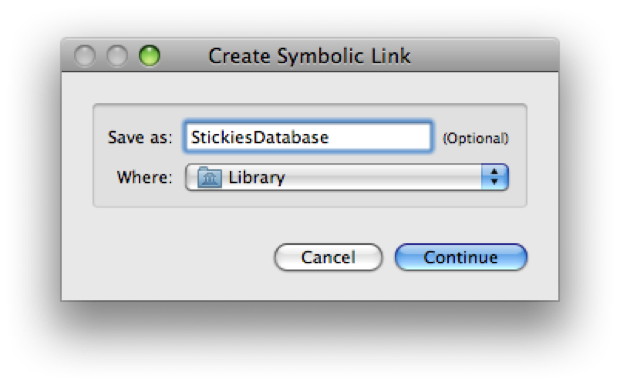
Now whenever you want to sync your Stickies with another computer, simply navigate to that computer's User/Library folder, delete that StickiesDatabase file (after backing up the info you need, of course), and create a symbolic link back to there from the StickiesDatabase file that's already in your Dropbox! Scrollbars Before we start, make sure you quit Stickies and Option + Drag its application icon to a safe place to make a backup in case something goes wrong and you need to revert. With a copy safely made, right click the original Stickies application icon and go to "Show Package Contents". Then, in Contents->Resources->English.lproj, look for a file called "StickiesDocument.nib" and double-click it to pop it open in Interface Builder (part of the developer toolkit). 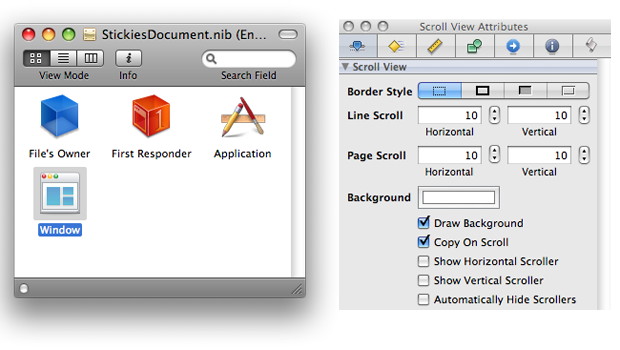
When it opens, you should see a mostly white window with Stickies in the title bar, a library box on the right, and a window with several icons on the left. If you don't see the blank Stickies window, then double-click the "Window" icon in the left box to bring it up. You'll also need to go to Tools->Inspector to bring up the Inspector window. The Inspector window's title bar will most likely say "Stickies Window Attributes". What you need to do at this point is simply click once inside the white space in the blank Stickies window. This will change the Inspector window's title bar to "Scroll View Attributes". You'll now notice the Inspector is giving you check boxes for both horizontal and vertical scrollers, as well as the option to automatically hide them. We want to check "Show Vertical Scroller" and "Automatically Hide Scrollers" to get the functionality we're after. When those are done, you can use Command + S to save the file, then safely quit Interface Builder — you're done! Next time you open Stickies, they will sport proper vertical scroll bars whenever your text is too long to fit. You can use the same method to enable the horizontal scrollers too, if you like. 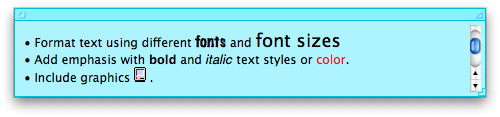
Stick With It! Click here for complete article. Intel doubles capacity, drops price in refresh of SSD lineby Lucas Mearian, Computerworld Intel announced today a new line of consumer-class solid state drives (SSD) based on its smallest 25 nanometer (nm) circuitry that replace the chip-maker's long-selling and most popular SSD, the X25-M. The new 2.5-inch Intel Solid-State Drive 320 Series offers models that more than triple capacity over the X25-M and reduces price by up to 30 percent, or $100, on some models. While aimed at the laptop and desktop market, the consumer SSD has also been Intel's most popular model for servers in data centers. The SSD 320 more than doubled sequential write speeds from Intel's second generation X25-M consumer SSD. With the 320-series, Intel has added native 128-bit AES encryption on the drives, which protects data while at rest on the NAND flash memory. For data resiliency, Intel also included surplus NAND flash chips on the drive's board over and above the useable capacity. If the SSD's controller detects a potential chip failure, it automatically migrates data to the spare capacity. Intel has also included small capacitors in its latest SSD, so that in the event of a power loss, data writes in progress to the NAND flash memory will be completed. "We're talking about microseconds [of power] here, not seconds," said Kishore Rao, product line manager for SSDs. "There's just enough reserve current to complete any writes that were in progress." Michael Yang, an analyst with market research firm iSuppli, called the SSD 320 Intel's "Honda Accord." Yang noted that Intel is not the first manufacturer to offer native encryption or data redundancy features on an SSD, but he said they have added what amounts of enterprise-class features to a consumer-class SSD. For example, SSDs made with SandForce and indilinx controllers (such as those from OCZ) also come with native encryption. "This is not a leadership product by any stretch," Yang said. "But, it's a good product, especially for a 25nm SSD." Intel's legacy consumer SSD series, the X25-M, comes in 80GB and 160GB models. The new SSD 320 series comes in models ranging in capacities ranging from 40GB to 600GB. Intel SSD 320 prices, based on 1,000-unit quantities, are as follows: 40GB at $89; 80GB at $159; 120GB at $209; 160GB at $289; 300GB at $529 and 600GB at $1,069. All models include a limited 3-year warranty from Intel. By comparison, Intel's 160GB X25-M SSD sells for $367 on online retail sites such as Pricegrabber.com. Gregory Wong, an analyst with Forward Insights, said while Intel has lowered its prices, it still amounts to about $1.80 a gigabyte. Wong expects mass adoption of SSDs by consumer won't occur until the price reached about $1 per gigabyte, sometime in 2012 or 2013. According to Yang, sales of consumer SSDs last year totaled $996 million. That is expected to more than double to $2.2 billion by the end of this year, he said. Intel SSD 320 also upgrades the serial ATA (SATA) connector from 1.5Gbps to the 3Gbps standard. The SSD produces up to 39,500 input/output operations per second (IOPS) random reads and 23,000 IOPS random writes on its highest-capacity drive model. The new SSD doubles sequential write speeds from its second generation X25-M drive to 220MBps sequential writes. The drive simply maintains the read throughput rate of the X25-M at up to 270 MBps, the company said. Wong said while computers coming out this year will begin incorporating the SATA III, 6Gbps interface, Intel appropriately targeted the vast majority of systems in place today that use the SATA II standard. "The SSD's upgrades includes some enterprise features: The data loss protection, and the surplus array of NAND, which is like over provisioning to do wear leveling and such on the drive," he said. "They know it ll end up in the enterprsie as well as the consumer market." Intel has been selling its X25-M SSD since 2008. Over the past three years, the X25-M has become the best selling SSD in retail space, according to iSuppli. Intel has sold "millions" of the drives and discovered a surprising trend: The X25-M outsold Intel's SLC-based enterprise-class SSD, the X25-E, by as much as 7:1 to 8:1 in the enterprise. Troy Winslow, Intel's director of marketing for NAND silicon systems, said it's "fair to say" Intel's enterprise-class SLC-NAND flash SSD, the X25-E, "is going by the wayside" "We believed SLC was required, but what we found ... through studies with Microsoft and even Seagate...is these high-compute intensive applications really don't' write as much as they thought," Winslow said. "Ninety percent of data center applications can utilize this MLC drive." Enterprise-class SSDs have historically been produced using single-level cell (SLC) NAND flash, which places only one bit of data per silicon cell. SLC NAND can natively ensure about 10 times the number of write-erase cycles as MLC—about 100,000 writes vs. 10,000. MLC flash allows two or three bits of data to be written per cell. However, over the past year or so, vendors have come to recognize that by using special software in the drive controllers, they're able to boost the reliability and resiliency of their consumer-class multi-level cell (MLC) SSDs to the point where enterprises have embraced them for high-performance data center servers and storage arrays. SSD vendors have begun using the term eMLC (enterprise MLC) NAND flash to describe those SSDs. Intel's X25-M line has never been designated an eMLC drive. It just organically gained popularity in data centers, Winslow said. Yang said most enterprises that had been purchasing SLC-based SSDs over the past few years, began switching over to MLC-based products in the third and fourth quarter of 2010, recognizing they could achieve the performance boost NAND flash offered over enterprise-class hard drives while also maintaining a high level of resiliency. According to Intel, of the first 1 million or so X25-M SSDs it sold, users reported a total 1.4 percent failure rate. "We're not satisfied with that," Winslow said. "We expect the 320 series will have greater reliability than the X25-M, regardless of going down to the 25nm level." Intel is putting its money where its mouth is. The company has already deployed 55,000 of its own SSDs in its data centers and in employee systems and expects that by the end of 2011, all employees will have SSDs in their computers, Winslow said. Later this year, Intel expects to release its first eMLC drive to replace the X25-E SSD line, he said. "That will provide the performance of an SLC drive and the endurance but in a more cost effective, higher capacity MLC product," Winslow said. "From a volume perspective, we do see there are really high-write intensive, high-performance computing environments that may still need SLC, but that's in the top 10 percent of even the enterprise data center requirements." Intel is feeding that upper 10 percent of the enterprise data center market through its joint venture with Hitachi Global Storage Technologies, which it is producing the SSD400S line of serial SCSI (SAS) SSDs, which has 6Gbit/sec. throughput—twice that of its MLC-based SATA SSDs. Last fall, Intel and Micron's joint venture company, IM Flash Technologies (IMFT), released a 3-bit-per-cell MLC SSD also based on 25nm circuitry. The 3-bit-per-cell NAND flash chips were targeted for flash cards, USB drives and MP3 players, but not SSDs because packing 3 bits in per cell made the media inherently less reliable than 2-bit-per cell NAND flash. Three bits per cell requires higher-level management and increases the potential for cell-to-cell electron leakage. At that time, Intel unintentionally revealed through a leaked slideshow that it was planning on a complete refresh of the X25-M family using its newest lithography technique. IMFT's 25nm 8GB die, which measures 0.35 by 0.74 in., is made up of many smaller 64Gb NAND chips. The NAND technology makes it possible to build products using half as many chips as the previous 34nm lithography technology, allowing for smaller, higher-density designs. For example, a 256GB SSD can be built with 32 of the 8GB NAND flash dies instead of 64 dies; a 32GB smartphone needs just four dies; and a 16GB flash card requires only two. The change also cuts the overall cost to produce mobile products, which is why Intel was able to cut its prices on the latest line of SSD 320 products over the X25-M line. Intel's NAND flash chips are small enough to fit through the hole in the middle of a compact disc, yet they pack more than 10 times the data capacity of a CD, which holds 700MB. There are inherent problems with shrinking the size of circuitry used in semi-conductors, most notably an increase in data error rates from electrons bleeding through ever-thinner silicon walls. That requires the development of more sophisticated error correction code (ECC), which Intel has on its controller. Unlike its last SSD product release, the the 6Gbps 510 Series , Intel is sticking with its own controller in the SSD 320 series. In the 510 series, Intel used a controller from Marvell for the first time. The 510 series is being marketed at PC gamers, media creators, performance-intensive workstation users and any technology enthusiast. At the time of the 510's release, an Intel spokeswoman explained that third party controllers are now able to meet its performance standards, when in the past they could not. "So in the future, we'll continue to use third-party controllers," Winslow said. "That doesn't mean Intel won't continue to produce its own controller too." Click here for complete article. Menu Bar Organizationby Ben Bonaccio, smalldog Mac OS X is well known for the deep levels of customization it affords users. Just about every aspect of the OS is customizable to an extent—especially if you know your way around the command line. Regardless of whether it's through performance tweaks or aesthetic changes, making it your own is one of the joys of owning a Mac. While it may seem like a familiar tip for longtime OS X users, a question we frequently hear is, "How do I move the little icons in the Menu Bar?" This is a great question, especially given the intuitive and easy customization of the Bar's southern neighbor—the Dock. If you've ever tried to rearrange the mini icons for Bluetooth, Airport, Volume, etc, then you have probably discovered they're a bit too stubborn for the typical click and drag. The secret is in the Command key. Simply hold it while clicking and dragging, and you can rearrange Menu Bar icons just like in the Dock! Need to cut the clutter? With Command held, drag any item from the Menu Bar onto the desktop. Release the mouse, and you'll get a satisfying "Poof!" and an accompanying cartoon cloud of smoke. If you remove something important—the clock let's say—don't fret. Simply visit System Preferences and the corresponding Preference Pane to re-enable the feature. In this instance, we'd want to visit System Preferences > Date & Time > Clock and click the checkbox "Show date and time in menu bar." It is good to note that these tips work best with pre-installed system Menu Bar icons. These include Bluetooth, Time Machine, Airport, Volume, Date & Time, Username, and more. While many third-party developers build this functionality into their apps, it's not guaranteed to work. Often times the best way to disable a rogue third-party icon is through the preferences located within the app. mini mac treat #1: To access the preferences of any application press Command + comma! The more you know… Keep in mind that your Menu Bar mileage will vary based on your screen size. If you're running an 11-inch MacBook Air, you'll want to be fairly selective with the number of icons at the top of the screen. Option-heavy applications like Photoshop need a lot of room to display all of their menus. Click here for complete article. Resetting your Mac's PRAM and NVRAMfrom Apple This document explains how to reset the parameter random access memory (PRAM) and nonvolatile RAM (NVRAM) on Macintosh computers. You should try both of these tricks when the computer is misbehaving - it is also a good idea to perform it every two or three months as part of your maintenance. Resetting PRAM and NVRAM:
Resetting PMU on PowerBook or iBook computers In some troubleshooting situations, if resetting PRAM does not resolve an issue, resetting the PMU may be the next appropriate step. For information on when this is appropriate and for instructions on how to reset the PMU in your PowerBook computer, see Resetting PowerBook and iBook Power Management Unit (PMU). Resetting NVRAM in Open Firmware If your computer is Open Firmware-based (Power PC) and you are unable to reset NVRAM as described above, you may alternatively reset the NVRAM and Open Firmware settings using the steps in the Solution section of Message "To continue booting, type 'mac-boot' and press return". In some cases, an Open Firmware-based computer may not respond to the keyboard commands noted above, and may not allow starting up into Open Firmware by pressing and holding the Command, Option, O, and F keys during startup. If you are unable to get to an Open Firmware prompt (and your computer supports doing so), try powering on the computer with the power button held down continuously—as if you were doing a firmware update. This should force the computer into Open Firmware, allowing the steps in the article noted above to be used. Contents of PRAM
Changing the System Fontsby Robert Elphick Several members have asked me whether the system fonts could be changed. They can! There is a very handy freeware application called TinkerTool that knows how to tweak many System parameters including the system fonts. The other parameters that it can change are ones that Apple have chosen not to reveal to normal users. The application can be downloaded here. 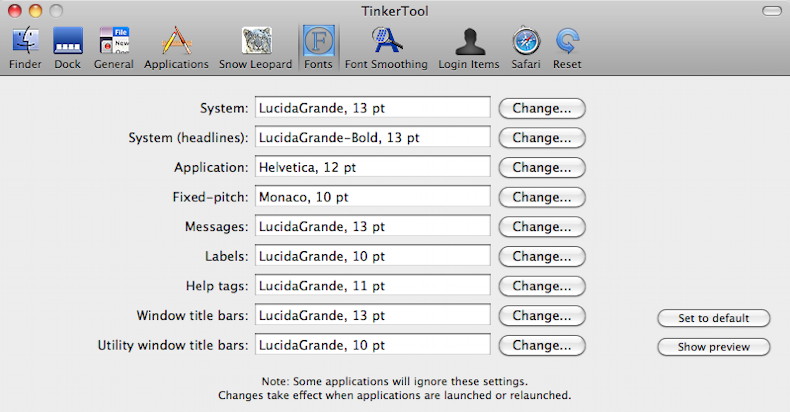
By The WayTwo items, Web Page Certificates and Corrupt Fontsby Ron Sharp, MAGIC First item: Web page certificates You may have experienced web page loading problems for a week in mid March. I did, and even after a little research, did not discover the problem until March 23rd when I read the MacWorld article about the recent web security certificate theft. I use a Yahoo news page, My Yahoo set up for my home page, and during the week starting March 15 the page would not come up. I couldn't find any information about the problem with my browser or about Yahoo online, so I just figured it was possibly Yahoo updating their site. But it was curious that it went on for days. For people who read their news online, it's like not getting your newspaper delivered and not even being able to find the number to call the paper boy. So what happened? Because of the theft of the Yahoo security certificate, along with a few others like Google, Skype, and Microsoft Hotmail, the certificate handler revoked those certificates. Therefore the browsers wouldn't, or couldn't load the pages until new certificates could be created. Mozilla, who also had a certificate affected, said they and certificate authority Comodo, should have informed the public more quickly with the news and the "potential mitigations as well as their side-effects." ..Duh! For more information see the article in this newsletter, " Digital certificate theft," as well as the link below. And for general information on secure websites, see a previous "By The Way" article: https://www.whidbey.com/magicmug/archives/2010-08.html#By http://www.macworld.com/article/158858/2011/03/mozilla_ssl_thefts.html#lsrc.rss_main Second item: corrupt fonts On fonts causing problems, I experienced this problem first hand. A few days after completing the OSX 10.6.7 update I experienced my SeaMonkey web browser crash on startup. The browser, which is a Mozilla web browser bundled with email and a web composer application, worked for a couple days after the update. It was when I opened the Composer window of the application that it crashed the first time. After that it would crash as soon as the application started up. I spent more time trying to figure out what the problem was than would seem practical, I am little obsessive with technical problems. What I discovered, with the help of Mozilla, was that the problem was corrupt fonts. When I opened my Font Book application the warning exclamation indicated problems. 
The warning indicates that there are multiple copies of this font and to use the "Resolve Duplicates" command from the Edit menu. That didn't resolve the problem and I chose to delete the font family. Afterwards my SeaMonkey application opened and worked fine. A couple days later I read the MacWorld article about the OSX update causing font problems. If I would have been patient with my browser problem until reading this article I may have saved a lot of time. That is if I connected the two, since the article didn't specifically mention any problem with browsers being affected. At any rate, if you have the font warnings but are not experiencing a problem, I recommend you do as the article in this newsletter describes and wait for another OSX update to correct the problem. Unless you have not installed the 10.6.7 update yet, then wait to see if the problem gets resolved. 
MAGIC, the Macintosh Appreciation Group of Island County, serves people who use Macintosh computers, software and peripherals. Our goal is to share information and get answers to questions to make us more productive with our use of technology. Our monthly meetings give us a chance to discuss computer problems and share ideas with other Mac users, feature speakers on specific topics, and to keep apprised of Apple news. |
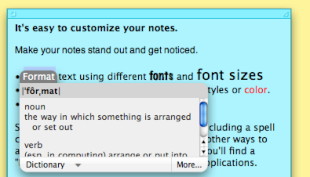 Since it makes use of the same text engine that drives TextEdit, Stickies is ready to handle all sorts of common text formatting commands including modifications of font type, size, color, and style with ease. If you want to insert a list as you type rather than having to paste one in and modify it, simply hit Option + Tab and you've got your first bullet point ready to go.
In addition, Stickies also supports the built-in dictionary so you can use your handy Control + Command + D shortcut to pull up the dictionary box in an instant. Remember, that little shortcut doesn't need you to have a word highlighted — as long as that key combination is held down, a definition will automatically be pulled up for any word under your cursor!
Since it makes use of the same text engine that drives TextEdit, Stickies is ready to handle all sorts of common text formatting commands including modifications of font type, size, color, and style with ease. If you want to insert a list as you type rather than having to paste one in and modify it, simply hit Option + Tab and you've got your first bullet point ready to go.
In addition, Stickies also supports the built-in dictionary so you can use your handy Control + Command + D shortcut to pull up the dictionary box in an instant. Remember, that little shortcut doesn't need you to have a word highlighted — as long as that key combination is held down, a definition will automatically be pulled up for any word under your cursor!