NewsletterNovember 2012Newsletter Editor: In This Issue:
Meeting information
Future Meetings: (subject to change)
Do not forget to bring your used ink cartridges. Minutes of the October 2012 Meetingby Penny Holland, Secretary The October MAGIC meeting took place at the Unitarian Congregation Meeting House of Freeland, and was called to order at 4:05 by Robert Elphick. Following an hour of Q and A., there was a brief business meeting: Business Meeting Treasurer Bonnie Abney reported $5418.27 in our bank account as of today. This is up a bit because of the classes we are running, despite the $500 we donated to 4H. Bonnie also announced that she has pre-paid Unitarian Universalist Church of Whidbey Island rent for our monthly meetings through December. At this time we donʼt know the exact amount of the rent we will be paying Pacific Rim Institute/Au Sable for our upcoming iPad class. (Unrelated to her treasurerʼs report, Bonnie also announced that Robert had just come from a showing of the Earthquake film to the Town of Coupeville, which brought applause from the audience!) Essentials class has requests for more offerings. Next one will probably be early in 2013. Robert usually emails members giving them first chance to sign up for classes, then the announcement is put into the MAGIC newsletter and finally classes are announced at the meetings and the web site. Penny put in a request for more helpers at the classes. (NOTE: Ed Severinghaus sounded interested in possibly helping.) Regarding recycling ink cartridges, Paul Morris is now the member collecting them. Two new members introduced themselves: Ken from Freeland has a new iPad, and Gayle, another new member, brought her Mac laptio and has an ipod. The questions came to an end about 5:45 p.m. but the majority in attendance voted to postpone the scheduled program about iTunes until another time. Presentation Following is a brief description of today's program presented by Robert Elphick: PASSWORDS and HOLIDAY CARDS He did a demo of a password protection program for Macs, CiphSafe, a free download from the internet. He also showed us the Apple program, Keychain Access program located in Applications>Utilities. For the second topic, "creating Holiday cards", Robert did a brief review of using iPhoto and its various choices for making calendars, cards, books, etc. To email a card, you can use the MAIL program. For those with Lion/Mtn.Lion be sure that SHOW STATIONERY is one of the buttons in the Toolbar. When you create a new card, using SHOW STATIONERY, you will be given many choices to select from. (Snow Leopard also has the Mail Stationary option, however, you have to open a new mail message and then click on the "Show Stationary" button in the toolbar. If the button isn't there you will have to go to the "View" menu and "Customize Toolbar" to put the stationary button in the toolbar.) And a third way to make a card if you want to print it yourself is to use PAGES templates for making cards, letterheads, newsletters, posters, etc. Meeting was adjourned at 5:55 by Robert Elphick. 
MAGIC Momentsby RYE Mac Essential ClassesThe next Mac Essentials class will begin on 2 February 2013. Details of the class can be found at this web page and we will start accepting applications in the new year. iPhoto classesA number of members have requested iPhoto classes and so we have scheduled the first one to take place on December 4th and 5th. It was so popular that we had to close applications after two days! In order to satisfy those who were disappointed a second class has been scheduled to take place on January 14th & 15th 2013. SOFTWARE UPDATESNote: This Software Update section of the newsletter lists the most relevant Apple updates. Not all updates are listed for all products. Additionally, I'll add other pertinent updates on occasion. Apple updates Aperture, iPhoto, SafariDan Moren, macworld.com 
Not content with releasing iOS 6.0.1 Apple released one of its occasional barrages of software updates on Thursday, Nov 1, 2012, dropping new versions of its consumer- and professional-level photo applications, as well as an update to Safari. iPhoto 9.4.2 is a pretty substantial update, with several Photo Stream-related enhancements. For one, it allows users to drag and drop pictures into shared or personal photo streams in the source list; they can also now copy and paste multiple email addresses into the "Shared with" field of shared streams; and the contextual menu now has an Import command that lets you import all photos in a shared photo stream. The reliability of Shared Photo Streams is also now improved when you switch between iPhoto and Aperture with the same library, and when more than five people "Like" a photo in a shared stream, their names are now correctly displayed. In addition, the update fixes a problem that prevented Microsoft Outlook from being used to email photos from within iPhoto and updated national holidays for use in printed photo calendars, along with other stability improvements. Aperture 3.4.2, meanwhile, includes its own laundry list of improvements, several of which are the same as iPhoto 9.4.2. In addition, the update lets users add pictures from photo streams into other shared streams, adding an Unsubscribe button to the Info panel for shared photo streams, correcting Face detection on imported photos from a shared stream, and adding EXIF metadata for adjusted photos that are added to a Photo Stream. There are several other improvements to the software as well, including RAW files no longer being showed in the Import window when "JPEG files only" is selected, key photos made from panoramic images being displayed at high resolution, a progress dialog being displayed when you are deleting large numbers of photos via the Empty Aperture Trash command, and many more. Details on Safari 6.0.2 are scarce; Apple merely says that it's recommended for all users of OS X Mountain Lion version 10.8.2 and includes security updates. All updates are free and available via the Mac App Store; the Aperture 3.4.2 update is also available via Apple's support downloads site. Click here for complete article. MacBook Air and MacBook Pro Update 2.0from apple.com, Nov. 8, 2012 
This update includes graphics performance and reliability enhancements and improves compatibility with some USB devices. This update is recommended for all Mac notebooks introduced in June 2012. Click here for complete article. Canon Printer Drivers v2.11 for OS Xfrom apple.com, Nov. 6, 2012 
About Canon Printer Drivers v2.11 for OS X This update installs the latest software for your Canon printer or scanner. For information about supported printer models, see: this web page. Click here for complete article. Lexmark Printer Driver v2.10 for OS Xfrom apple.com, Nov. 6, 2012 This update installs the latest software for your Lexmark printer or scanner. For more information about printing and scanning software, see this web page. News, Info and StoriesHow to share documents with iCloudby Kirk McElhearn, macworld.com The new dream in computing is keeping all of your files in "the cloud," on remote servers that you can access from anywhere at any time. Apple's cloud-based syncing and storage service, iCloud, debuted in June 2011. Still, only since the release of OS X Mountain Lion that enough applications have started to support iCloud document syncing for this feature to be useful. Working with iCloud is fairly simple, but you need to know the ground rules if you plan to start storing your documents in the cloud. Activate Documents & Data If you don't have a free iCloud account, or if you're just starting out with it, this article will give you an overview of how to set up a new iCloud account. To store documents in the cloud—no matter which application puts its files there—you also need to activate the Documents & Data setting in the iCloud pane in System Preferences, as well as in the Settings of any iOS device you plan to use (to do so, select Settings > iCloud). Once you've done this, any iCloud-compatible app can store files in iCloud. Search out compatible apps For now, only a limited number of applications can store files in iCloud. By files, I mean documents that you create, not data that an application such as Calendar stores in the cloud. On the Mac, many of Apple's apps do support iCloud, including Preview, TextEdit, the iWork '09 suite (Pages, Numbers, and Keynote), and GarageBand. Third-party apps that store documents in the cloud include text editors such as iA Writer, Byword, and Smultron; the PDF editor PDFpen; the graphics editor Pixelmator; and some others. At this point, compatible programs can produce files in Microsoft Office formats, but Microsoft Office itself doesn't support iCloud. Note that Apple lets only apps sold through the Mac App Store use iCloud to store documents. If your favorite productivity app is only sold directly by the developer, you're out of luck. Save documents to the cloud If you're using an application that can save documents in the cloud, doing so is fairly simple. Say you're using TextEdit. After you've created a new document, press Command-S, and make sure the Where menu shows iCloud. Name the file and click Save, and the document will be sent to the cloud. 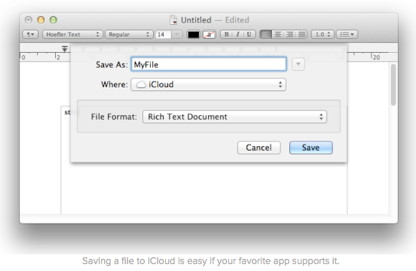
Once you've saved a file to the cloud, you can access it from multiple devices. Say you have a desktop Mac and a laptop; you can save any files you need on the road in iCloud and access them from either computer as long as you use the same app. Open documents saved in the cloud To open files you've saved to iCloud, press Command-O in an iCloud-savvy application, then click on the iCloud button. You'll see something like this: 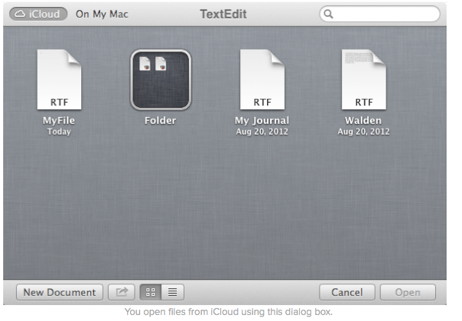
Note that in the above screenshot you see a folder. To create a folder, just drag one file on top of another, as you would with icons on an iPhone or iPad. Name the folder, and it'll be saved on iCloud. Move existing files to the cloud You may have a number of files on your Mac that you'd like to put in the cloud; this is straightforward. Just open a file with an application that can put documents on iCloud, choose File > Move To, then choose iCloud from the Where menu. If you want to move a file from the cloud to your Mac, click on the Where menu and find the folder where you want to place the file. If the folder where you want to move the file isn't in the menu, choose Other from the bottom of the menu, and navigate to the location you want. Learn to live within one app iCloud is a great place to store files that you need to access on multiple Macs. However, there are limits, some of which may be deal-breakers. The main problem is that files are accessible only to the applications that created them. If you create a file with TextEdit, for example, you can save that file in a number of formats, such as RTF and .doc, the Microsoft Word format. However, you can't open those files with Word. In fact, you can't open those files with anything other than TextEdit, at least not from iCloud. You can, of course, move a file from iCloud to your Mac, as I explained above, and then open it with Word, but this adds an extra step. Frankly, if you need to pass files between different applications, you're probably better off using Dropbox. Find files that don't appear on iOS devices Apple's iWork programs—Pages, Numbers, and Keynote—have iOS equivalents that let you access files you create on your Mac on your iPad or iPhone. But, the same is not the case for, say, TextEdit or Preview. If you save a TextEdit file in the cloud, it's in a black hole as far as iOS is concerned. When you go to your phone, for example, there's no way you can access it—it's in the cloud, but your iPhone doesn't have the keys to open its container. While you can move files from the cloud to your Mac, there's no way to do this on an iOS device. You'll need to go back to your Mac to find your file and move it. Depending on what you need to do, a number of third-party text editors can help fill the iCloud gap. For instance, the text editors iA Writer and Byword both have both Mac and iOS versions. If you want to write on your Mac, and then switch to your iPad, either of these apps (along with some other text editors) will allow you to do this. Access your iCloud files in the finder 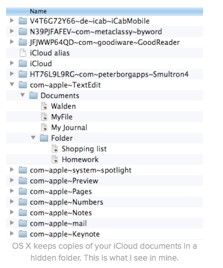
While trusting your files to iCloud means trusting them to servers somewhere out in the ether, the files are also stored on your Mac. In fact, they are stored in a somewhat odd folder that seems to be permanently connected to the cloud, as long as you have Internet access. You can see this folder from the Finder by choosing Go -> Go To Folder and then typing ~/Library/Mobile Documents/ and clicking on Go. In this folder, you'll see a number of other folders, some oddly named, but all of which contain the names of applications. For example, in the com~apple~TextEdit folder, you can see some of the files in the second screenshot above. If you need to access any files that are on iCloud, it's a lot quicker to copy them from this folder than it is to open an application and move a file. You can even make a smart folder that finds all the documents in this local iCloud folder: see this hint on the Mac OS X Hints website for more. iCloud is a great idea, and can be very useful. As long as you know what its limits are, iCloud can become an essential part of your workflow. We'd like to see more flexibility with applications, so that you could create a file in one app and then access it from another. But, for now, you just need to be aware of these limitations. Click here for complete article. Wizard's Warning: Although the iCloud has not yet been accessed by evil, it is vulnerable, as is all cloud storage. Be very careful what you put out there. You must balance the convenience with the probability that sooner or later any cloud data will be accessed by bad guys. How to share family contactsby Christopher Breen, macworld.com Reader Walt Bischoff and his spouse—like all good couples—would like to share more of their lives with one another. He writes: My wife and I have separate Apple IDs and would like to share contacts via iCloud. How should we set up iCloud to achieve this? Right now we never seem to be able to access all of our contacts. I can offer a couple of solutions. We'll start with iCloud. 
iCloud doesn't allow you to share contacts between accounts. You can't, for example, create a group of contacts within your iCloud account and then tick off a little box marked "Make these contacts available to my spouse as well." What you have to do is create an additional iCloud account that you share. To do that you go through the usual rigmarole to create an iCloud account. On an iOS device simply navigate to Settings > Mail, Contacts, Calendars; and tap Add Account. Tap iCloud and create a new Apple ID. Once you've obtained that ID, add it to every device you intend to use to share contacts. 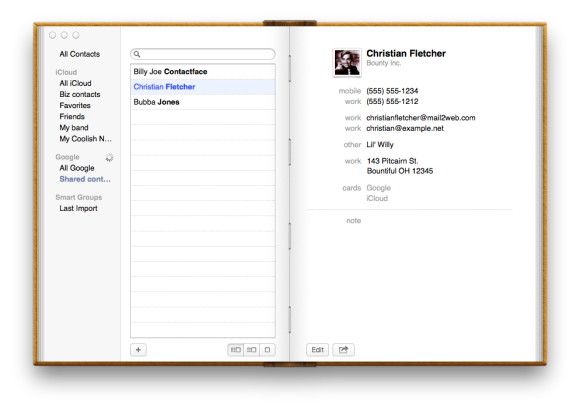
On the Mac, go to System Preferences > Mail, Contacts & Calendars; click the Plus (+) button at the bottom of the window, click iCloud, and click Create Apple ID. (Or, if you've already established that new ID on another device, just enter the Apple ID email address and password and click Sign In.) Again, make sure that you've added this new iCloud account to all your devices. In each case, enable contacts syncing for the new account. Now when you open the Contacts application on your Mac or the Contacts app on an iOS device, you'll see your new iCloud account listed. Any contacts that you want to share should be added to this account. In cases where you don't want to share particular contacts, simply leave them in (or add them to, when creating new contacts) the account tied to your personal iCloud account. Gmail contacts is another option. And it works similarly. Create a Gmail account that the two of you will share. On your iOS devices go to Settings > Mail, Contacts, Calendars; tap Add Account, tap Other, and tap Add CardDAV account. Configure the sheet that appears to read: Server: google.com User Name: The email address for your shared Gmail account Password: That account's password Description: Something along the lines of Shared Google Contacts You'll then want to import your shared contacts into this Google account, which you can do on your Mac by launching Contacts, selecting the contacts you want to add to Google, and dragging them to the Gmail account you've created. Do the same with your wife's contacts. If you like, just click on the Plus button next to the Google entry in the All Contacts area to create a new group, which you can use to help manage your shared contacts—Our Friends and Our Relatives, for instance. Your contacts will be uploaded to Google and synced with other devices that you've configured to use this account.  Note that when using this method, any new contacts that you create on an iOS device will, by default, be added to your iCloud account, not Gmail. But you can rectify that. Go to Settings > Mail, Contacts, Calendars; swipe down to the Contacts area, tap on Default Account, and in the resulting screen, tap on your Gmail account. Until you change this option back to iCloud, any new contacts you create will be added to your Gmail contacts. Click here for complete article. Hands-on with iBooks Author 2.0by Serenity Caldwell, MacWorld Originally released in early 2012, Apple's education-themed ebook creation tool took bold steps as the first WYSIWYG program to export an ebook just as its author envisioned it. As I noted in my review of that software, however, the first version of iBooks Author was very much a 1.0 product, with strange omissions and odd workflows for users who didn't want to build textbooks. Ten months later, an updated version—iBooks Author 2.0 (Mac App Store)—brings simplified tools, new templates, portrait-only options, and a better publishing workflow to the table. Naturally, I couldn't resist taking the updated program for a spin. Not just for textbooks anymore Though Apple's software still clearly slants toward the education market, this second version of iBooks Author acknowledges that people might want to create other styles and types of books. The template chooser offers three new landscape templates: Photo Book, which emphasizes big images alongside text; Antique, reminiscent of an old storybook; and Cookbook, self-explanatory and nice for authors planning to publish or collect recipes. Like iBooks Author's textbook templates, the new landscape templates are organized by chapter and section, and have a mandatory glossary, but the section headers look less like they belong in a textbook. (The new templates ditch the outline-style Section 1.1 and 1.1.1 section heads in favor of a simple Section 1.) Portrait-only options (but no iPhone love) In addition to the three new landscape templates, iBooks Author introduces portrait-only templates, which seem to be aimed toward Apple's new iPad mini. Most of the new portrait-only templates skew away from the textbook design, instead targeting specific reading genres: Biography and Photo Book offer basic designs for those book types, while Gazette, Classic Text, and Charcoal take their cues from storybooks and picture books. Modern Basic is the lone new textbook-style template, and even it leans more toward minimalistic how-to than full-fledged instructional manual. In total, the program offers nine new templates (though you can always purchase additional templates from non-Apple vendors or create your own in-program). 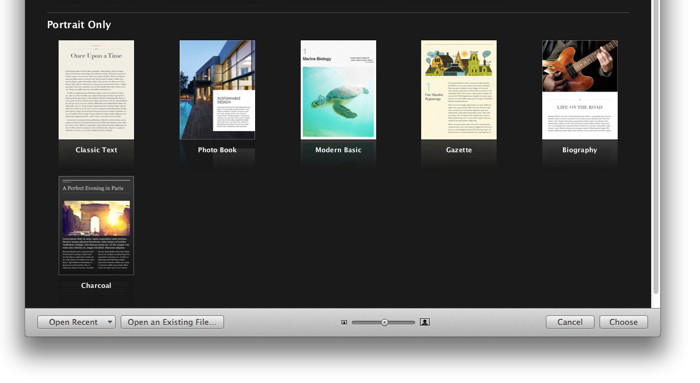
Unlike landscape-oriented books, which show reflowed text in portrait orientation, the new portrait-only templates are fixed-format and thus have a fixed font size. This may explain why iBooks Author continues to bypass the iPhone and the iPod touch: Fixed-format book text can look outrageously small on the 4-inch screen of an iPhone 5 or iPod touch. That said, if Apple's concern involves disappointing customers with small text, I'm confused as to why it allows publishers to sell iPhone versions of non-iBooks Author fixed-format ebooks on the iBookstore, rather than disallow anything but flowing text on its smallest devices. As it stands, iBooks Author is a segmented product—one that can only serve half of the iOS devices Apple makes—and that keeps it from being a truly compelling tool for the majority of iBookstore publishers. Widgets, widgets, everywhere 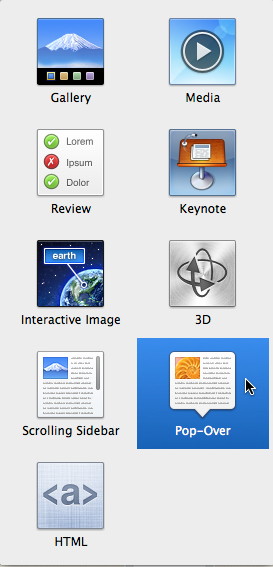
iBooks Author debuted with a decent number of interactive elements; in 2.0, Apple tacks on Pop-Over and Scrolling Sidebar options, adds support for LaTeX and MathML mathematical equations, and tweaks the Audio widget. Add a Pop-Over widget to your book, and you get a blank image along with a pop-over bubble. You can't manually choose where the pop-over appears; that placement depends on the location of the accompanying image. And the image is mandatory: You can't turn a word in your text into a pop-over. (You can hide the image behind your text to get the same effect, but the process for doing so is incredibly clunky, and I don't recommend it.) 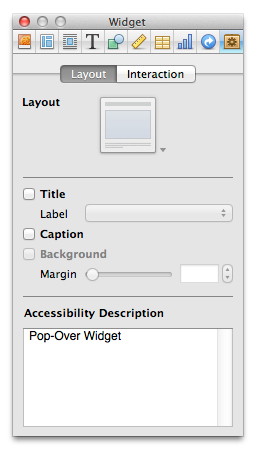
The Scrolling Sidebar widget gives you a nice way to present extra content on a single page: It should be useful for elements such as tips and helpful notes within a how-to book; users will undoubtedly come up with other creative uses for it. One other neat thing: The Sidebar and Pop-Over widgets accept both images and text. The new Equation feature lets you add and edit equations. 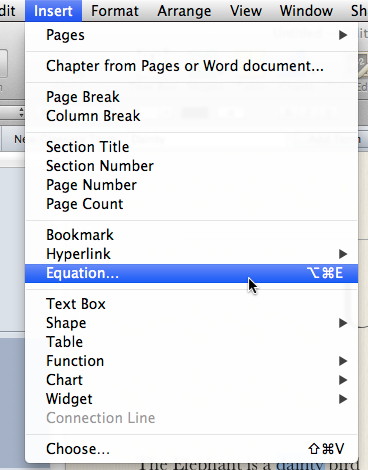
I couldn't test iBooks Author 2.0's LaTeX and MathML integration thoroughly, as I have little experience with mathematical equation programs. If you're interested, however, Apple has a document on its website detailing the terms that iBooks Author's new Equations prompt will recognize. Inserting an equation seems fairly simple: Go to the Insert menu, click Equation, and paste in your LaTeX or MathML code. Users who like to embed audio in their books will appreciate the Audio widget's new formatting options: In addition to the traditional play button, you can display a scrubber or disguise the audio button as an image. Simplified publication options - sort of As part of version 2, Apple says, iBooks Author supports an "improved publishing workflow, including automatic sample book creation and pre-publish checking." Creating a sample book is definitely easier: You can export your project specifically as a sample from the Export menu, or you can go through the Publish option to create a sample from one of your chapters automatically. As for the rest of the program's improved publishing workflow, it still doesn't do the most important thing: Publish your book. (You have to use iTunes Producer for that.) Here's what you can expect from the new Publish option: Instead of booting you immediately to iTunes Producer after compiling your file, iBooks Author routes you through a five-step process. The app performs a diagnostic check of your file to confirm that it's properly compiled, and then it asks you to sign in with your iTunes Connect account. After that, you have the option of indicating whether the book you're making is new or an updated version. Choose 'updated', and iBooks Author will pull up a full list of every title that you've published on the store—a pretty neat improvement. You can choose the appropriate title, add a version increment, create a sample book, and then export your book to iTunes Producer for final checks. 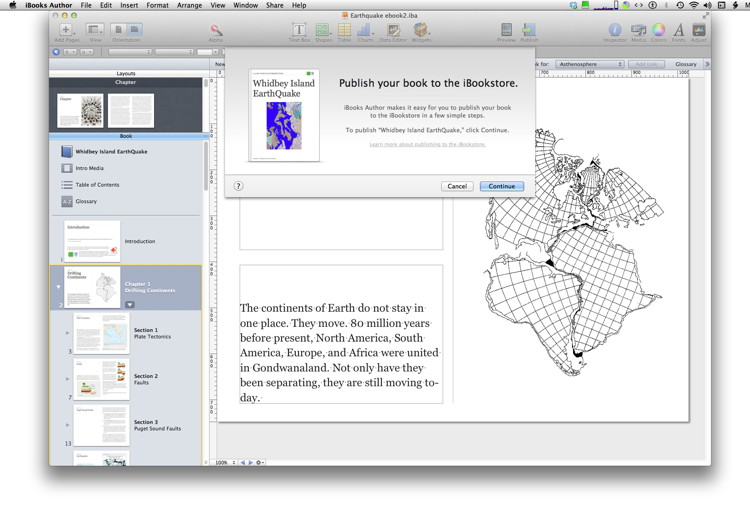
The problems involved in updating existing books arise once you reach iTunes Producer. The app populates the record with only the information you can edit in this update (the title and the page count), instead of graying out metadata that you've already entered. This approach has the side-effect of inducing panic in nervous authors—Oh no! Did iTunes Producer lose all my data?—and it may lead users to (needlessly) add all of the missing information into the record, just to make sure that the unseen data doesn't get overwritten with blank text. In addition, you have to reenter your territory information and pricing—not the most enjoyable task in the world. And strangely, iTunes Producer lacks a version field, so you can't confirm that you are, in fact, uploading a new version. Don't get me wrong: I love the idea of simplifying publication, but these changes seem to make the process more complicated. Miscellaneous improvements Among the other welcome additions to iBooks Author 2.0 are custom fonts, tapping objects to make them full-screen, and media optimization. Custom fonts: iBooks Author can embed any TrueType or OpenType font (those with a .ttf or .otf extension) into any book that you choose, and the process is as simple as opening the Font Picker or the Text Inspector and selecting one. If you choose a font that doesn't have a TrueType or OpenType version, you'll get an error message informing you that, if you use the font, one of the iPad's system fonts will automatically be substituted for it. Note: When you pick a compatible font, the program doesn't police for copyright; so make sure before publication that you have the necessary rights to use the font in a book, lest you run into legal complications down the road. Full-screen objects: Hidden away in the Widget Inspector is a checkbox for making objects full-screen when tapped. A few caveats: The object will expand only to the width of the screen, and you can't pinch to zoom—that gesture will instead close the full-screen and return you to the book page. Media optimization: iBooks Author 2.0 automatically converts your audio and video files to an acceptable format when you add them to your book. This happens in the background, though you can't publish your book until it's done. Click here for complete article. The End is Nigh (For Your Optical Drive, at Least)by Carl Grasso, smalldog.com 
Apple recently updated their iMac line with new insanely thin models that now lack an optical drive just like their newer laptops. I think we're now witnessing the beginning of the end of a very old technology. It's about time, in my opinion. Optical discs are easily damaged and do not store as much data as modern flash drives can. Most software manufacturers now offer download options for nearly everything, and we're seeing a rise in savvy vendors making use of legal bit torrent sharing to speed the download of their software so you don't spend all day getting your new programs. Many of us still have programs that are on physical media that will no longer work on the newer operating systems released by Apple. However, what if you are planning on upgrading your computer but don't want to lose access to those programs that still actually do work? If these applications won't transfer with Migration Assistant, you have some obvious options: Let go of the older software, purchase an external optical drive, or use Disc Sharing to hijack the optical drive of another Mac load the software into your new machine. Another lesser-known option is to convert your physical media to the the ubiquitous modern software delivery tool called a disk image which can be easily moved, mounted, and accessed on any machine. Step 1) Insert the optical disc into your Mac. Step 2) Go to your Utilities folder and open Disk Utility. Step 3) You'll see the disc listed on the left hand side of the window; select it and then click on the New Image button Step 4) Select a location where you'd like the disk image to be saved. I recommend a place that would be included in your backup. The one downside to this process is that the image is as vulnerable as any other information stored on your hard drive. The eventual loss of optical drives from computers should stress the importance of doing backups on a regular basis. Step 5) Wait until the image is created then eject your disc. Double click the image file created by Disk Utility to verify that it opens. Step 6) Move your copy of Asteroids for OS 9 to your new Mountain Lion-equipped iMac and… (well, of course that's not going to work, but you get the point.) You can keep a big software library in a relatively small space this way, and no need for an optical drive for any of it. On a side note, just to avoid emails saying I'm spelling disc inconsistently as disk, or vise versa, a disc refers to optical media such as a CD or DVD. Disk refers to magnetic media like your hard drive or a floppy disk (everyone remember those?). Some people refer to flash drives as disks as well, though they aren't magnetic and the word chip would be more accurate. Click here for complete article Drag and Drop Attachmentsby Carl Grasso, smalldog.com We've always been able to drag and drop files into a Mail message to create an attachment for that email. I recently found out that you can actually just drag that file directly onto the Mail application and it will create a new message with that file already attached. Saves you a couple steps and you get a few seconds back. I'm not sure if this is a new feature in 10.8, it could very well have been around since 10.0… Click here for complete article. Wizards Comment: This feature has been around for some time and should work in all current versions of the OX Macintosh OS X Beachballs!by Randy B. Singer - The head of the MacAttorney User Group I've created this Web site to comprehensively help users who have suddenly found that their Macintosh has slowed down noticeably, and it is often exhibiting the rotating rainbow beachball cursor. Activity Monitor Demystifiedby Bruno Skvorc on Sep 18th 2012, mactuts.com Not many casual users know about the Activity Monitor, fewer still understand what it can really do apart from force-quitting an application. In this overview of the Activity Monitor, we dissect the user interface, learn to manage memory, kill unresponsive applications and dissect active processes. After iWeb - try SandVox*by Robert Y Elphick, MAGIC  Apple has decided to no longer support iWeb. There is however a new product which is similar and is able to read all those iWeb files that you produced for your website. It is not necessary to redo the website after all. The product is called SandVox and you can download a free trial version to see if you like it. With Sandvox, you can build beautiful websites easily and quickly… with no HTML expertise. Yet, as easy-to-use as Sandvox is, it holds powerful features: the ability to add blogs; create photo galleries; and so much more — all from an elegant interface designed for those who want professional results without any hassles. That's Sandvox. Only Sandvox lets you drag and drop content, integrate with Twitter and Facebook, add YouTube videos and more, AND see exactly what it looks like right on the screen, as you go, even before you hit the Publish button. With Sandvox, no "preview" feature is needed, since what you see in the editing window represents exactly what your website will look like. Save As… in Mountain Lion*by Robert Y Elphick, MAGIC In Lion (OS-X 10.7) the Save As… disappeared and was replaced by the Duplicate option in the File menu for most Apple applications. There was a lot of negative feedback so in Mountain Lion (OS-X 10.8) it was put back but without the keyboard alternative. You can add the keyboard alternative if you follow these instructions exactly:
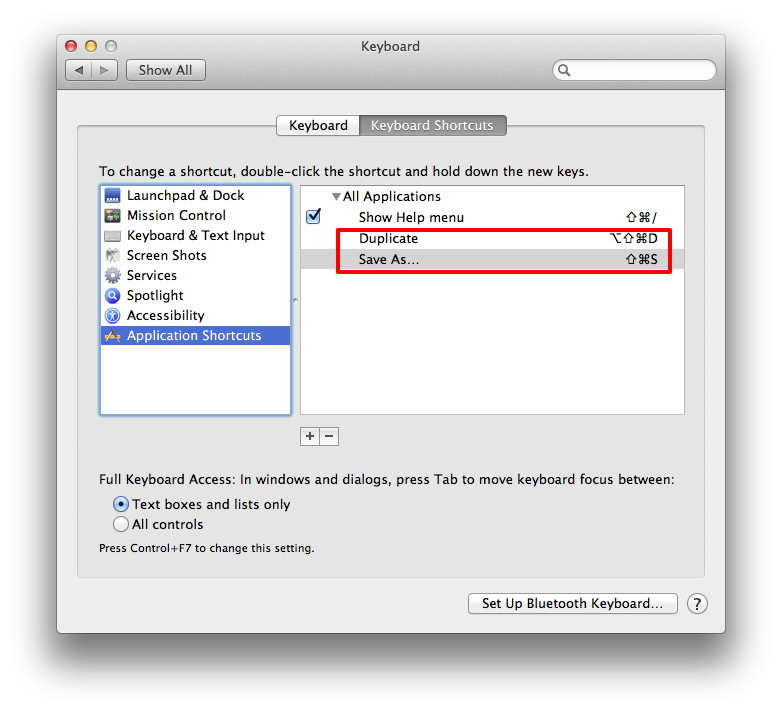
Now you should be able to use [Shift][Command]S to do the Save As… like in the good ol' days iPhones, iPods, and iPadsApple releases iOS 6.0.1 with bug fixes, improvementsby Dan Moren, macworld.com Much as we might like iOS 6 around these parts, it's not without its flaws and foibles. Hence Apple's Thursday, Nov 1, 2012, release of iOS 6.0.1 for the iPhone, iPad, and iPod touch. iOS 6.0.1 is available over-the-air, from Settings > General > Software Update. According to Apple, the update contains improvements and bug fixes. iPhone 5 users have an intermediate step in the process: They first must download and install an Updater for iPhone 5 which fixes a bug preventing Apple's newest smartphone from wirelessly installing software updates. Among the bugs squashed in iOS 6.0.1 is one where horizontal lines may show up across the software keyboard, another where the camera flash wouldn't fire, a problem where the iPhone couldn't always use cellular networks, an issue where Passcode details could be retrieved from the lock screen, and a flaw with Exchange meetings. In addition, the update features improved reliability of both the iPhone 5 and the fifth-generation iPhone touch when using WPA2-encrypted Wi-Fi networks, and consolidates the Use Cellular Data switch for iTunes Match. There are also patches for a few security issues. While the largest criticism around iOS 6 has involved the OS's revamped Maps app, don't expect to see any large changes in this update. Those issues largely deal with mapping data, which Apple can tweak remotely without a software update; indeed the company has already been doing so, according to comments on last week's financial results call. It's also unknown whether or not iOS 6.0.1 will repair an issue many users have experienced with excessive data usage over cellular networks. Both the iPhone 5 Updater and iOS 6.0.1 are free updates and recommended for all users. Click here for complete article. Impressions of the iPad miniby Michael Burl, smalldog.com Boy do I feel like a kid on Christmas right now. I just got my hands on a new iPad mini and I am impressed. I was never big on the iPad when I worked in retail. I could see why people liked the iPad, but it really just wasn't for me. The iPad mini, on the other hand, let's just say it is going to take a lot of willpower for me to not get one. 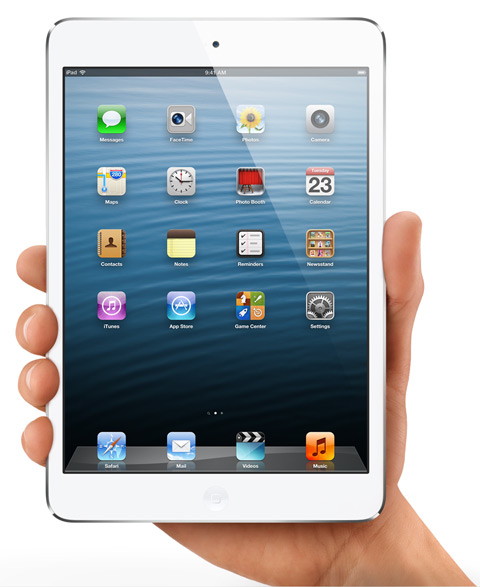
When holding the iPad mini, you notice right away how much lighter it is compared to its big brother. Where some might get some muscle fatigue holding the iPad Retina in one hand, the iPad mini seems light enough to be held indefinitely - that's right, I don't want to put it down. Speaking of the iPad mini and your hand, I was in disbelief that this would fit so perfectly in one hand. I swore up and down that it was some giant holding the iPad mini in all the Apple pictures. To my surprise, the pictures were completely accurate. This thing fits nicely in one hand, making the browsing of websites, reading books and looking at anything in a vertical orientation a sublime user experience. When it comes to performance, the lil' guy worked just as expected. There wasn't anything it couldn't handle. Granted, I wasn't pushing it to its limits, but rather getting a feel of how it would perform using my own commonly used apps — which range from games to watching movies. As for the display, I know the numbers and its resolution is the same as the iPad 2 but I couldn't shake this feeling that the iPad mini looked better. I watched the same Iron Man 3 trailer on an iPad mini and an iPad 2 at the same time and I preferred watching it on the iPad mini. I will say that I want to use one hand to hold the iPad mini horizontally but alas, my wrist just wouldn't bend in the way I wanted it to. The final ringer I put the iPad mini through was a typing test. I simply typed out my thoughts in Notes in a vertical orientation mainly using my thumbs and then tried it out in a horizontal orientation. I did prefer typing horizontally, and to my surprise, my fingers didn't feel cramped like they usually do when I use a non-standard sized keyboard. My final impression is one of surprise. Since I wasn't the biggest fan of the original iPad, my first thoughts of an iPad mini were ones of loathing — why would Apple try to sell a shrunken version of something I already didn't want? Now that I have put the iPad mini in my hands, I am a firm believer that if the iPad wasn't for you that the iPad mini very well could be. In any case, I highly recommend stopping by any of our retail locations so you can take a look at one in person. You might just become a believer like I did! Click here for complete article. Which iPad should I buy?by Lex Friedman, macwolrd.com For a product not yet out of toddlerhood, the iPad sure comes in an awful lot of variations. With the new iPad mini and the fourth-generation iPad each unveiled this week, and with the iPad 2 still on sale, potential customers are faced with more iPad questions than ever: Should you get an iPad? If so, which model? And after you decide on a model, which size? And should you buy one with cellular connectivity? That's a lot of questions. We'll address them—and a few others—one by one. Before we dive in too deep, here's a quick spoiler: Which iPad is right for you depends on what you need, and there's no one perfect answer. But we can at least run down the right points to consider before you decide whether to lighten your wallet, and if so, by how much. Do I need a new iPad? 
I love my iPad. And I'm not alone, either: Apple CEO Tim Cook reported earlier this week that customers keep buying iPads because existing iPad owners love the tablets so much. That said, I'm not convinced anyone out there truly needs an iPad. More than a computer, the iPad still feels like a luxury device: You can derive great joy from one, but need is a strong bar. The exception: If you have to replace an older Mac, and your computing requirements are simple—email, Web browsing, word processing, games, and the like—you can probably eschew a replacement Mac and rely on a new iPad instead. Should I buy an iPad? This is an easier question to answer, in theory. If you want an iPad, and if you can find an iPad that fits your budget, then sure, you should buy an iPad. If you already own an iPad, the issue gets more complicated. If you own an original, first-generation iPad, the sorry truth is that your tablet from April 2010 is getting a little long in the tooth. Yes, it's still a fine iPad; despite its lack of a Retina display, it works well, runs apps, and can multitouch with the best of them. The problem, however, is that your original iPad can't run iOS 6. Already, some popular apps require iOS 6 as their base operating system, and that trend won't abate. If you're not already encountering apps that you can't update or install on your iPad, then you can probably squeeze more time out of the device. But if you're frustrated by your inability to install certain apps—or to avail yourself of the many new features built into iOS 6—with your original iPad, now is as good a time as any to upgrade. Many existing iPad owners may lust after the new iPad mini. Apple would certainly love for them to buy that new, 7.9-inch tablet. But Apple's key aim with the iPad mini is to attract buyers who don't yet have an iPad. Unless you're constantly bemoaning your current 10-inch iPad's size or weight, the case for existing iPad owners to buy an iPad mini is tough to make. And unless your family could benefit from an additional iPad—or you're a gadget hound for whom money is no object—you may want to sit this release out. I have the third-generation iPad. Should I buy the fourth-generation version now? Probably not. Your third-generation iPad is the same powerful, Retina-display-sporting iPad it was a week ago. Sure, the fourth-generation iPad boasts a faster processor and further improved Wi-Fi speeds. Remember, though, your third-generation iPad is no slouch—in fact, it's downright speedy. Predicting Apple's plans and being right 100 percent of the time is impossible, but this week's fourth-generation iPad release is most likely an indicator that Apple is shifting the tablet's release cycle from March to October. It can't hurt that an October release pushes the new product out in time for the holiday season. In other words, you probably needn't fear that yet another new iPad will show up in March of next year; we'll probably have to wait until October 2013 for the fifth-generation iPad to appear. I have an iPod touch or an iPhone. Isn't the iPad mini redundant? Nope! Your iPhone and iPod touch run iPhone apps. The iPad mini runs iPad apps. Yes, when Apple first unveiled the iPad, people called it a big iPod touch, and the iPad mini is a smaller big iPod touch. But they're different devices, geared toward different uses. I'm buying a new iPad. Should I pick the fourth-gen, the iPad mini, or the iPad 2? Frankly, I think it's increasingly difficult to make a compelling argument for buying the iPad 2. The iPad 2 starts at $399; the iPad mini starts at $329. Internally, every spec on the iPad mini matches or surpasses what the iPad 2 offers, and it costs less money. You sacrifice a couple inches of screen real estate, but the iPad mini released in 2012 will surely support more iOS releases than the iPad 2 first released in 2011. The forward-thinking purchase is the more powerful iPad mini—if cost is a key concern for you. The fourth-generation iPad starts at $499. If you don't mind spending the $170 difference between the iPad mini and the fourth-generation iPad, this model is certainly worth considering: It's the fastest, most powerful iPad that Apple has made to date. Just as the iPad mini will surely outlive the iPad 2, the fourth-generation iPad's beefier internals suggest that it could outlive the iPad mini. If instead you prefer the smaller size, easier portability, and one-handed use of the iPad mini, it may well be the better option, so long as you won't begrudge its lack of a Retina display. I know which iPad I want. Which size should I buy? Do I need the cellular option? 
You can't upgrade your iPad's storage; you buy what you buy, and you don't get to cry. My advice is consistent: Buy as much storage as you can afford. The base model of each iPad comes with 16GB; the 32GB model is available for $100 more, and the 64GB model costs $200 more. In the case of the fourth-generation iPad, the costs are $499, $599, and $699 for 16GB, 32GB, and 64GB respectively. The iPad mini versions are $329, $429, and $529. Apps are getting bigger and bigger. If you don't use iTunes Match, your music library can take up a lot of space, too. And if you sync your photos and movies to the iPad, now we're talking serious gigabytes. Quite simply, in my case 16GB is too confining on an iOS device these days. With iTunes Match and aggressive photo deletion (after syncing those photos to my Mac), I find that 32GB works fine for me right now. I only hope that Apple increases the iPad's base storage before even 32GB gets too tight. Adding cellular data options to your iPad also adds $130 to its cost. A $499 16GB fourth-generation iPad costs $629 with a cellular option added on—and that's before you start paying for the data itself. Whether you want a cellular-equipped iPad will depend on how you intend to use it. I do just fine with my laptop and its Wi-Fi-only access to the Internet, so I've never been let down by a Wi-Fi-only iPad. My third-generation iPad has cellular connectivity, and I've never used the feature in the half-year I've owned the device. But you might not be like me. If you want your iPad online wherever you are, remember that—as with storage—built-in cellular connectivity is a now-or-never option. If you'll ever want it, you need to buy an iPad that supports it. Wrap it up for me, Lex: What's the final word? In short, if you want an iPad and can afford an iPad, buy one. If you crave portability and don't sweat Retina displays—or if budget is a key concern—the iPad mini is your best option. Don't choose the iPad 2. Purchase as much storage as you can afford, and get cellular connectivity only if you intend to use your device regularly while away from reliable Wi-Fi. Click here for complete article. The ultimate iPhoto workflowby Derrick Story, macworld.com A growing number of enthusiast photographers are traveling with iPads instead of laptops. The lighter weight, thinner body, and WiFi + Cellular connectivity of an iPad (if you go that route) makes for a good companion on the road. But just because you leave the computer at home doesn't mean that you should ignore it when you return. Its greater horsepower and storage options make it a better choice for managing large photo libraries. For example, iPads max out at 64GB of internal storage. You can buy camera memory cards that size! So those hundreds of travel images will need to migrate from memory cards and mobile devices to your Mac, and integrate into your existing photo workflow. Now might be a good time to figure out how that's going to work. iPad Basics It's important to know how photos are stored on your iPad. When you upload shots from your camera's memory card, they automatically appear in albums called Last Import and All Imported and also appear in the Events view as discreet events, based on when the photos were taken. We can "see" the Camera Roll from many applications, including iPhoto for iOS. But iPhoto is a bit like Hotel California. Once you edit images in the application, they stay there. They're not automatically saved back to the Camera Roll. In order share those shots outside of iPhoto for iOS—say to your Mac—they need to be exported from the application via one of a few options. 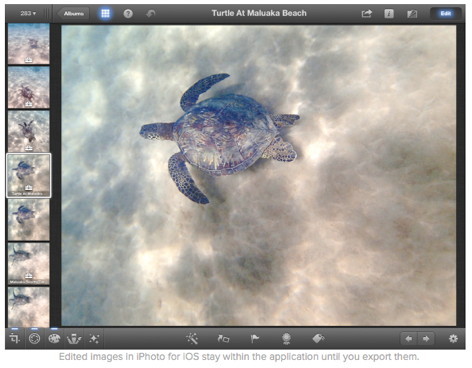
In addition to that, if you want to batch export images out of iPhoto for iOS, there are some limitations. You could save images to the Camera Roll (up to 100 as of iPhoto for iOS 1.1) and have them appear in your Photo Stream, but that can be time consuming. The iTunes approach, which I discuss below, is a fast and reliable way to move many images out of iPhoto for iOS and on to your Mac. Workflow that works One of the keys to using this workflow is to have enough camera memory with you to last the entire trip. Don't erase your memory cards. When one fills up, store it in a safe place and put a fresh card in your camera. SD cards are quite affordable. If you need more than you have on hand, buy them. They're a good investment. Along the way, use iPhoto for iOS on your iPad to view and edit your favorite images. There's no need to upload every shot you take to the iPad. Instead, preview the thumbnails, upload the best shots, and play from there. The first part of this flow goes like this:
The pictures you selected are copied from the memory card to the iPad. Once the transfer process is finished, you'll be asked whether to Keep or Delete the imported photos from the attached camera. Be sure to choose Keep! Remember, an important point of this workflow is to retain all of your original shots on the memory cards. Consider those cards your digital masters, like you would the film negatives in the analog days. 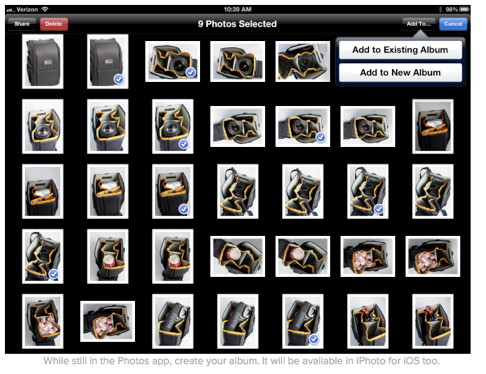
Once your selected photos are copied to the iPad, I recommend that you create an Album to store them. While still in the Photos app, tap on the Photos tab at the top of the interface. Now follow these steps:
Your new Album will be displayed in the Albums tab of the Photos app. But even more importantly, it will also appear in your iPhoto for iOS library as a gray album. Now, within iPhoto, you can flag images, mark them as favorites, add tags, sort, edit, view metadata, and share them with the world. This is when the iPad is really fun. The images look fantastic on its Retina display, and you can improve them further by using iPhoto's excellent set of editing tools. So enjoy your photos on the iPad while on the road. When you get home, upload all of your full memory cards (that you've carefully stored and protected) to your normal photo management application: Aperture, iPhoto, Lightroom. Every shot you took is now safe and sound on your Mac. But what about those favorite images you played with for hours on your iPad? There's no need to re-edit those shots. You've already done the work. So now incorporate those finished images into the Mac's photo library alongside the originals you've just uploaded. Here's my favorite way to do that. Remember the Album of images that I had you create on the iPad? You can sort within it in iPhoto. Tap on the album to open it. While looking at the thumbnails, look for the filter control at the top of the thumbnail panel. Tap on it to reveal a pop up menu. Choose Edited Items from the list of options. 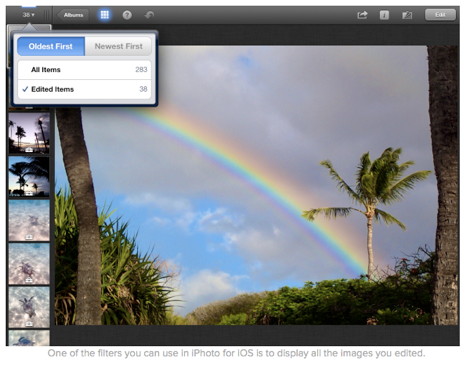
All of the images in your album that you edited will now be filtered and displayed in the thumbnail panel. None of the other shots will be visible. Now go to the Share button and choose iTunes from the popup menu. Tap on All and a Share to iTunes dialog box gives you an Export button to tap, plus some information about the Sharing feature in iTunes. Tap Export, and each of your edited photos will be saved to folder and held in iTunes on your Mac. This process can take awhile on the iPad if you have a lot of edited photos. Then connect your iPad to the Mac and open iTunes. (I use the WiFi method for connecting, but the USB cable works fine too.) Click on your iPad that's listed under Devices in the left column, then click on the Apps tab. Scroll down to File Sharing and click on iPhoto. The folder with the pictures you exported will be listed there. Save them to the Desktop via drag and drop. 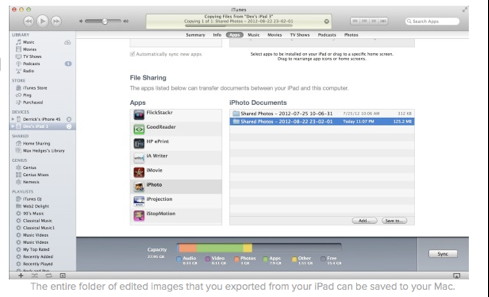
Finally, import those pictures into your photo management application along with the originals. I like to put them in a separate album, as shown here. What's interesting to me is that I edit pictures differently on the iPad than on the Mac. Sometimes I feel that I'm more creative on the iPad. By adding those shots that I played with to my formal Aperture library gives me the best of both worlds. 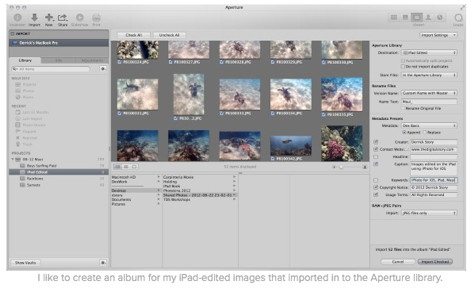
Final thoughts This is one way to integrate your travel images with your Mac photo library. There are other good apps for iOS, such as Photo Manager Pro, FilterStorm Pro, and Photoshop Express that have their own workflows. That said, I do like iPhoto for iOS, despite its quirks, because of its attractive interface, solid set of organizational tools, image editing power, and ease of use. And with the latest update, the maximum file size for photos is now 36.5 megapixels. So you can use this workflow with practically any DSLR. If this workflow does appeal to you, then also take a look at my Mastering Albums in iPhoto for iOS to learn more about how to organize your work within iPhoto. Chances are, even after you copy everything to your Mac, you're still going to want to keep the really good stuff on the iPad too. After all, it's easier to show off that way. Click here for complete article. Hiding Unwanted Apple Apps (iOS)by Carl Grasso, smalldog.com One of the most frustrating things I've found with iOS is that I haven't been able to hide native Apple applications that I'm not using. In my internet wandering, while stuck in the airport in Washington DC, I found a website that gives you a way to hide these unwanted applications. 
It's not a permanent change; the applications will come back if you restart the device. Additionally, it does not require jailbreaking your device. This is great for me, since I hardly ever reboot my devices and I no longer jailbreak them since Apple gave us a bit more control over system sounds. As always, in cases like this, proceed at your own risk. That said, I have not had any issues with this process. Here's what you need to do: Step 1: Go to the following website on your iDevice: rag3hack.no-ip.org Step 2: Tap on "Hide Apps without Jailbreak" Step 3: Choose the App you want to hide and tap on it Step 4: You'll be asked to install a new App, so confirm that it's what you want to do. The installation will not complete, but that's ok — it's supposed to do that. Just tap done. Step 5: The App you're trying to hide will turn grey and it will have the word "Hide" before its name. Just tap and hold until it starts jiggling and then tap the "X" in the corner to remove it. From what I've seen, the site doesn't let you do this with all the Apple apps; I still can't get rid of Photo Booth on my iPad, but I can get rid of Newsstand and Game Center on my phone. Should you want to get these Apps back, all you need to do is power off your device and power it back on again. Click here for complete article. By The WayWhat's New from Apple*by Ron Sharp, MAGIC
Apple announced new products on Tuesday October 23rd. The iPad Mini was highly anticipated even though Apple had been so secretive about it. And it looks great. Here's a round up of what's new: New iPad 4th generation, new Macbook pro 13 inch with retina display, new iMac, a new iPod Nano and iPod Touch, and the iPad mini. The iPad Mini is competing for the right intermediate size mobile device. Larger than an iPhone and smaller than the iPad, it's .28 inches thick and the screen is 7.9 inch diagonally. It weighs a mere .68 pounds and still does 1080 p HD video. It uses the lightening connector and has a 10 hour battery. It doesn't, however, have the retina display that the newer larger iPads have. 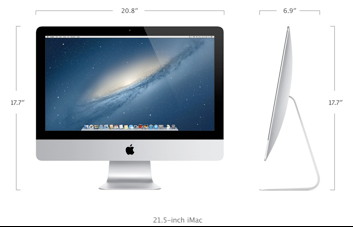
What impressed me with their lineup of new products was the iMac. The new iMac looks so svelte. It's only 5 mm thick at the edge. How do they do that? It's thinner than most monitors without computers in them. Another interesting thing about the iMac is the option for a Fusion Drive. The Fusion Drive is a hybrid drive that incorporates a regular hard drive with a flash drive and software that makes the best use of that combination. The new 13 inch MacBook Pro now comes with a retina display and 500 or 750 GB hard drive but have the option for a flash drive instead of a hard drive. The flash drives have no moving parts and are much quicker accessing data. (I replaced my MacBook hard drive with a flash drive and it made an impressive difference.) The new iPad fourth generation uses a new A6 chip that Apple says is twice as fast as the previous A5 chip. Apple's web site says it has advanced Wi-Fi features that are also twice as fast. And for a bit of sales news, Tim Cook said in the Tuesday presentation, Apple has sold over 100 million iPads in just 2¼ years. 
The iPod Nano is a new design with a 2½ inch multi-touch display. The iPod Touch is a new slimmer lighter design and comes with the new earPods that sound great, by the way. On Saturday October 27th, CNN headlines read "Apple ran out of 16GB black iPad minis in 35 hours." Apple posted quarterly revenue of $36.0 billion and quarterly net profit of $8.2 billion. I would say iPad Mini hit it's mark. Other small tablet makers again have a challenge to keep up with Apple's tablet. Thoughts in the Cloud*by Ron Sharp, MAGIC Cloud services are a big question mark for me. I know that they are data storage for your stuff in the cloud rather than on your own computer, but why do I need that? Lets see... Syncing iCloud, Apples's cloud service, has some great advantages for keeping your stuff synced on all your devices. I've talked about this before. When you have an iCloud account set up then all your addresses and Apple documents are automatically synced to your devices, from computer to iPad to iPhone. What this service isn't really designed for is sharing with others. Besides keeping your stuff synced on all your devices, using a cloud service means you also need less storage space of your own. In general, this means you can use smaller, less expensive devices which are more portable. Unfortunately iCloud has some shortcomings in that it is set up to store your documents by application, Apple applications that is. And if a document is stored from one device and that application isn't available on the other device then it can't be accessed on that device. For instance, documents saved with Preview on you iMac or MacBook are not available on the iPad or iPhone. Sharing With iCloud, other people cannot access your stuff even if you want to share it. You would have to email your stuff to them. For some that isn't a problem, for others who often work on shared documents there are other cloud services to seek out, such as DropBox. Backup If you don't own more than one Apple device and don't need to share a lot of stuff then the only reason for a cloud service is to backup your data instead of using a local external drive. And even then, iCloud only stores your data, not your operating system. Other cloud services may be used for total backup of your system. Other services Every time I open an email, it seems, there are more cloud services available. If you're in the market to test some alternate cloud service, check the attributes for the options you want. Some services offer security encryption on all or part of your data. Compare pricing and size of storage and ease of sharing. Here is a great site to compare a few services: 2012 Best Cloud Computing Services Even your own internet service provider may offer cloud service. Here are a few others: Also see Using iCloud in the MAGIC August newsletter. Cartoon of the month*submitted by Penny Holland 
MAGIC, the Macintosh Appreciation Group of Island County, serves people who use Macintosh computers, software and peripherals. Our goal is to share information and get answers to questions to make us more productive with our use of technology. Our monthly meetings give us a chance to discuss computer problems and share ideas with other Mac users, feature speakers on specific topics, and to keep apprised of Apple news. |