In This Issue:

Meeting information
Do not forget to bring your used ink cartridges. Minutes of the November 16, 2016 Meetingby Penny Holland, MAGIC Secretary* The monthly meeting of MAGIC, held at the Freeland Unitarian Congregation Meeting House, was called to order at 4:00 by President Robert Elphick. There were approximately 37 people present at the meeting. PRESENTATION Today's presentation MANAGING PHOTO LIBRARIES was presented by Gary McIntyre. His Keynote address will be posted on the MAGIC website. Often people believe their computer HD is getting too full, so we can set up libraries using external hard drives for our photos. The first job is to set up dedicated external hard drives for photos, and one for the photo backup. You should buy two more external hard drives one for the photos, and one to back them up. You should already have a drive that is partitioned that has superduper and time machine. SuperDuper is the application we recommend to use for backing up your photos to a PhotoBackup drive. Gary showed a screen shot of the three external drives connected to his computer: PhotoDisk, PhotoBackup, SuperDuperbackup and TimeMachine (these latter two partitioned on a single drive). To figure out what size drives you need, use GET INFO (Command-I) on the MacHD. Check out these two numbers: (1) Capacity of the computer's HD and (2) Available space on the HD. If your used space is, say, 90% of available space, it's time to move photos to an external drive. (Also, Gary notes, having photos on a separate drive makes it easier to bring photos to show at Grandma's House—IF you both have Macs, that is.) To figure out what size photo HD you need to get, click on Pictures* on the sidebar of a Finder window, find your iPhotoLibrary, and check its size. (Select it and click on Command-i for the Get Info window.) Whatever this size is you need your external photo HD to be somewhat larger than that, especially if you plan to keep taking photos. Know this size before you buy your new HD. *NOTE: TO GET PICTURES TO SHOW UP IN THE FINDERS SIDEBAR: Go to Finder>Preferences>Sidebar under Favorites and be sure that PICTURES is checked. (Also, in this same menu, under Devices, make sure you have EXTERNAL DISKS checked on.) Open iPhoto. Goto File menu>Switch to Library. Look at the flow of where iPhoto library is located. (It should look something like: /Users/yourname/Pictures/iPhoto library ) If you are using Photos vs iPhoto, some of the drop down commands may be in a different place. At this point in the presentation there was some confusion because several people did not realize Gary was talking about iPhoto and they were using Photos, the newer photo management program put out by Apple. To MOVE YOUR PHOTOS off of your computer and onto your external photo drive, drag and drop your iPhoto library to your new external Photo Disk drive. After you've moved your iPhoto library (this will take some time) make sure the photos are really on your external drive, and then DELETE that library on your main computer. Now the pictures no longer exist on your computer, and you should have freed up the space on your main internal hard drive. Next you will want to create a backup of your photos. We suggest using SuperDuper to backup the photos on the PhotoDrive to a PhotoBackup. To Copy Libraries: drag the iPhoto library from the iMac to the Photo Disk. Make sure you've backed up your PhotoDisk to PhotoBackup on your external HD. (Note: the difference between Moving and Copying a file is if you "MOVE" photos you then delete the original file. If you just COPY, you DON'T delete the file.) How to ADD a library: Often it is useful to have separate Libraries for different objectives. For example you may want one for personal stuff and a different one for work, a hobby, a volunteer organization, or a project. Then you need to make a new library - it can be on the the computer hard drive or any other hard drive that you choose. Go to iPhoto menu File > Switch Library&helip; and click on Create New&helip; button. Give the new library a name. To create a new Library for the Photos app, quit Photos if it is open. Then reopen Photos while holding the "Option" key. You'll see the window to create a new Library. If you need to transfer pictures from the default library to your new library then create an Album in iPhoto that will show up on the left sidebar. Give the Album an appropriate name. Drag and drop the desired pictures into the new album. Then open the album and select all the photos. Use the menu File > Export to put the photos into a temporary folder on your Desktop or anywhere on your Hard Drive. Then Switch Library to the new one and import the photos from the temporary folder into it. You can then delete the temporary folder. You may also want to remove the pictures from the default library. Do not forget to back up before and after this process. NOTE 1: If you use iCloud Photo Library, it will only sync one library. So additional libraries are not backed up or synced to devices. NOTE 2: There was some discussion about iPhoto versus Photos. The only version of iPhoto that still works in the newer OSs is iPhoto 9.6.1. If you don't have it on your computer, ask MAGIC people, such as Robert to download it onto your computer. BUSINESS MEETING Gary McIntyre gave the treasurer's report: We have about $8,200 in our account. For 2017 we will be electing some new officers. If anybody is interested contact Robert or any of the officers. Gary commented that as an officer, you get a chance to work with the experts and you will learn a lot! You can also send an with comments or questions. Q&A Q: Why are you wanting to still use iPhoto instead of Photos? A: Photos offers fewer choices. Apple is wanting people to use Photos because that is what works on iPads and other devices, and then everything will all look the same. There are several features that have gone away in Photos. You have less ability to sort photos. There are no Events. You can't choose an outside editor to work on your pictures, etc. Most of us in Magic still prefer using iPhoto. Q: If I take a picture on my phone and want to put it on eBay, how do I do it? A: You can go straight from your Phone; you don't need to put the picture on your computer first. COMMENT: I take all my pictures on my iPhone, and it creates geographic collections. Collections on the iPhone names the places where the photos are taken. I like this feature! REPLY: The iPhone records the GPS location of your pictures. In iPhoto select Places under Library, you can also see where the pictures were taken—if your camera has that ability to record the location. Q: In a new iMac, connecting the camera causes photos to go into both Photos and iPhoto. How do I stop this from happening? A: Open Image Capture. Click on the little square on the bottom left. Look for: "Connecting this camera opens PHOTOS." Change it to "iPhotos" or select "No Application." Q: If I want to delete from iPhoto will it also delete from Photos library? A:No, they are independent. Q: When you take photos on your camera, what format do you recommend using. Some people say RAW takes up too much space. A: GIF is a good compression algorithm that is lossless. Tiff files are not compressed, but they can be compressed with JPG. Raw tends to be very large. The question is how accurate do you want your photo to be? If you are going to enlarge it to a huge poster, then you want all the pixels possible. For putting something on the web you don't need many pixels at all. It all depends on what you are doing and how accurate you want it to be. You can probably use JPG with photos of people. (Remember you don't want to email a photo larger than 1MB. These days if you drag something into an email it will tell you what size image you've added. ) COMMENT FROM ANOTHER MEMBER: I use Photoshop and Lightroom, etc. Most professional photographers shoot in RAW. Q: I have an old CPU, an old iPad, etc and I want to clear them off to recycle. I no longer have the cords and cables to turn these devices on so I can't erase anything. How can I securely get rid of them? A: Go to A-tech and they will know how to remove the old HDs. Both of the recycle centers on the island will take old computers, etc. Q: (continued from last question) I want to use the old iPhone but don't know the passcode to unlock it. A: Hold down both buttons on the iPhone to completely erase it and rebuild it to a new iPhone. Or ask A-Tech to help you with that, too. Q: How can I send files larger than 1GB to someone? A: Check out the website called WETRANSFER.COM They will let you send 5GB files. Also DROPBOX and SENDMYFILES are other options. You can also use iCloud Drive, if the other person uses Mac. Q: On my iPad it gives a certain number for available memory, but when I sync it with my computer it tells me I have way more room. Why? A: People have been telling Apple about this discrepancy for some time now. Don't know why it's happening and nobody knows which one is right. Q: When I move something to trash on iPhone or iPad, how do I get rid of that? A: Go to the trash file and select all and then delete all. Q: I delete files on a thumb drive, but I understand they just get put into a Delete Folder. How do I empty that? A: Leave your thumb drive connected to your computer and empty the trash from there. It will empty trash on the thumb drive as well. Q: Siri has gotten really "stupid" lately, I think since the latest OS 10 upgrade. I dictated very carefully and it was very garbled. A: I'll Google and see if I can find anything on it. Can you go into Siri preferences and clear these out? A TIP by a member: There is an update on iOS 10.1 and there it said something about Siri, so maybe they've fixed it. A: The person with the Siri problem had the latest update. Q: Is there a simple way in Pages when you save a document to have it automatically go into a particular folder? Can you set a default? A: I don't think so. When you save a Pages document, you are given the opportunity as to where to save it at that time. The first choice listed is the last folder you saved to. Q: If Safari is checked under iCloud what does that mean? A: Your Safari bookmarks and History are being synced through the cloud. The cloud is the only other way to sync bookmarks. Also Notes are the only way to sync through the cloud. In System Prefs, under iCloud do not check any boxes to avoid using the cloud. But IF you have them checked, DO NOT simply uncheck them or you may lose everything in that category. You need to ask an expert for help before disconnecting from the Cloud! Most often iCloud will ask you if you want to save the data on your device when unchecking an iCloud option. COMMENT: I use iCloud for music and photos. I like it. Pictures don't take up space on my phone. I enjoy listening to all my music on various devices and in my car. It costs me 99cents a month, and is well worth it! The meeting was adjourned at 6:00 PM. MAGIC Moments & SEASONS GREETINGSClassesby Bethany Kennedy, VP Education * The HTML classes concluded 7 December. They were well attended. We may extend these classes if there is a demand. No classes have beed scheduled for 2017. Now is your chance to make a request for classes in something that interests you. Please send an with your ideas or requests. Everything considered! MAGIC electionsIt is time to replace the board of directors! Elections will be held at the January meeting. Would you like to serve this wonderful community? Would you like to be a magician (looks good on any Resumé)? Please give me a call or send me anSwaps and SalesDon't forget to check out the swap page of this website. There is a nice 27" iMac on there now. 
Note: This Software Update section of the newsletter lists the most relevant Apple updates. Not all updates are listed for all products. Additionally, I'll add other pertinent updates on occasion. No OS updates, only app updatesThere are no Apple operating system updates for this period. There are updates for some Apple apps, Keynote, Pages, and Numbers for instance. These updates are primarily for the programs to take advantage of the new MacBook Pros Touch Bar. You can learn more about the new MacBook Pro on the Apple website. 
Use Tabs in Apps in Sierraby Emily Dolloff, smalldog.com We've all become accustomed to opening web pages in separate tabs in Safari, Google Chrome, and Firefox. In OS X 10.9 Mavericks, Apple gave us the capability to open different folders in tabs in Finder windows, making it easy to work in multiple folders with limited screen real estate. 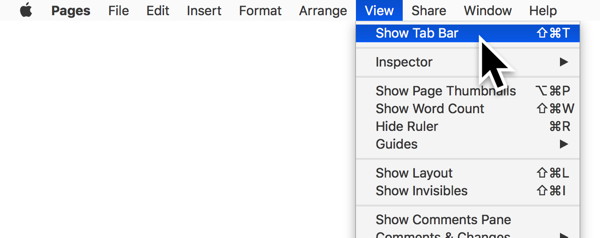
In macOS 10.12 Sierra, Apple has gone one step further, building tab support system wide so you can open windows in tabs in most Mac apps. Tab support is 'free' in apps, developers don't need to do anything to support it and you won't need to download an update to take advantage of it in most of your apps. So how do you get started with tabs and how can you use them in your everyday work? First, to determine whether Sierra was able to add tab support to a particular app, look in the app's View and Window menus. If you see View > Show Tab Bar and tab-related commands in the Window menu you're good to go. Next, if Show Tab Bar doesn't have a checkmark in the View menu, choose it to reveal the tab bar, which appears between the app's main toolbar and the document itself. You'll see a tab for the current document or window, and (in most apps) a + button at the right side of the tab bar. 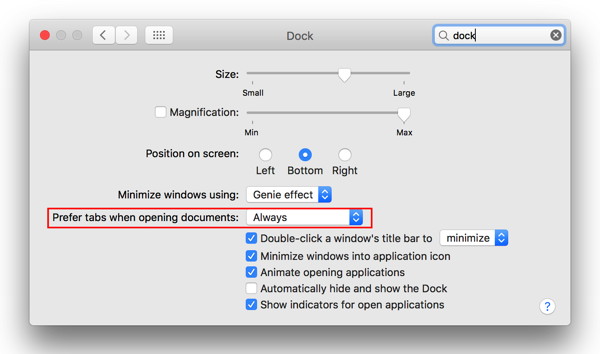
One final setup step: By default, documents open in separate windows. To make them open in tabs, open System Preferences> Dock, and choose always from the Prefer tabs when opening documents pop-up menu. This setting applies to both existing documents and those you create by choosing File > New. Now that you have everything configured, here is what you can do: Create a new, empty tab: Click the + button in the tab bar Move between tabs:
Merge multiple windows into tabs in one window:
Move a tab to it's own window:
Rearrange the order of the tabs: Drag a tab to the desired position Close a tab:
Getting used to tabs may require a little adjustment, but if you configure your Mac to always prefer tabs when opening documents, using tabs will quickly become second nature just as it likely did for you in web browsers. How to install an app in macOS Sierra that's not signed by a developerby Glenn Fleishman, MacWorld Howard Robertson can't get a piece of software he uses to run in macOS Sierra: The guys who make the program are not recognized developers for Mac. However, I have used this app for years (it's required for work). How can I install it with the new restrictions on installing apps in Sierra? The kind of app Howard's referring to is one that's "unsigned" by its developer. That means that while it's legitimate software that can launch in macOS, the software maker hasn't gone through the steps to be active in Apple's developer program, which costs $99 per year, and obtain a cryptographic certificate. When an active developer creates an app, Apple uses that certificate and its own encryption data to "sign" it, which allows a user to know that the app hasn't been modified between when the developer created the app and when it reached the user. This reduces the chances of malware. Apple has information about the developer and can revoke the certificate if they engage in malicious activities, preventing their apps from running on Macs in the future. Not all unsigned software is dangerous. I've seen plenty of simple utilities designed by side-project programmers who simply don't want the minor expense and associated hassle of signed apps. If you know the app developer well enough and download the app directly from a site under their control using an https connection, then you have a decent amount of certainty that it doesn't contain malware. And less well-known software is also less likely to be intercepted and re-released with malware inside, too. (Don't accept and run randomly provided or discovered unsigned macOS apps, though.) In Sierra, Apple removed an option in the Security & Privacy system preference pane that used to let you opt out of Mac App Store (MAS) only or MAS plus signed app security and choose to run any downloaded app. But you can still launch such apps. 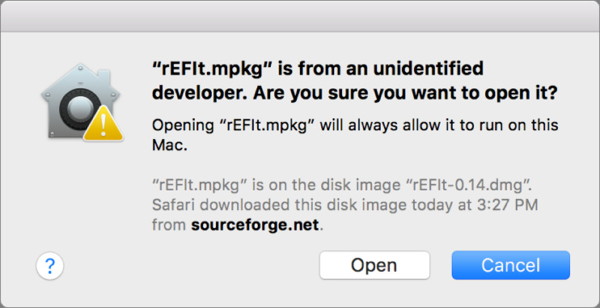 Beware this dialog, unless you know the developer well enough and download the app via https.
That choice is stored with the app, so you won't be asked again until you install a new version. Wizard sez: The only application that most MAGIC members will encounter with this problem is probably Onyx. Beware of any others - ask if you do not know. Streaming-box app comparison: Roku vs. Chromecast vs. Apple TV vs. Fire TV vs. Android TVby Jared Newman, macworld.com 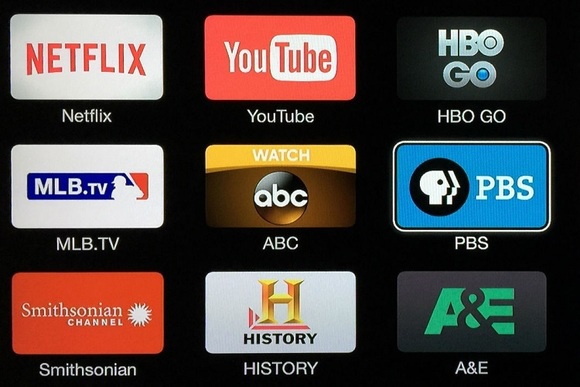
App selection should be one of the biggest factors in choosing a streaming media player, because all the fancy features in the world don't mean much if you can't watch the movies, TV shows, and other content that you want. The good news is that there's relative app parity among the major streaming-media devices, including Apple TV, Amazon's Fire TV and Fire TV Stick, the Roku boxes and the Roku Streaming Stick, Google's Chromecast, and Android TV devices such as the Xiaomi Mi Box and Nvidia Shield. If you're just looking to watch Netflix or Hulu, pretty much every device on the market has you covered. Still, each platform does have its hang-ups, which we reveal in the chart below. Have a look, then keep reading for some takeaways and caveats. (Keep in mind, the chart applies to the United States only. Some apps and services may not be available in other areas.) MacBook Pro with Touch Bar review: The best bits of iOS in a really great Macby Susie Ochs, MacWorld AT A GLANCE
Apple gave its new MacBook Pro a thinner, sleeker case, which demanded a new, lower-travel keyboard, a new venting system, and even a smaller battery. But while I appreciate a Mac that's smaller and lighter, I'd rather have a Mac that's easier or just more fun to use. These 13-inch and 15-inch MacBook Pros with Apple's new Touch Bar are both. The Touch Bar brings my favorite things about the iPad Pro's software keyboard to the Mac. The amount of useful shortcuts it adds is ridiculous, and this is before most third-party developers have even had a chance to add Touch Bar support. Even for a premium price—and these Macs aren't cheap—I think the Touch Bar makes this a much more compelling buy than the MacBook Pro with function keys. Meet the Touch Bar The Touch Bar is an OLED strip that's tempting to call a display, but Apple wants developers and users to think of it as an input device, not a display. You can't adjust its brightness yourself, for example, because if it was too bright it would start looking more like a display than a set of keys. It's also optimized for viewing at a 45-degree angle, looking down from above, which is odd for any screen. Nonetheless, the Touch Bar stays visible and legible even if you are sitting at an off-angle to your Mac. The Touch Bar is designed to blend in and look like keys, not a bright, glowing display.  The Touch Bar is designed to blend in and look like keys, not a bright, glowing display. See Video and Continue Reading.... Understanding Two-Step Verificationby Emily Dolloff, smalldog.com Two-Step verification is being used now for more and more accounts. When we first started to use two step verification for some accounts here at Small Dog I was a little unsure how it worked and honestly thought it did nothing but slow my workflow down. Waiting for the verification text or e-mail has delays occasionally which is frustrating. But after I had a break-in to an e-mail account, I've learned the value of this added security step. I was lucky, there wasn't anything personal stored in the e-mail account that was compromised, but that is rarely the case for many users whose accounts are compromised or hacked.  It seems we hear almost weekly information about a new security breach. I remember most recently one involving Yahoo accounts. Strong passwords are something that is always recommended and some sites even require it, but not all. We've talked a lot about not using kids and pets for passwords. Keeping track of your passwords is becoming more and more complicated. I am a fan of ( and rely heavily on! ) iCloud keychain password storage myself. I also utilize 1Password for some of my accounts as well. Using these kinds of password management systems can be critical in not only your organization, but also your account security. Having to move away from simple passwords and utilizing more complex passwords with special characters can be complicated to keep track of. I know I've more than once reset passwords and then found myself locked out because I couldn't correctly remember the password&helip;very frustrating. Utilizing password management software to keep track of passwords as they get more complex is extremely helpful, but often a complex password isn't enough. This is where two-step verification comes in. With a normal account, a bad guy has to get only one thing to break in, your password. With an account that's protected by two-step verification, breaking in becomes far more difficult. That's because logging in requires both your normal password and a time-limited one-time password or numeric code. This one-time code is generated by a special authentication app and sent to you in a text message or via e-mail. This secondary passcode is only valid for a short amount of time and you can only use it once. Depending on your account ( you can't control this yourself ) you'll either have to enter the one-time code each time you log in or sometimes they last for extended periods of time. I have some Apple accounts that I have to use the code each and every time I log out of the account. For some of my e-mail accounts I only have to use the code once every 30 days. So it does vary. Most accounts that offer ( some will require it ) two-step verification provide fairly detailed instructions on setting up your two-step authentication. One very important note and step is safely storing your recovery key. Your recovery key is your emergency lifeline or safety net if you find yourself locked out of your account for some reason. I was recently locked out of my Apple ID and easily got back in only because I had my recovery key handy. I do not recommend keeping your recovery key physically on your device, you should print it out and put it in a safe place. If you do choose to store your recovery key on your device, I recommend also printing and filing your recovery key. If your end up losing your device or a drive fails etc, you'll be thankful you have this on hand! Ultimately having two-step verification is the next best step for safeguarding your accounts, especially during the busy holiday shopping season! Does it have draw backs? Sure, but I feel the perceived inconvenience felt in the beginning becomes second nature with time. My best suggestion is to have your mobile device set up if possible to receive your codes. Most of us carry our phones with us 24/7, so even if you're not physically with the device that's needing the verification you'll know when someone is trying to access your account and quickly determine if it's someone who should be or someone who shouldn't. De-commission your old Mac *by Robert Elphick, MAGIC This is the last time you will ever log into this computer. It has been great but the time came to move on - to a new Mac. On this last login you need to remove all your data, no matter what will happen the computer next - sell it? give it to a friend or relative? give it to a school or retirement home? Backup Do this so that you always have a copy "just in case". You will also need it to put your data onto your new computer (if you have not already done so). Best advice is to have a Time Machine backup (you already do this, right?) but is is also a good idea to have an exact duplicate using SuperDuper that you can boot onto if required. De-authorize Some Apple software can only be used on a limited number of your computers so you need to de-authorize those applications on this computer so that you can authorize the new one(s). 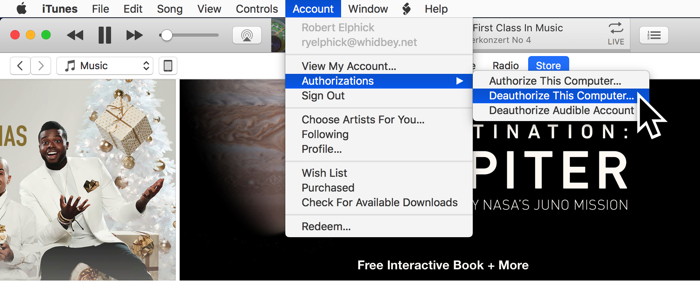
Your iMessage account can be removed by starting the Messages application and the choosing the menu item Preferences > Accounts and then click Sign Out. Remove Data The next step depends on how old your computer is. For most computers you should be able to use the recovery mode to reinstall the operating system. This will make sure that ALL your data is removed and that the operating system is up to date. For details on how this done visit this Apple site. For older computers that do not have the recovery mode, you will need to create a new account in System Preferences > Users & Groups. Make sure that it has admin privileges. Then log into the new account and use System Preferences > Users & Groups to completely delete all the other users and erase their data. You will need to pass on the new username and password to whoever gets the Mac next.If any of this sounds daunting, get help! 
5 of the Best Free Charity Apps for iPhoneby Jonathan Lee, idropnews.com 
With the bitter and divisive presidential election past and the holidays upon us, it's refreshing and healthy to start thinking about giving for a change. As with many other aspects of life, technology can help you along with your philanthropy, offering a couple of convenient options for charitable giving that can make a world of difference in someone else's life. Whenever you feel the urge to give, you can fire up the following free apps and help feed a hungry child thousands of miles away in an instant, or pay for cleft palate surgery. Here is a roundup of apps that will help you make a difference: 1. ShareTheMeal 
It only costs fifty cents to feed a child for a day, and a couple of dollars to provide him or her with meals for an entire week. Once you enter your payment information into this app, you can instantly donate money to the United Nations World Food Program and help them save lives. This UN developed-app will show you where your meals have gone. So far, close to 9 million meals have been served. You can even link ShareTheMeal to Facebook to convince friends to join you in sharing their meals. The next time you order food on your phone and feel the urge to feed someone in need, you can simply open this free app and share in mere seconds 2. Charity Miles 
If you are a health and fitness fanatic, this app provides an amazing way for you to track how many miles you've covered during your workout and give to charity. The best part is that you don't need to pay any money yourself. For every mile you jog, walk, or bike, Charity Miles earns money for its charity partners through brand workout sponsors like Chobani, Johnson & Johnson, and Humana. So far, the miles covered by Charity Miles users have helped raise over $2 million for 40 different charities, including The Michael J. Fox Foundation, Autism Speaks, and the World Wildlife Fund. It's available for free on iOS. 3. Donate a Photo 
Make your powerful iPhone 7 Plus camera a force for good. Like Charity Miles, this app raises money on behalf of charities through a sponsor. Donate a Photo is a free donation app, developed and funded by Johnson & Johnson. All you have to do to raise $1 for charity is take a photo with your mobile device and share it through the app. Once you do, Johnson & Johnson will donate $1 to a charity of your choice The charities you can choose from include Save the Children, which helps newborns breathe, and Girl Up, which donates school supplies to girls in Guatemala. You can share up to one photo a day, and by sharing your activity on social media, you can inspire your friends to give as well. It's available for free on iOS. 4. Budge 
This app is for all of you who are competitive and enjoy making bets with your friends. Budge is a charitable app with a social and competitive twist to it. You challenge a friend to a competition, whether it's a race or a game of chess. The loser has to make a small donation to a good cause through the app, which has partnered with a range of charities. The app features simple-to-use challenge creation and a news feed so you can follow your friends' activities. Budge is available for free here. 5. Tinbox 
Here's another great app that lets you donate to charity without charging you a dime. All it takes is a few taps, something you can achieve while you're in your Uber ride. Tinbox lets you team up with corporate sponsors to send $1 to a charitable project of your choice. All you have to do donate is tap on a sponsor and read about the company's goals, which you can do in about 20 seconds. After that, the company will notify you that it's sent a dollar to a specific cause or project as opposed to simply naming the philanthropic organization - whether it's funding a new hospital bed or meals for a food bank. It's available here at no cost to you. 5 Quick and Easy Ways to Speed Up Your iPhoneby Troy Thompson, idropnews.com 
Apple's iPhone is arguably the company's most successful, beloved product of all time. Not only are they aesthetically pleasing to look at, constructed of the most premium materials planet Earth has to offer, but iPhones are also among the fastest, most fluid smartphones money can buy. Of course, as with everything in life, sometimes they tend to slow down on us the more we use them. The longer your iPhone is in your possession, handling tasks and keeping you connected to what matters most, they're going to accumulate data and content and the general mileage typical of any tangible good that's used day in and day out. Fortunately, there are litanies of ways in which you can get your iPhone humming along like new again. Check out our recommendations for the top 5 ways to make your iPhone run faster and more seamlessly than ever before. And if you feel like learning more, head to 6 ways to free up memory in order to speed up your iPhone as well as how clearing mysterious "Other Data" can speed up your iPhone or iPad. 1. Clear Your RAM iPhones aren't the most beastly handsets in the RAM department, and most of the latter-year handsets only boast either 1, 2, or 3 GB, depending on the model. Sure, even though the iPhone is historically known to utilize a lower amount of RAM than its Android-running rivals, there's no rule of thumb saying you can't speed it up on your own, and noticeably so, depending on how many apps or behind-the-scenes processes you have running in the background. To clear your iPhone's RAM, simply press-hold on the handset's power button until the 'Slide to Power Off' option appears; then, release your finger from the power button, and press-hold the Home button for roughly 15 seconds, or until the screen view reverts back to your home screen. 2. Reboot Your Device In some instances, a sluggish iPhone can be sped up a bit by simply rebooting it. To do this, simply press-hold on the Power and Home buttons at the same time for 30 seconds, or until the device physically shuts off and boots back up again. See reboot directions for iPhone 7 and 7 Plus here. 3. Enable 'Reduce Motion' In case you haven't noticed, iPhone is pretty heavy on the fancy schmancy UI animations. Performing basic tasks, such as getting back to the home screen or opening and navigating between apps, display a zoom in-zoom out animation as you either enter or leave that app. And unfortunately, those animations can consume a fairly significant deal of resources (mainly RAM) on your device. But a really cool accessibility feature baked into iOS 9 or later will now allow you to essentially shut those animations off. The result? Apps open faster, and you can navigate the iOS platform much quicker, too, albeit at the expense of seeing any cool animations when you jump around from app to app. Head to Settings > General > Accessibility > and then scroll down to select Reduce Motion. Lastly, toggle the feature On. You'll likely notice that navigating is more seamless and doesn't take as long. Try it out. Worst-case scenario, you don't like it, you can always go back and toggle the feature 'Off' again by following the steps above. 4. Change Background App Refresh Settings If you have a multitude of apps installed on your device, chances are they may be sucking away at your precious battery life and slowing down your iPhone in the process — since the device might be constantly refreshing either one (or all) of those apps behind the scenes, without you even realizing it. If you're not using an app, or you don't use it often enough, you can always go in and play around with these settings by simply navigating to Settings > General > Background App Refresh > and then scanning the list of downloaded apps to decide which apps, if any, that you'd like to allow to refresh in the background. 5. Delete Unused Apps or Games You Almost Never Play With millions of apps available to download from the Apple App Store, chances are you've got a fairly substantial number of them installed on your own device — of course, that doesn't necessarily mean you're actually using them all, right? Fortunately, going through and deleting any unused or infrequently used apps will not only clear extra space on your device, but could also allow your iPhone to run a bit quicker. To simplify the process, simply navigate to Settings > General > Storage & iCloud Usage. Under the 'Storage' section, select 'Manage Storage', and then select the apps you want to delete, one-by-one, by tapping on them as you move down the list and selecting Delete App. 8 Important iOS Security Settings Every iPhone or iPad Owner Should Knowby Troy Thompson, idropnews.com 
Apple's mobile devices are among the most secure that money can buy. Indeed, the company behind the iPhone places a great importance on the concept of security and user privacy — always seeking to ensure that every iPhone, iPad, or iPod Touch owner has access to the most advanced settings and features to help them maintain their privacy and stay safe, free from the myriad of cyber adversaries and their attacks, while using your iPhone or iPad. Yet even Apple, despite all of its high-security, user-privacy talk, is somewhat of a nosy body, in itself, particularly when it comes to sharing certain aspects of your iPhone's location, for instance, with 3rd party vendors who're looking to mosey their way on into your life. And while iPhones, by default, are definitely much safer than their Android-running counterparts, we think it's still important for every iOS user to know these 8 crucial iOS security features. 1. Change Lock Screen Notification Settings If you're a private person, or you know that incoming messages or emails might contain sensitive information, perhaps you'd like to conceal these pop-up notifications from unauthorized eyes? Fortunately, you can tweak what notifications are shown on your iOS lock screen by going to Settings > Notifications > and then selecting the app you want to control notifications for. In the subsequent menu, you'll then be given several options. To privatize your messages and emails, for instance, you'll want to toggle the Show Previews option to Off, which will hide any of the content from that message or email from showing up in your notifications. 2. Use a Unique, Alphanumeric Passcode Want to beef up your iPhone's security, even beyond the standard 4- or 6-digit passcode? Now you can create your own, custom passcode to unlock your device — inclusive of numbers, letters, or other special characters. To set one up on your device, simply go to Settings > Touch ID & Passcode. From there, select Change Passcode > enter your current passcode > select change passcode options > and finally, select Create Alphanumeric Code. 3. Tweak Lock Screen Access Settings From the same Touch ID & Passcode settings menu mentioned above, you can also control what apps or services you're able to access while your iPhone is locked. For instance, under the Allow Access When Locked section you can choose which options and services — such as Siri, responding to a message, or accessing the camera — can be accessed from the lock screen, by toggling them on or off. 4. Lock Your Notes With iOS 9.3, Apple introduced the ability to lock individual notes in iOS' proprietary Notes app. So, feel free to jot down your passwords, or pour your heart out, and, once you're ready to keep the note private, simply tap on the Share button within your note > and then select the Lock Note option. You'll either be able to manually enter a password, or use Touch ID, to unlock that note moving forward. 5. Set Up Two-Factor Authentication If you have only one Apple ID that you use to access multiple Apple devices, consider enabling the Two-Factor Authentication feature. Doing so will heighten your security substantially, as Apple will only allow you to set up and log into new iOS or Mac devices by entering a six-digit passcode sent to your other Apple devices. This will ensure that you, and only you, have access to your Apple ID, only on the devices within your possession. To set this up, you'll have to visit Apple's website > log in with your Apple ID > and then select Two Step Verification to set the feature up. 6. Privately Browse Safari To browse the web using Apple's Safari browser just became a whole lot safer. Now, by selecting the Tabs icon from your current webpage > Enabling Private, you'll be able to browse the web on your iPhone or iPad without leaving behind of trail of the sites you visit, or any record of logins on sites visited, either. 7. Turn Off Location Tracking By going into Settings > Privacy > and selecting Location Services, you'll be able to manage apps, and to what extent they track your every move, on an individual basis. Simply select an app from the list, such as Facebook, for example, and then you'll be given options on whether you want to allow the app to track your location only when you're using it, or never. By selecting Never for apps that you don't use very often, you'll not only save precious battery life, but you'll keep your whereabouts private knowledge. 8. Tweak Ad Tracking Settings in Safari If you've ever felt like someone was watching you as you browse the web on your iPhone, since, you know, the advertisements that show up always seem so specific, in that they're tailored to show you what you've already been looking at - that's because of Apple's default Ad Tracking settings in Safari. This feature is employed to ensure that you're only seeing ads that Safari, by default, determines are most relevant to you. However, maybe you don't want to be so closely monitored. Fortunately, you can tweak Safari's Ad Tracker settings by going to Settings > Privacy > scroll down to the bottom of the list and select Advertising > and finally, toggle the Limit Ad Tracking option to ON. The best iPhone/iPad USB flash drives with Lightning connectorsJordan Kahn, 9to5mac.com 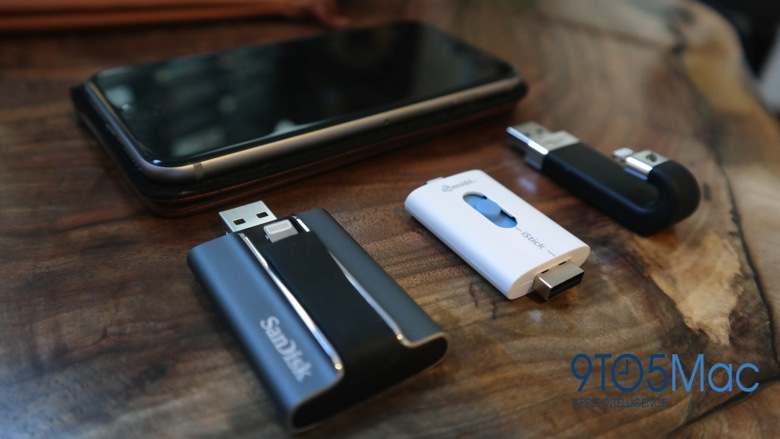
There are now several companies selling USB thumb drives for iPhone and iPad since the first ones with built-in Lightning connectors debuted late last year. By connecting a small and lightweight thumb drive directly to your iOS device, you can avoid limitations of onboard storage and cloud services and instead store and stream media like music, video, and photos using the drive's additional storage. A few things to consider when searching for the right Lightning drive: some have a battery that requires charging, companion apps for managing and streaming content from an iOS device vary in quality, and I found some have designs that make using the drives and your iOS device at the same time easier than others. Lastly, pricing varies quite a bit based on the the options below with drives ranging from 8GB to 256GB and other options offering bring-your-own storage using a micro SD card slot. Filter Mailboxes in iOS 10by Apple If your email load is like mine or just someone who's an organization freak (OK, also me) then you will love some of the filtering features in iOS 10. I use my phone exclusively at times so being able to better navigate through my Mail app helps a lot. Apple has enhanced the Mail app in iOS 10 to help you filter your email and focus on what's important. The filters are like searches in that all they do is show messages in the current mailbox that match the filter, hiding everything else. They don't move or modify messages in any way, but allow you to quickly access the e-mails you need. 
To start using these filters in iOS 10 tap the Filter button in the bottom-left corner. By default, mailboxes are set to show only unread messages. You can click or tap Unread to bring up all the preset filter choices which fall into four categories: Email Account: This section appears only if Mail checks more than one account. These choices tell Mail to include mail from specific accounts. Perhaps you want to be able to stay more focused while at work, you can specify to look only at your work email account. When you're at home, you can help yourself to disconnect from office concerns by only viewing your personal account. You will want to make sure to specifically select "all mailboxes" or individual accounts depending on your viewing and filtering preferences. Status: You'll likely want to keep Unread selected most of the time, after all half the point of these features to keep things more filtered and organized! You can also select flagged emails specifically, a huge time saver for me when I'm planning my meetings. 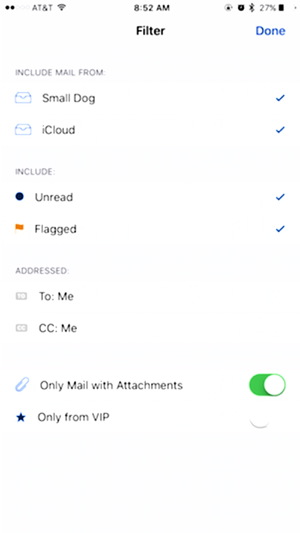
Addressed: Sometimes it may be helpful to see only messages that have your address in the TO line, versus those where the sender CC'd you. These options will also hide most mailing list messages, automated emails and marketing offers. Attachment and VIPs: I am constantly having to reference emails with specific attachments that I need so this is a huge time saver for me when I am on the run. Being able to specifically pull up emails with attachments has really saved me from unnecessary headaches while on the move. You can do the same with VIPs, I must admit though that I do not use this feature. I tried to use VIPs once but quickly found I put too many senders in my VIP list so it didn't save me any time. Any of these filter options can be easily turned on and off with a quick tap, so as your needs change so can your filters. Give filters a try, hopefully you find them as useful as I have! Apple saves iPhone call history to iCloud, but barely mentions itby Ian Paul, macworld.com 
Modern smartphones make it easy to back up all your data to the cloud so you can keep it synced across devices, or download it to a new phone. That can have unfortunate consequences, however—especially when phones are syncing sensitive information that users aren't explicitly aware of, and then a company famous for developing smartphone cracking software finds out. Moscow-based Elcomsoft recently added a feature to its Phone Breaker software that the company says can retrieve an iPhone user's call history data via iCloud. To use its software to crack an iCloud account, an attacker would need your login data or a login token from one of your devices. Apple saves up to four months of a user's call history whenever they are using iCloud Drive, according to Elcomsoft. The call history saved to iCloud keeps detailed information including phone numbers, dates, times of day the calls were made or received, and duration of calls, as first reported by the Intercept. Data for missed and ignored calls is also synced. In iOS 10, this synced data includes call data from VoIP apps that use Apple's new CallKit framework. In response to Elcomsoft's announcement, Apple told iMore that it supports "call history syncing as a convenience to our customers so that they can return calls from any of their devices." Why this matters: The problem isn't so much that Apple is syncing call logs. It's how it's implemented. Call log syncing is a nice convenience for those who want it, which is why Apple did it in the first place. But for those who don't want to sync their call logs, or weren't expecting to, it's a huge problem. What's missing? Consent and control For starters, this call history data is the same information the National Security Agency was so interested in obtaining, which the public discovered during the initial Snowden leaks in 2013. As the Intercept points out, four months of data records is twice as long as mobile carriers maintain that same information. Privacy-conscious users would not like this data easily accessible to law enforcement regardless of their proclivity for criminal activity. The second issue is that there's no explicit way to turn call syncing on or off. You can stop it by shutting down iCloud Drive, but that means you lose every other convenience of that service. Apple also did a terrible job of disclosing this information. Call log syncing is mentioned in Apple's security white paper released in May, a PDF document that few users would ever read. >But why isn't it in this iCloud security and privacy overview from Apple's support pages? It lists all kinds of other sensitive data sent to iCloud and how it is protected, but at this writing mention of call history is absent, as is any mention of SMS and MMS. Or how about this support page, which lists backed-up iCloud data similarly to the white paper, yet call history is absent at this writing. These two pages were last updated in mid-September and at the end of October, respectively. Now, before you go searching for a loophole as to why mention of call history syncing wouldn't be on either of these pages, ask yourself this: What's more important? To know that your browser bookmarks and ringtones are synced to iCloud, or that your call history is? Exactly. This is a major oversight on Apple's part. Elcomsoft says call syncing to iCloud has existed since at least iOS 8.2, released in March 2015. A quick search on various Apple-themed forums shows people starting to complain around that time about call syncing across multiple devices—especially when two users shared the same iCloud ID. So what's the solution? Simple. Apple should offer granular controls for what is synced to iCloud. Rene Ritchie on iMore rightly observes that this could result in "settings fatigue" where users are overwhelmed by too many options. Nevertheless, that's a risk Apple should be willing to take if it truly cares about user privacy. For now, users have a choice to make. Those who like the convenience of call syncing don't need to do anything. Anyone who is bothered by it can shut off iCloud Drive. The extra concerned could also delete their phone calling history on their devices before shutting down iCloud Drive. That change should be reflected on Apple's servers fairly quickly; however, there could still be redundant backups of this information kept on Apple's systems for a time. Regardless of which camp you fall into, everyone should also enable two-factor authentication. That makes it much harder for a hacker to access your data stored on iCloud. Two-factor authentication won't, however, prevent law enforcement from legally obtaining iCloud data directly from Apple. If you're using an Android phone, know that Google also stores this data on all devices running Android 6.0 and up when they are signed in to Google Play Services, according to Elcomsoft. In other words, pretty much every Android user with a modern phone. Random iPhone 6s shutdowns due to faulty battery component, Apple saysby Michael Kan, macworld.com 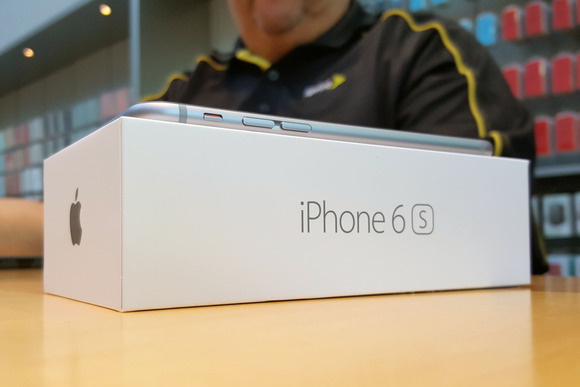 Apple's iPhone 6s Credit: Martyn Williams A problem with iPhone 6s products randomly shutting down comes from a battery flaw found in a small number of models, according to Apple. After a Chinese consumer watchdog group reported the issue, Apple is offering a fix free of charge to any eligible iPhone 6s user through its customer support sites. On Friday, Apple explained on its Chinese site that the problem was found in iPhone 6s devices containing a faulty battery component. This component was "exposed to controlled ambient air longer than it should have" before it was assembled into the battery packs, Apple said. "As a result, these batteries degrade faster than a normal battery and cause unexpected shutdowns to occur," the company said. However, the faulty components were only found only in a "small number" of iPhone 6s devices made in September and October 2015. "It's important to note, this is not a safety issue," Apple said. Its iPhones are built to automatically shut down under certain conditions, such as extremely cold temperature, to protect the device's electronics. Apple has posted customer support websites where consumers can submit their iPhone 6s serial numbers to see if they are eligible for a battery replacement. Last month, the China Consumers Association asked the company to investigate the shutdown issues, after receiving a "considerable number" of complaints from iPhone users in the country. The shutdowns would occur when the device's battery charge dropped between 60 to 50 percent in both cold and room-temperature environments, according to the association. The phones would also fail to turn on unless connected to a power supply. Although Apple claims to have addressed the problem, the China Consumers Association said earlier this week that consumers continue to complain the shutdown issues are also found in older iPhone 6 and 6 Plus models. In addition, consumers with iPhone 6s models built outside the September and October 2015 date range have also reported the problem. The China Consumers Association has asked Apple to investigate the other claims. But on Friday, Apple said it had found no other problems. "We looked for any other factors that could cause an iPhone to shut down unexpectedly," the company said. "After intensive investigations, no new factors have been identified. We will continue to monitor and analyze customer reports." Is Your iPhone 6s Eligible for a Free Battery Replacement? Here's How to Find outby Troy Thompson, idropnews.com 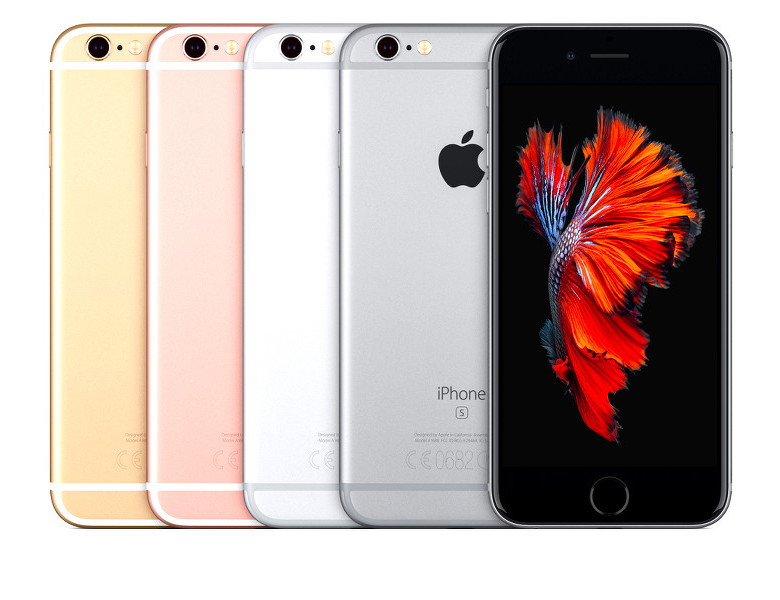
If you're among the iPhone 6s owners whose handsets have been spontaneously powering down in recent weeks, then you'll likely be ecstatic to know that Apple recently launched a program offering free battery replacements exclusively for you. Expanding on the program, Apple on Friday subsequently released a helpful new tool — available for iPhone 6s users via Apple's iPhone 6s battery replacement web portal — which will allow them to quickly enter their iPhone 6s' serial number to instantly determine if they're eligible for a free battery replacement. How to Find Your iPhone's Serial Number If you still have your device's original packaging in your possession, then the serial number can be found printed directly on the barcode label that's affixed to the rear-side of the box. If you don't have your device's original packaging on you, that's okay, too! You can also find your serial number by navigating to Settings > General > About > and then scrolling down to Serial Number. Once the number is located, all you have to do is make sure you enter it correctly in the form on Apple's support web page to get an instant answer. According to Cupertino, the iPhone 6s units beset by this spontaneous shut-down issue were manufactured between September and October of last year — meaning, in other words, that they were among the first batches of units to hit store shelves shortly after the iPhone 6s' launch in September, 2015. Apple has offered to replace the battery in devices affected by this issue, free of charge; however, the company was quick to note that any extraneous damages — such as cracked screens, water damage, etc. — will have to be rectified, at the customer's expense, prior to a battery replacement being executed. So if you're the proud owner of an iPhone 6s that's been acting kind of funky lately, then you might want go mosey on over to Apple's website to see if you're getting a free iPhone battery for Christmas this year. 

by Penny Holland, MAGIC* Stealing someone's coffee is called Mugging Pasteurize: Too far to see. No matter how much you push the envelop, it is still stationary. 
The old days. 


If you have any pictures, cartoons, or jokes that might be appropriate for this fantastic publication, please send them to Penny at 
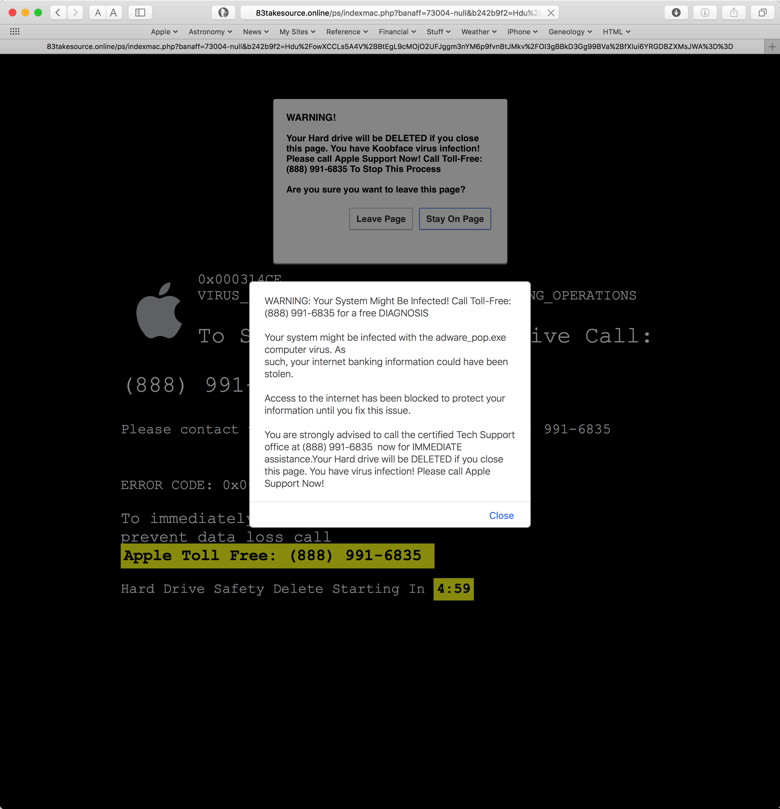
Troubleshooting some nasty Safari malwareby Jason Snell Jason Snell's sister ran into a persnickety pop-up asking her to call an 800 number. Instead she called family tech support! "I need Apple advice," My sister texted me last week. "I got a message that my computer is blocked due to an unexpected error. It gives me a number to call to fix it. Does that sound legit?" No. It did not sound legit. What's worse, the error message gave her an 800 number to call, which she did, and the person on the other end of the line offered to share her screen and tried to sell her $200 in security software. That was the point at which her instincts kicked in and she got off the call and asked me for help. The culprit in all this was a pop-up message in Safari, which read in part: "Your Apple Computer has been blocked. Mac iOS alert! System might be infected due to unexpected error! Your Browser might be hijacked or hacked." Ironically, this "warning" message is a common form of malware itself. The problem is that the pop-up appeared every time my sister opened Safari, and it proved impossible to dismiss the pop-up and then access Safari settings before the pop-up reappeared. Her question for me was simple: How do I get access to Safari back and make sure this doesn't happen again? It took a couple hours of trying to get the answer. If you or a family member of yours gets infected by this same approach, maybe I can save you some time and heartache. The sure-fire solutions The cause of the "infection" seemed obvious to me right away: Safari was loading a web page that contained a JavaScript script that spawned the pop-up message. Because it loaded immediately, I had to assume that it had been set as Safari's home page, so it loaded immediately on launch. I did a whole lot of web searching to come up with possible ways of fixing this. It seems impossible, but there's no way to reset Safari's settings from outside Safari. I suggested we delete a bunch of Safari's preference files, but that had no appreciable effect. We did try a few things that, after the fact, I was told are the most standard ways to work around a malicious webpage in Safari. First: Try to launch Safari with the shift key held down. This should prevent Safari from opening the pages that were open the last time Safari was running. Unfortunately, it doesn't prevent Safari from loading its home page. Second: Load Safari, then Control-click on its icon in the Dock and choose Force Quit. Try this a couple of times and Safari may get the message that there's something severely wrong on startup and instead start without loading anything. We tried to Force Quit numerous times and it had no apparent effect. 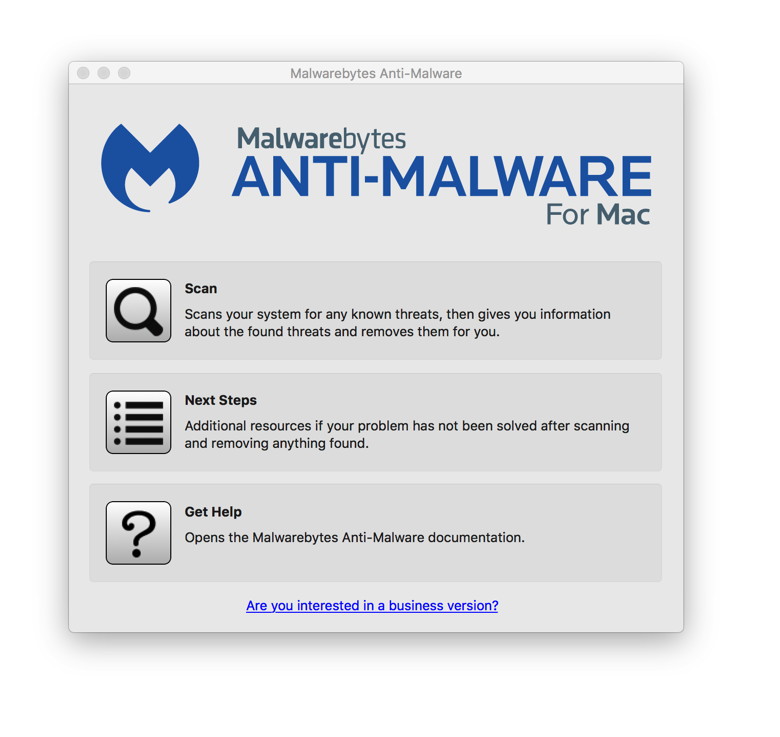
Malwarebytes is free and trustworthy Third: Download Malwarebytes Antimalware for Mac. I had this recommended to me by numerous people, including some Apple techs, and though my sister couldn't download anything because Safari was the only web browser she had installed, I was able to download the app and transfer it to her via Messages. She installed and ran it-but no luck. Fourth: Update to El Capitan or Sierra if you haven't. This probably would've solved my sister's problem, and was actually the next step I was going to try when I found what proved to be the solution. Apple added a lot more malware protection in the move from Yosemite to El Capitan, including fixes that stop many browser-based hijack methods. My sister was running Yosemite, unfortunately. Depending on your particular infestation, any of these approaches may solve the problem. Unfortunately, they didn't solve mine. Screen-sharing: A hail mary It wasn't fun trying to troubleshoot my sister's computer problems via Messages. What I wanted to do was control her screen and see if I could figure it out on my own. But for whatever reason-perhaps because her Mac was running Yosemite?-I couldn't find any way to share screens directly within Messages. No combination of iMessage or AIM or Google Talk allowed me to get access to Message's screen-sharing features. What ended up saving my bacon was TeamViewer, one of Macworld's picks for great ways to control a Mac remotely. It's free, and I was able to send the lightweight QuickSupport app to my sister via Messages. She opened the app, gave me the ID code and password, and I was able to control her screen. 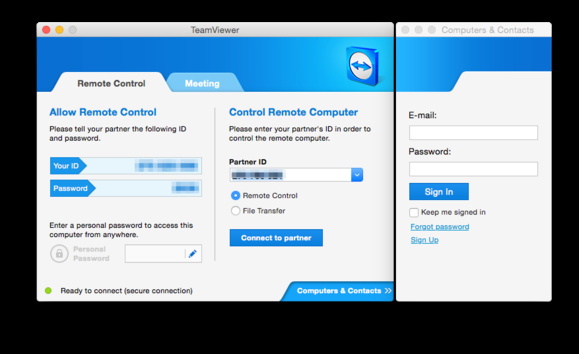
TeamViewer was a big help, and easy to set up. If you find yourself in a jam and need to control someone's screen remotely, definitely check out TeamViewer. I was impressed with how quickly we got it set up and working, and it's free for personal use. (Businesses pay a subscription fee to use the tool.) In the end, common sense wins Despite all of my attempts, a couple hours had passed and nothing had worked. Finally I turned to a suggestion I'd seen in a couple of message threads about browser malware, one that I had dismissed as a last resort because it was something I couldn't do myself, but would need to step my sister through via text message. It was this: Disconnect the computer from the Internet entirely. Unless you've got a hardwired Ethernet connection, this generally means turning off Wi-Fi. That's it. If there's no malware hosted locally, that pop-up can only be generated by loading a remote webpage that's set as the Safari home page. If you're not on the Internet, the webpage can't load. Which means the JavaScript script never runs, which means the infernally blocking pop-up message never appears. So I disconnected from TeamViewer and instructed my sister to turn off her Wi-Fi and open up Safari. Sure enough, this simple solution is what broke through the logjam. When she opened her Safari preferences, sure enough, her home page had been set to a weird "free deals and coupons" domain. Once she deleted that URL from her Safari settings, she was able to turn her Wi-Fi back on and the problem was over. Or at least, all over but the important aftermath: I told her to update to Sierra immediately, consider getting some simple malware protection software, and not click on suspicious links. Also, downloading a second web browser's never a bad idea, in case something terrible happens to your first choice. And under no circumstances should you call a phone number that appears in a pop-up on your Mac, or allow an unknown party to control your Mac. Even doing a Google search for the words in a particular fake alert box may not help you-because the creators of the scam may have built whole websites with those keywords in order to lure you in and get your money or access to your computer. If your Mac seems disabled, take it to an Apple Store, a local Apple tech in your community, or call Apple support directly. With any luck, My sister will never have a problem like this again. And if someone you know ever gets caught in this particular loop, I hope my two hours of troubleshooting will allow you to get to the solution faster than I did. Evil Emails and Browser Malwareby Robert Elphick, MAGIC* Another selection of emails that are up to no good and browser messages that are crooked. Never click on anything in an email that is even only slightly suspicious. Macs are only vulnerable to malware that you invite in by clicking on the links or zip files in these emails. So don't touch them! 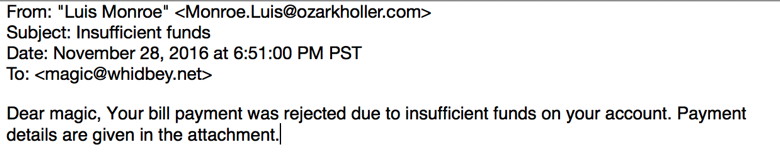
 A look at the address for this one tell you it is NOT from Apple Scary though, right? 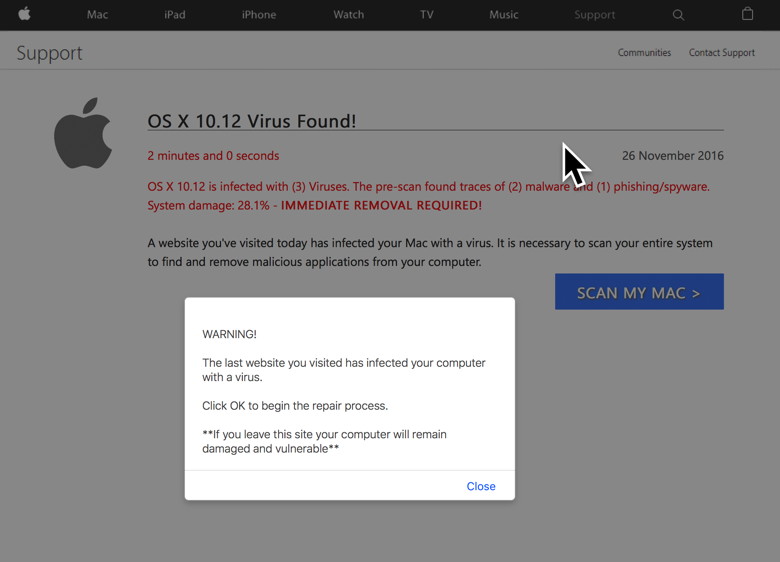 Wow! They went to a lot of effort to make this look like it is from Apple - it is not! 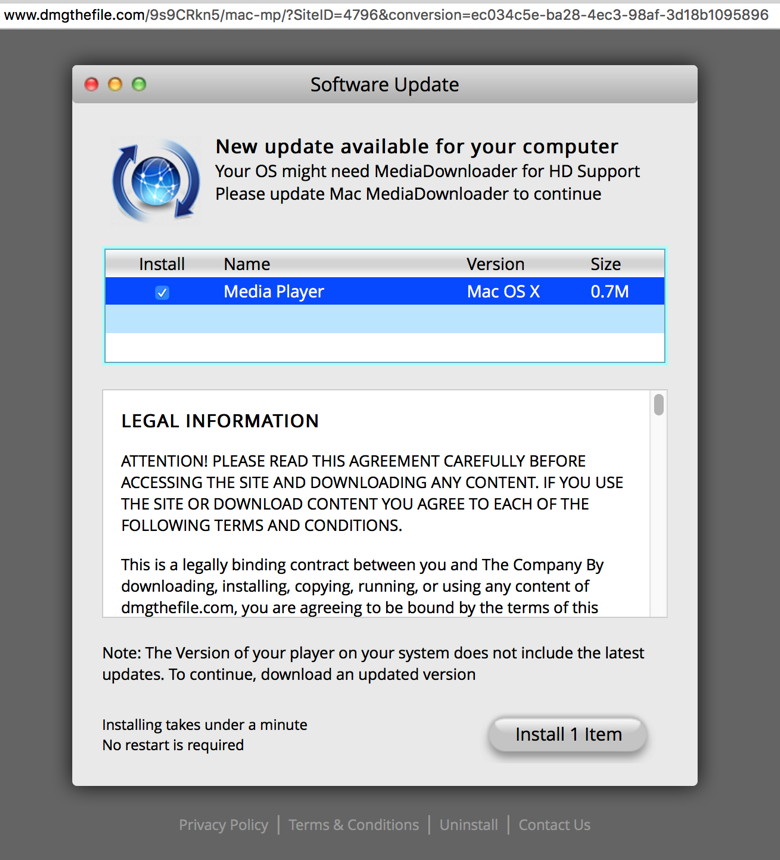 Again, the URL address is a give away. Staying out of trouble *by Robert Elphick, MAGIC* After reading the two previous articles you might want to be sure that you have these three applications in case of problems.

Playing your iTunes music in your carby Ron Sharp, MAGIC* 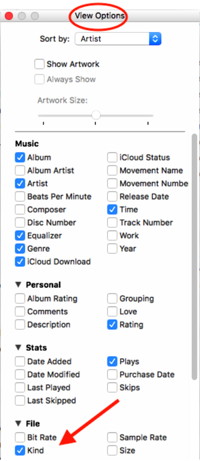
Hey, I'm finally driving a car with a good stereo in it. No more cassette tapes. My choices now, besides radio, are CD's and USB. However, CD's seem old style also, you still have to haul around the CD's and there is most often not a good place to store them in your car. But using a usb flash memory is really the way to go. A 16 GB usb flash drive will only cost about $12 and will hold more than my entire iTunes library which is over 2000 songs and more than 6 days of continuous playing time. So far I've only put about 40 songs on a drive to try it. I have run into a few hangups. So here are some tips to make your process a breeze. First you have to have a drive that is formatted to your radio specifications which is most often the format called fat32. Any drive you buy can be reformatted using the Disk Utility app on your Mac. Just put your drive in your computer, open the Disk utility app (in the Utilities Folder), select the usb drive in the left column and the app will show the title of the drive and it's format is listed right below. If it's not fat32 then click the "Erase" button, give it a name and choose the fat32 option from the drop down menu. The next step is to check the format of your songs. Most radios require MP3 format and the default song format for iTunes is AAC. Here is an easy way to see your music format for each song. Click on "Songs" in the left column. Then from the "View" menu click "Show View Options." In that window select "Kind." Now there will be a column on the left that shows the format. If the songs you want to use for your car radio are not mp3, then here is the process to create an mp3 version. Actually it's not too difficult but the explanation may make it seem like a daunting task. Just hang in there. 
In iTunes, open iTunes Preferences. On the first tab, General, find and select "Import Settings." In the window that opens just select mp3. Now if you have music to import it will be in the correct format. The new songs will show in your "Recently Added" folder in iTunes. 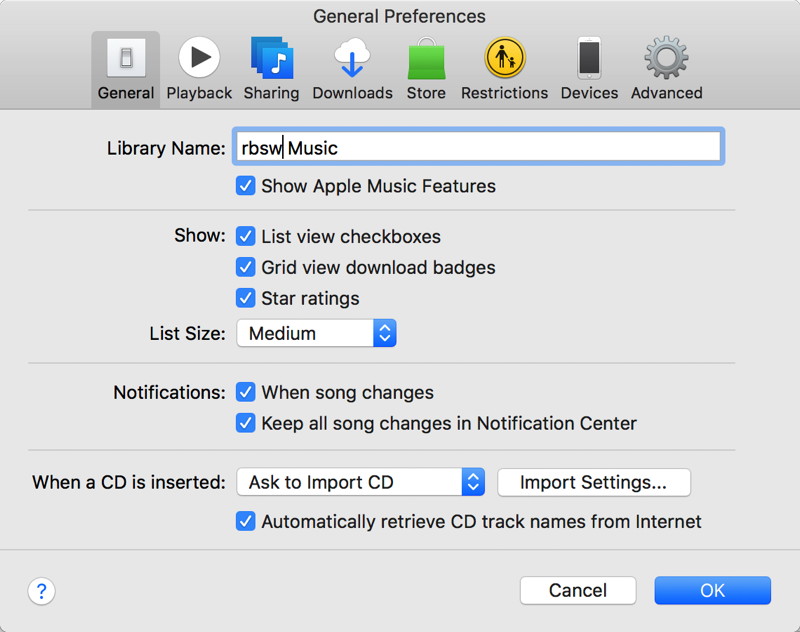
If the music you want is already in iTunes, then select the songs you want and in the "File" menu select "Convert" then click on mp3. Your songs will be duplicated as mp3 files. The only problem you might run into is that if one of your choices in a list is a "protected file" then the convert process will quit at that point and you'll have to start it again after each "protected" song you come to. What I did at this point was to create a Smart Album with the criteria that the "kind" "contains" "MPEG." It'll show all your mp3 music in one place. Now you can simply drag songs from iTunes to your usb drive in the finder window or icon on the Desktop. At the risk of making this all more complicated, I have to mention another issue you may encounter. I have found that when playing the usb music on the car radio there are blank files that the display reads "Not compatible" or "Not Readable" or something similar. It seems there is a blank file for every song. Just skip past the blanks and the music plays fine. I am, however, still looking for a solution to this annoyance. 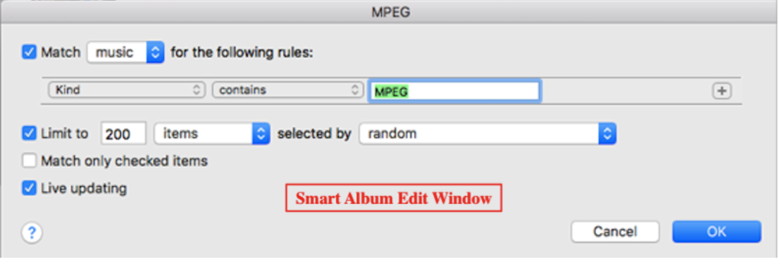
iPhotos versus Photosby Ron Sharp, MAGIC* Nothing stays the same. The best software is probably the ones that are easiest to transition to. Apple created photos to replace iPhoto to enable you to more easily work with your photos across all their devices. The first version of Photos was not up to par with iPhoto so it seems some people were reluctant to learn it. Here are some comparisons and tips how to use Photos. iPhoto: Sorted your pictures from downloads into Events. Let you short event photos by Title or Date and oldest first or newest first. Let you change the grayscale background of the viewer window light to dark. Tools were fairly intuitive Photos: Sorts your pictures in Years, Collections, and Moments. The collections is nearly the same as Events was. Photos only sorts by date. However, all the photos you import from iPhoto will still show as Events and will still sort by Title and Date. Grayscale background window brightness is not adjustable. ( My biggest complaint.) Some of the image editing tools are hidden and not viewable until you click on a button that is only visible when you scroll over it. Syncs with your iPhone, iPad and iPod Touch. Can stream images between devices and can share images with others with the same tools that your iOS devices use. Shows albums for Shared images, People, Places, and sorts Videos, Panoramas, and Screenshots in separate albums too. So if you don't own an iPhone or an iPad and don't care much about sharing then I'd say there is no reason not to use iPhoto. That is until a new operating system or computer model won't work with it any longer since it is not a supported app. Then what? If you're on the fence here, or have tried Photos but not particularly impressed, then read on. What you have to do is use Photos a little, and set it up the way you'd like. It's viewing and sorting options are variable. So first, familiarize yourself with the View menu. The big one is to Hide or Show the Sidebar. With the sidebar you'll see all your albums and project choices. If you choose to hide the Sidebar, then you can choose between, Photos, Memories, Albums, Projects, and Shared photos, and you'll see these choices as tabs at the top of the window. With the Photos Tab selected you see your photos as Years, Collections, or Moments, and use the arrows in the upper left corner of the window to move between them. Much like iOS. For sorting and finding photos, the automatic albums for People, Places, Videos, Panoramas, Screenshots, and Shared is an instant help. Next, you can of course create Albums of your own to sort further. You can use the search box to find photos by Title, Keyword, or Description. I feel the keyword option is under-utilized but a big help in finding images. Creating Smart Albums is another option in Photos and iPhoto. I can get more detailed about Smart Albums and Folders another time. 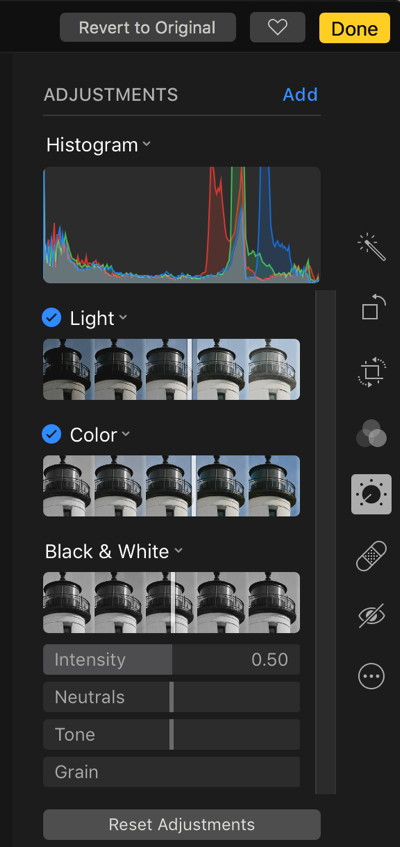
Here is my recommended method for using a photo app, which often is overstating the obvious. It's so easy to snap photos, -camera always with us and no film to worry about wasting. So as soon as you take a photo, or sit down to look at them, delete them. I mean save only the best ones and toss all the marginal ones. Then give them a title or keyword. Under the View menu, >Metadata you can choose to have Titles and Keywords show. Once you have used a keyword, then next instant you use it to label a photo, just type the first letter and it'll come up. I have a lot of pictures of Penn Cove, so that's one of my keywords. I type the P and it's there. After opening a picture just click on the info icon in the upper right corner to add a title or keyword. 
For editing photos, it's basically the same as iPhoto but a couple of the buttons are not so obvious. Once you click on the Edit Photo button, the menus will expand by clicking the little up or down arrow, but it's only visible when you scroll over it. Also, don't miss the Add button to see more adjustments. Use iCloud for syncing and sharing and backing up. With iCloud Photo Library turned on, your photos will be backed up to iCloud. If you have iOS devices, iPhone etc, you can choose to turn iCloud Photo Library on for each device that you want to sync your photos to. If you don't want your whole library backed up or syncing, you can use Photo Stream instead. For sharing, turn on iCloud Photo Sharing. You can create albums to invite friends and family to share. For more information about iCloud see iCloud, a summary of what you need to know. One of the advantages of iCloud is that you can see all your photos on any of your devices even though they don't have the storage space on their own. Photos, as with iPhoto, gives you projects for Slideshows, Books, Cards, and Calendars. But another feature of Photos is Memories. It'll group a few pictures of the last three months for you. And the slideshow feature is easy and convenient in Photos. For instance, in the Years view if you click on a photo it takes you to that section, Collections. But if you click on the little arrow next to the year, you'll get a page of Memories. And on that page, simply click the arrow Play button in the top menu and your slideshow for that year will start. It's kind of amazing to see how much you did in one year. So that'll get you started with Photos. As usual, it's more difficult to visualize the functions when reading than when doing. Easy Browsingby Ron Sharp, MAGIC* Here's a couple reminders for easier browsing. When on a webpage with Safari, if you see the little lines at the left edge of the search/URL box, then clicking it will give you the text article without the ads and other distracting media. I find it realy helpful and appreciate the option. Also, if you open a webpage that starts playing sound automatically, clicking the little speaker image on the right end of the search/URL box will mute it. You don't have to even have that tab open, just look for the speaker image and click it.  Show Reader View with Safari browser.  Mute sound from a webpage with Safari  Enter Reader View with Firefox browser. MAGIC, the Macintosh Appreciation Group of Island County, serves people who use Macintosh computers, software and peripherals. Our goal is to share information and get answers to questions to make us more productive with our use of technology. Our monthly meetings give us a chance to discuss computer problems and share ideas with other Mac users, feature speakers on specific topics, and to keep apprised of Apple news. |