In This Issue:

Meeting information
Remember to bring your used ink cartridges for recycling. Thank you to Paul Morris who collects and ships the empties. MAGIC is rewarded with a check for our efforts. Minutes of the Meeting - September, 2019The meeting was called to order by Robert Elphick at 4:00 with about 21 in attendance. The September meeting of MAGIC was held at the Freeland Unitarian Congregation Meeting House from 4:05 to 6 PM. There were about 29 people in attendance. In the absence of our Wizard Robert Elphick, Assistant Wizard, Ron Sharp called the meeting to order at 4:00. PHOTOS PRESENTATION By Ron Sharp Using the Photos App Version 4.0, on Mac OS, and Photos App on iOS Apple's photos started out with iPhoto, which was a great program. When iOS started up, Apple wanted to keep the mac compatible with the iPhone and iPad. The early version of Photos was missing a lot of what we all knew and loved on iPhoto, but in the last couple years Photos has improved into a pretty good product. In early Photos app you couldn't change the background color to dark mode, where all the windows have black backgrounds. Today there are a couple of tricks to get the background dark. If you use FULL SCREEN if you show Tool Bar the white background comes back. But by deselecting Tool Bar and using Full Screen, you'll see the black background. On the left column of the Photos window, you can see the list of folders, albums, media types, projects, etc. My Albums (ones you've created), and iPhoto Events (have been copied over from the old iPhoto Events). Clicking on Photos at the top of the left column, you get four tabs: Photos, Moments, Collections, and Years. (Live Photos give you three seconds of action/video. You can turn this on and off on your iPhone. Note: this takes up a lot of memory if you always keep Live photos on.) You have the option on your phone to do Panoramas. Burst photos are a set of three photos the camera takes, and you can choose the best one. (It's called HDR High Dynamic Range. If your image has a lot of contrast it will give you 3 choices. You can keep the one you like best.) Shared Albums - are an iCloud feature that you can invite other people on iCloud to share and subscribe to these albums. The button on the top right looks like a portrait, and here you can add people to your list. People with non-Apple products can't be added to the album, but they can go to the Public option.To add photos to this set you can select certain photos and choose "Add to Shared Album". There is a little text bubble that people can click on and type in messages/comments about the shared photo. (Go to Photos> Preferences> iCloud and click on Shared Albums.) Photos can be selected in the normal way, holding SHIFT key to select contiguous photos, or COMMAND key to select non contiguous photos, etc. Photos Side Column: If you move your mouse up and down the blank right side of the left column, there are some hidden buttons that will be activated by your mouse. These appear as "Hide" and "show" and also a plus sign to add to an album. Use these to hide certain items, or add items, as you click on the + . To get titles to show up in the array of photos go the VIEW menu> Metadata> Show titles. You can also show keywords in Metadata, and a little tag symbol will show up in a corner of the image. These keywords and titles are labels you give to your image. When photos have been labeled you can quickly find them, or use their labels to create various albums with similar tags. A SMART ALBUM is an album you create with certain conditions. If you give a set of albums or pictures a keyword, such as Presentation, and then you can create a smart album including these similarly labeled photos. When you create a smart album titled "Presentation," that album will contain every photo with the label of Presentation. You can give your images as many keywords as you wish. Smart albums are signified with a gear-shaped icon. You can keep adding or changing conditions for a given Smart Album and your group of photos in that smart album will reflect that change. Check to see that you've chosen that it meets ALL or ANY of the conditions. To add a title or keyword or other data to your photo, click once to select a photo, and Get Info (command-I). When the info window appears you can add a title, keyword, or description. You can also get to this window from the top menu bar info button, which is a circle with a small letter "i" inside. To remove an image from an album, you can delete its key word, and the photo is no longer in the smart album. Or you can also use the left click button on your mouse to delete it. On the right side of the top menu bar you will find several Action buttons. First is the Info button (explained above) for getting Info on the item. Next is the Share icon, which allows you to share or email your item. The third button is a HEART, which puts the image into your favorites album. Fourth button is a Rotate button. The last is Search field which will find any images with labels, titles, keywords, etc. you've previously entered. TO EDIT PHOTOS: If you double click on a photo, now you will see an Enhance button, which automatically makes "logical" changes to your photo. You may or may not like what the computer thinks is a good enhancement. If not click on the Edit button and you will get a whole new right column of editing choices for changing the color, the brightness, the white balance, etc., of the image. Under many of these choices is an array of sub-choices. The CROP button at the top of the window also allows you to level the image, such as if the horizon is crooked. It will even try to do so automatically. Down the right column under EDIT there are what looks like thousands of editing choices. Any time a photo has been changed there is a blue button to indicate a change has ben made. When you click DONE it will save all the changes you've made, but at the bottom is a button called RESET ADJUSTMENTS. You can also make a copy of your original before doing adjustments on the copy. Or you can use the REVERT TO ORIGINAL button on the top menu bar to get back to the original photo, which you can always do. You can select a color in the photo and play with the saturation of just that color in the photo. Retouch: Click on a blank area and then drag the selector over an item you don't want to "erase" it. To eliminate spots that are too bright, you can EDIT and change brightness, or you can also select Vignette and then soften the bright corners. For importing images from elsewhere on your computer: Click on File>Import, which will give you a window where you can navigate around your computer files and select a picture to import into Photos. Using CREATE (under the Photos File menu) gives you a selection of: books, cards, calendar, slide show and more. Selecting one of these takes you to the App store where you have to go to get this capability. To play a SLIDESHOW on your computer screen, first select an album or a group of photos. Then go to File>Play Slideshow where you will be given a choice of the effects you want, as well as your choice of music. Then you can Play the slide show. You can also save the slideshow. Your photos are stored in your Photos library in the "Pictures" folder of the Home folder. If you have too many photos it will slow everything down and so you can create more than one photo library. NOTE: Only the main Photos Library will work with any iCloud option. Photos on the iPhone or iPad On the bottom of your photos window, there is a row of several options: Photos, Albums, For You, and SEARCH. (In the PHOTOS mode, if you click on the back arrow you will see a larger range of time, weeks, months, years, etc. and if you keep clicking on the back arrow you will keep getting longer ranges of time. Use the "Albums" button to view all your albums including the main Camera roll Album. The Search button will automatically recognize certain images, and typing in a search term may narrow down the results. You cannot add a keyword or title to your phone images. If you select a photo on your phone, you get similar editing choices as those on the Mac. If you click on the MORE button (3 dots in a circle) you'll get more editing choices. One of the MORE choices you get marker tools and colors in many choices so you can add words and shapes to your photo. BUSINESS MEETING TREASURER: We currently have $8062.66 in our account. OTHER BUSINESS: We will be offering an iOS iPhone/iPad class in November 2019. Next month's program is replacing iTunes because with the next Operating System iTunes is about to be broken into 3 parts. IOS13 is coming out next month. It will be compatible back to iPhone 6. A new OS called Catalina will be available in October. Check with your System Information>Software>Applications. It will run on any computer from 2012 and newer. At the end Ron played 4 minutes of a video from the Apple event on September 10th. It was about the amazing Apple Watch and how it can monitor heart rate and possibly save lives. QUESTIONS AND ANSWERS Many questions were asked and answered during Ron's presentation. The last part of the second hour was devoted to Q&A Q: I've downloaded photos from Facebook to my Pictures folder. How do I get them in Photos? A: Select the photo desired and drag it to the Photos app and now it will be there. If you have photos on your phone, and you don't use iCloud, you can plug your phone into your computer. The phone will show up on the left column. Select the photos you wish to import from your phone. Q: How can I use LOCATIONS on the Photos app? A: Click on an image, and then PLACES. it will show a map and indicate where the photo was taken. Q: How can I get my photos uploaded to the COSTCO website for printing? A: This is really two steps: You have to export the photo from the Photos app then upload it to the website you want. First, you can create a new folder to use for images to send. You can put the new folder on your Desktop or in Documents or wherever your want. Then select the image in the Photos app and click on >FILE MENU> and Export it to your new folder. Then when you are on the Costco website, choose that folder and upload from there. Q: What is the difference between a folder an album and a file. A: A file is an individual item, such as a photograph or a document; a folder will hold a group of files, an album is kind of like a folder, but it holds images or photos. Q: How do you do a slide show on your phone? A: Select the images you want, click on the "Share" button and then select "Slideshow." Q: I have 3 different hard drives, and some of my photos are on them. A: Open the photos app on your computer, Click on IMPORT and select the photos you want and click the import button on that window. It will ask import duplicates? Say NO.(Perhaps we need to do a class on retrieving data from backup drive.) Q: I Found a flash drive in some of my papers. A woman was looking around for it last spring at a MAGIC meeting. Trying to find the owner of the flash drive A: We'll put an announcement in the newsletter. Q: Can you break up an image from a photo? I want it into 4 parts. A: Not that I know of. Penny Holland made a comment regarding a COMPUTER SCAM she almost fell for. She got an email from a friend asking for a "favor." It sounded suspicious, but she checked the email address and it was the correct one for the friend. She wrote him back from her own address book being careful not to simply REPLYING to the email. "He" responded and said he was traveling and asked her if she would mind buying $200 worth of Amazon gift cards he wanted to give to his cousin. Penny wrote back and asked how she should get them to his cousin. HE instructed her to scratch off the back of the card and take a photo of the i.d. number and email that to him. When things started to sound fishy, she called the friend who was actually home, and not out on the road. He had just learned from his daughter about the scam. There are other such scams going around. One is that these bad guys can now get hold of your TEXT messages and make it sound like a friend is texting you. Another scam was done by a person who somehow was able to create a clone of a person's FaceBook Page. All sorts of things were being said that were NOT recommended or liked by the actual person. If you think something sounds a little phony, it probably is. Call and speak to the actual person. If you can't do that, then text or email or facebook back with a question that only the REAL person can answer, such as "What is your firstborn's name and where did that take place?" When the friend did this on the Facebook page, he got an answer of LOL! They notified Facebook of the scam and within the day the fake FB page was deleted. Be safe and be careful. There are a LOT of scammers out there these days - your computer, your iphone, your landline phone. Nothing is truly secure! The meeting was adjourned at 5:45. Respectfully Submitted, Penny Holland, Secretary MAGIC MomentsMAGIC Classes for 2019We have arranged for iPad/iPhone classes to be held November 5, 6, and 7 2019. Details and an application can be found on the Education page of this website. Any member wishing to see us provide any other classes should contact us at 
Note: This Software Update section of the newsletter lists the most relevant Apple updates. Not all updates are listed for all products. Additionally, I'll add other pertinent updates on occasion. Apple releases security update for iOS 12, macOS Mojave, High Sierra, and Sierraby Roman Loyola, macworld Apple has released a security update for iOS 12 and macOS Mojave, High Sierra and Sierra. According to the release notes for the Mac and iOS, the update is described as follows: Impact: A remote attacker may be able to cause unexpected application termination or arbitrary code execution Description: An out-of-bounds read was addressed with improved input validation. The update is for iOS 12 devices that cannot upgrade to iOS 13, macOS Mojave 10.14.6, macOS High Sierra 10.13.6, and macOS Sierra 10.12.6. How to install the iOS 12.4.2 update Back up your device first. You also need an internet connection. Open the Settings app and tap on General. Then tap Software Update. The device will check for the update and once it is found you can tap Download and Install to proceed. How to install the update on a Mac Before installing any operating system update, it's a good idea to back up your Mac. The download and installation will take several minutes. When you're ready to install the update, click on the Apple menu and select About This Mac. Then click on the Software Update button. On Mojave, the Software Update system preference will open and look for the update. Once it's located, you can proceed with the installation. On High Sierra and Sierra, the App Store app will launch and it will look for the update. The update will appear in the Updates section. 
Hands-on with four helpful USB-C accessories for Mac usersby Miles Somerville, 9to5mac 
Trying to work with USB-C/Thunderbolt devices like the MacBook Pro or iPad Mini can typically require dongles to use accessories you use fairly often. Here are four of my favorite current USB-C accessories that obviously don't require an adapter to use, and are well-valued accessories. Watch our hands-on video to see each of these products in use. JTC425 wooden monitor stand The first item in no particular order is the JTC425 wooden monitor stand from j5Create. It's an 8-in-1 type-C docking station that's perfect to use with something like a MacBook Air or Pro. The port selection includes 5 USB 3.0 Type-A ports, 3 USB-C ports, and a HDMI port that supports 4K UHD up to 30 Hz. One of the Type-C ports has support for power delivery 3.0, allowing it to charge your MacBook while it's in use. Continue reading and see video.... How to Change the Default Search Engine in Safari for Mac OS Xby Jim Tanous, techjunkie 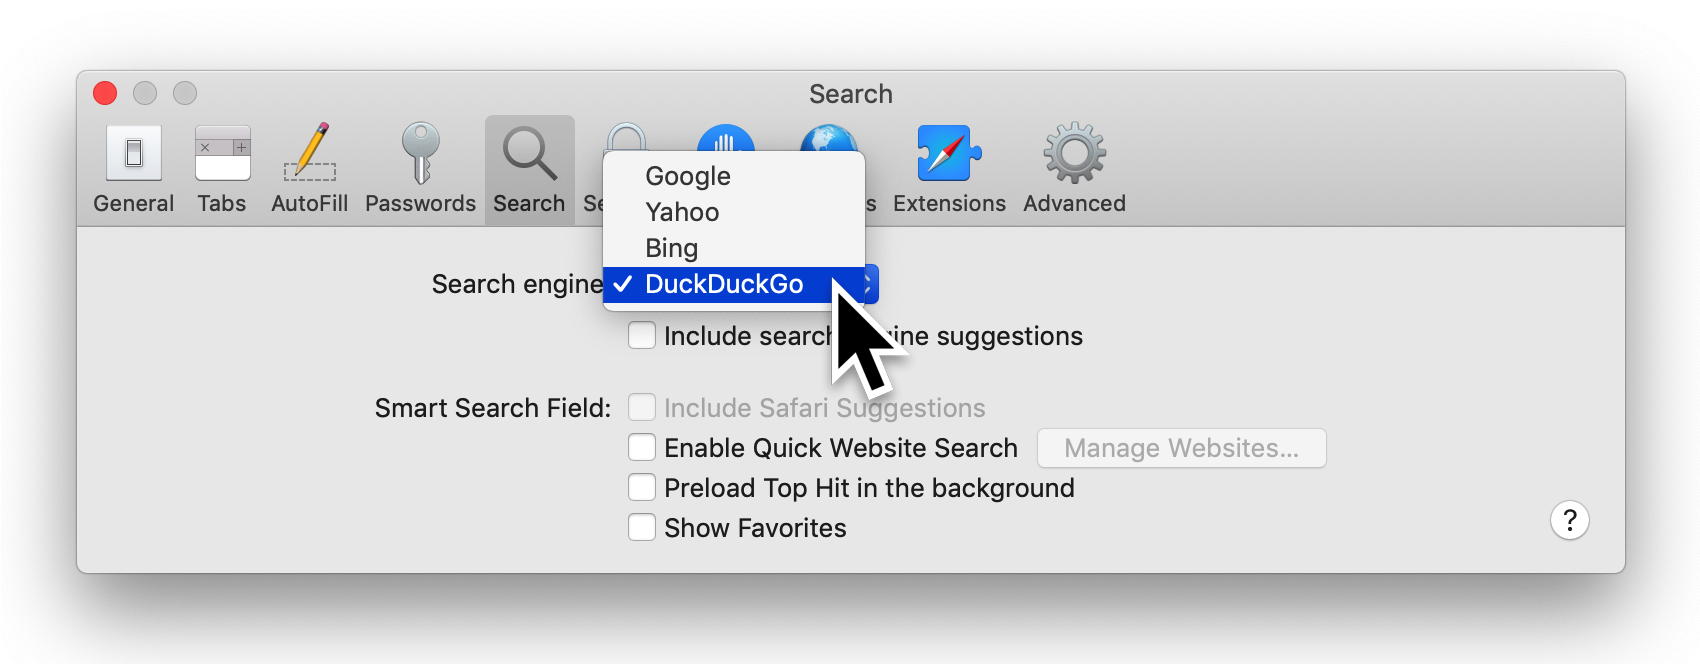
Google is the largest and most popular search engine, so it makes sense that Apple has long included Google as the default search engine in Safari. But Google isn't a perfect search engine, and concerns over the company's data gathering practices have led many macOS users to seek alternative search engines that do a better job of protecting user's privacy such as DuckDuckGo. For those who would like the default search engine on Safari be something other than Google, one solution is to simply navigate to the alternative search engine's website, but this approach lacks the convenience of quickly performing a Web search directly from the Safari address bar. If you've changed from Google to another search engine at some point, you may just want to change your default search engine on Safari back to Google. Thankfully, you can change your default search engine in Safari, making quick and convenient searches with your search engine of choice. HOW DO I CHANGE MY DEFAULT SEARCH ENGINE IN SAFARI ON MAC?
Simply select your desired search engine from the drop-down list to make it the default for Safari on your Mac. There's no need to restart Safari or reboot your Mac; the change takes effect as soon as you make your selection. You can now search the web more conveniently using your favorite search engine, though fans of search engines not mentioned above may be disappointed. Apple currently provides no end-user option for making Safari's default search engine anything other than the four options above: Google, Yahoo, Bing, and DuckDuckGo. If you are using an older version of Mac OSX, then the list of default engines is limited to three choices. Users looking for ease-of-access to alternative search engines will have to turn to Safari Extensions, or possibly use another web browser. Oprah's Book Club starts a new chapter with Applefrom apple newsroom 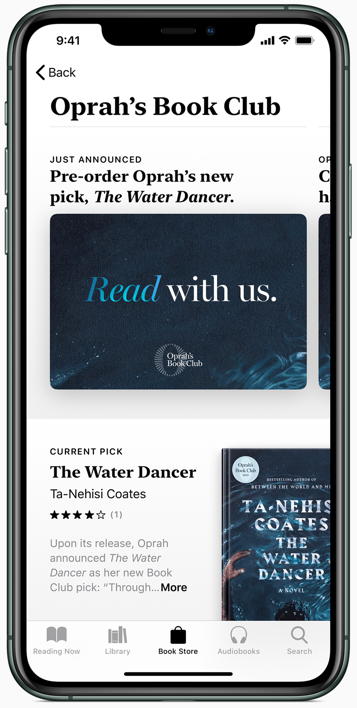
Powerful Stories to be Celebrated on Apple Books; First Author Interview Premieres Exclusively on Apple TV+ November 1 Oprah's Book Club screen in Apple Books on iPhone 11 Pro. Oprah's Book Club will connect readers around the world by celebrating selections on Apple Books and author interviews on Apple TV+. Cupertino, California — Apple and Oprah Winfrey today announced Oprah's Book Club will connect a community of readers worldwide to stories that truly matter by today's most thought-provoking authors. Winfrey, the esteemed producer, actress, talk show host, philanthropist and CEO of OWN, will partner with Apple to build a vibrant, global book club that has the power to both transport and transform people — turning every book into an opportunity for self-discovery, and bringing the world together through reading. Winfrey's first book selection is "The Water Dancer" by Ta-Nehisi Coates, available for pre-order now on Apple Books in both ebook and audiobook formats, and debuting tomorrow.1 Winfrey will interview Coates for the first installment of her new exclusive Apple TV+ series, "Oprah's Book Club," premiering November 1. A new episode will be available every two months. For every Oprah's Book Club selection sold on Apple Books, Apple will make a contribution to the American Library Association to support local libraries, fund programs that give access to everyone and create lifelong readers at an early age. Service Battery Warning on Mac - Do You Need to Replace the Battery?by Robert Hayes, techjunkie One of the most dreaded alerts a MacBook user can ever see is the one that says Service Battery. As with all laptop computers, the battery is one of the most critical and expensive components, and it is also a component that essentially cannot be serviced, which is ironic given the wording of the alert itself. When a lithium-ion battery is done, it's done, and either need to replace the battery or you need to keep your MacBook plugged in at all times, which kind of defeats the purpose of having a laptop in the first place. What exactly are your options when your MacBook returns the Service Battery warning? In this article, I will explain how the lithium-ion batteries in your MacBook work, how to get the best performance and longest life out of your battery, and I will give you some suggestions on ways to resolve the Service Battery alert that does not require you to pay a lot of money for a new battery pack. 
iPadOS 13: How to make iPad app icons and text biggerby Michael Potuck. 9to5mac 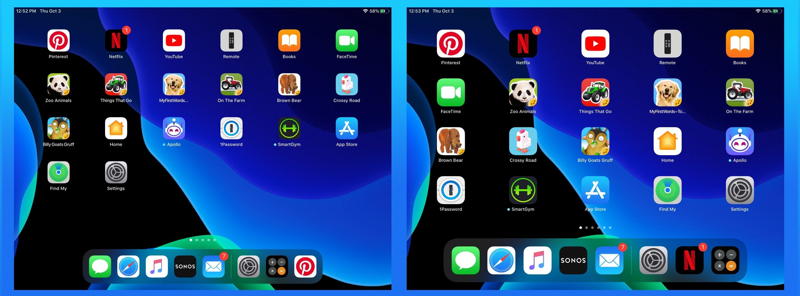
iPad has officially received its own operating system with the arrival of iPadOS 13. One of the many changes includes new Home screen layout options. Follow along for how to make iPad app icons and their text bigger. You can now fit more apps on the iPad Home screen than ever before. However, some might find the app icons and text becomes too small. There's an easy way to change the app grid to feature fewer apps that makes them bigger at the same time. This also makes the dock and its apps larger. You can also use the Bold Text setting to make apps' text even easier to read. iPadOS 13: How to make iPad app icons and text bigger
Here's how the process looks: 
Tap Bigger to enlarge the apps on your Home screen. You'll notice "Keep Today View…" will become grayed out when "Bigger" is chosen. 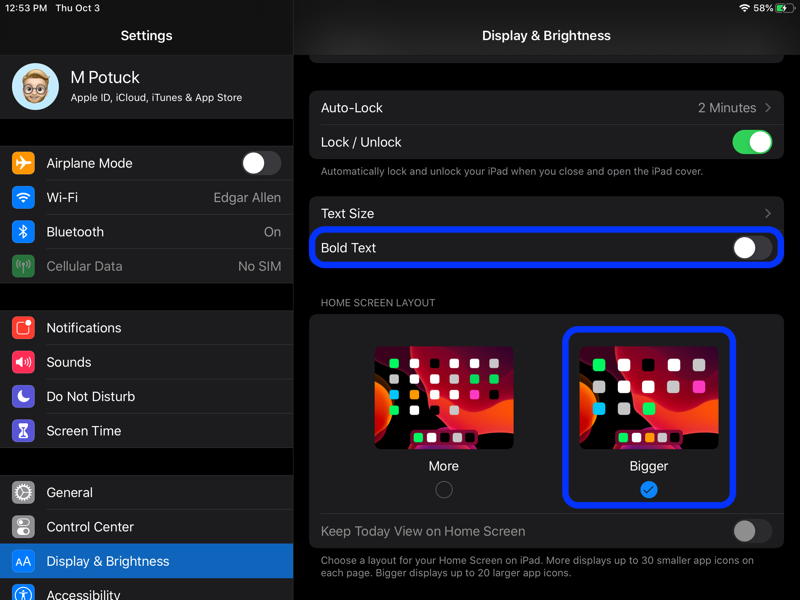
You can also make app icon text easier to read by tapping the toggle next to Bold Text. However, keep in mind that this will apply across the entire operating system. What Can You Store in Apple's Wallet App? Credit Cards, Boarding Passes, Tickets, and More!smalldog.com Have you wondered what you can do with the Wallet app on your iPhone? Although it started out life called Passbook, Apple soon realized that the only sensible name was Wallet. That's because it stores digital versions of roughly the same sort of things you might put in a physical wallet: credit and debit cards, store cards, membership cards, and even cash (well, Apple Pay Cash, anyway). 
Nearly all airlines can put your boarding passes in Wallet, too, and if you buy something like a concert ticket online, you may be able to add it to Wallet by tapping the "Add to Apple Wallet" button in the confirmation page or email. Having a boarding pass or ticket, which Apple calls a pass, in Wallet makes it easy to scan for a gate attendant. Here's how to use cards and passes in Wallet. Display Your Cards and Passes The main Wallet screen shows your cards and passes in a scrollable list, with credit/debit cards at the top. (If you've set up Apple Pay Cash, it's treated as a debit card.) To view more details about a card or pass, tap it. 
In the case of a credit/debit card, you see the face of the card and a list of its recent Apple Pay transactions. For boarding passes for multi-flight trips, you see a single pass in the main list, but after you tap it, you can swipe horizontally to display the pass for each leg of the trip. Membership cards, such as the ChargePoint card, may work like credit/debit cards in that you need to hold them near a reader to sign in. In each case, to access settings related to the card or pass, tap the black ••• button at the upper right. Adding and Using Credit and Debit Cards Adding a credit/debit card so it can work with Apple Pay starts with tapping the black + button at the upper right of the Wallet screen. From there, follow the prompts—you can scan your card with the camera instead of keying in the data. If you add more than one card, you'll want to specify which should be the default for Apple Pay. Go to Settings > Wallet & Apple Pay. Scroll down to Transaction Defaults, and tap Default Card. Tap the desired card. In Wallet, the default card appears with its full face showing, below your other credit/debit cards. 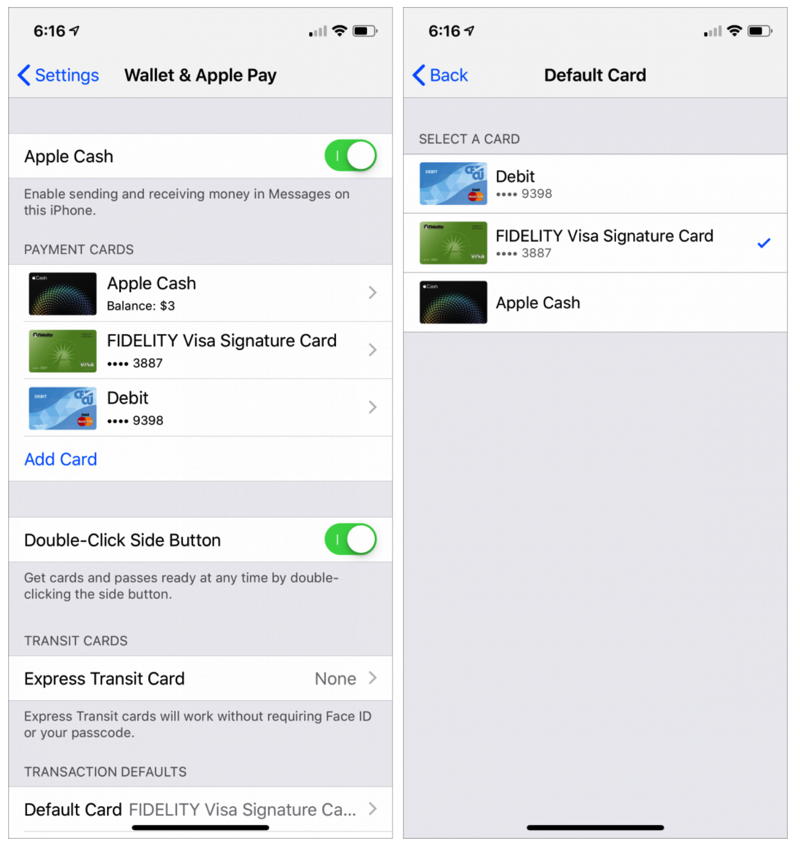
To pay for a purchase with a stored credit/debit card at a payment terminal, put your iPhone right next to the terminal. The iPhone may automatically prompt you to authenticate Apple Pay, but if not, double-click the Home button or, with the iPhone X, XR, XS, or XS Max, double-click the side button. Wallet displays your default card. To authenticate, rest your finger on the Home button or, with the iPhone X models, authenticate with Face ID. To use a non-default card, tap the card pile at the bottom of the screen and then tap the desired card. Adding and Using Airplane Boarding Passes and Event Tickets For flights, when you check in and get boarding passes using the airline's iPhone app, you'll be given the opportunity to tap an Add to Apple Wallet button. Do that and the boarding pass appears in Wallet, which will also display a notification for it on the Lock screen in the hours before your flight. When you need to show the boarding pass to security or the gate attendant, tap that notification to display the boarding pass with its QR code. 
For events, the ticket-seller may display the Add to Apple Wallet button on the confirmation page of the checkout process or attach the tickets to your email receipt. In the latter case, open the message in Mail and tap the attachment to open it, and then tap Add to put it into Wallet. Later, when you arrive at the venue, open Wallet and display the ticket—again with a QR code—to gain entry. 
Deleting Cards and Passes Although you may want to keep some digital tickets for nostalgic reasons, it's best to clean out old items:

iPhone 11 Pro Max: The best gets even betterby Leander Kahney, cultofmac This thing is a beauty. The first thing you notice is the glass back. The frosted matte finish makes it semi-translucent, giving it a weirdly illusory depth. It looks great. Not even the controversial, compound-eye camera bump can spoil its good looks. The iPhone 11 Pro Max is the best-looking iPhone to date, and I love it. But don't be fooled by the familiar design. This year's refresh makes almost everything about Apple's most expensive handset better than ever. It's faster, stronger and more water-resistant. It packs the best display you'll find in a phone, and the best camera you've ever used. The battery lasts forever. Is it worth its hefty price tag? Absolutely. 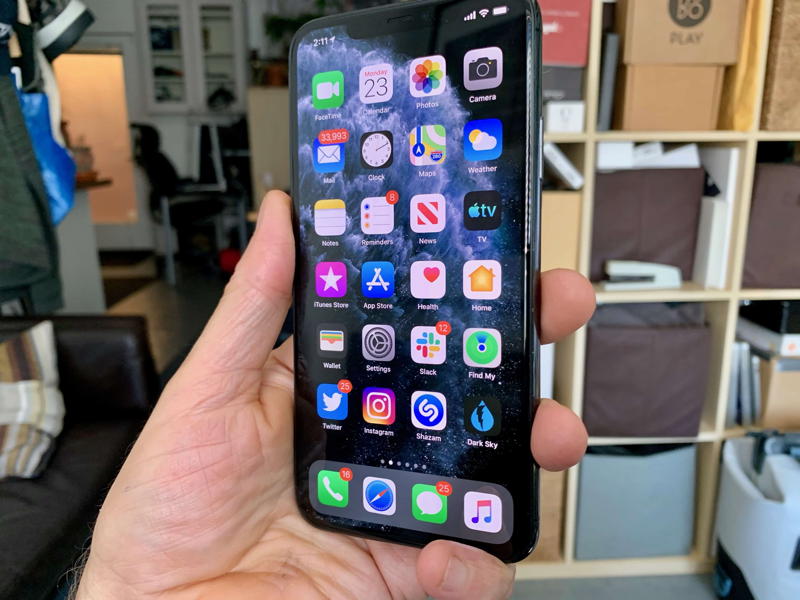
Unlike the entry-level iPhone 11, which got a welcome price cut, the 11 Pro Max costs the same as its predecessor. You'll pay $1,099 for the 64GB model, $1,249 for the 256GB model or $1,449 for the 512GB model. Those prices didn't seem to hold back iPhone XS Max last year; it didn't sell as well as iPhone XR, but it proved incredibly popular. And now you get a whole lot more for your money. Brilliant design made even better 
iPhone's design changed only slightly this year, and we're OK with that. The few changes Apple made are mostly nice improvements to what we considered an already excellent design. The 11 Pro Max is more water-resistant than its predecessors, and it's tougher, thanks to what Apple says is the strongest glass ever used in a smartphone. Its rear panel also has a matte finish now, which looks fantastic, especially in space gray. It may be my favorite case material so far. That finish doesn't add substantial grip, unfortunately, so you probably still will want a case. If only I had the guts to go case-less! But it's glass! I daren't risk it! But it looks terrific, and it's not a fingerprint magnet like the shiny glass we got before. The Apple logo on the back of this year's iPhone lineup is now perfectly centered, and the iPhone branding has disappeared. In fact, you won't find any writing anywhere on the 11 Pro Max. What you need to know about Dark Mode on iOS 13by Buster Hein, cultofmac 
The iPhone finally joined the dark side with the new Dark Mode feature introduced in iOS 13. Apple delighted fans who have been clamoring for the feature for years — and it appears the wait has been worth it. After using Dark Mode, I don't think I'll be going back to the bright white iOS interface anytime soon. Apple poured a bunch of thought into Dark Mode so that it does more than just make everything black. Dark Mode takes over every pixel of the iPhone and iPad display with a beautiful dark color scheme. It's perfect for low-light environments. Plus, it's easier on your eyes. Apple loves Dark Mode so much that every single photo on its iOS 13 preview page is dark. All the other software updates have very bright pages. Needless to say, Dark Mode is probably going to be the biggest new iPhone feature of 2019. There are a couple tricks you should know about using it, though. How to use the amazing new text tools in iPadOSby Andrew O'Hara, appleinsider In iOS 13 and iPadOS, Apple rejigged the text-selection engine and the cut/copy/paste tools. And they're amazing. For the last 10 years, selecting and manipulating text has been a frustrating nightmare on the iPad. Try to select a couple of words in Safari, for instance — a package delivery tracking number, for instance — and the selection would bounce back and forth between a few characters and the entire page. It was enough to drive you back to the comfort of the Mac's mouse pointer. In iOS 13, though, this all changes. Text selection is accurate and predictable. And the new copy/paste gesture shortcuts become second nature almost immediately. How to select text in iOS 13 and iPadOS: the cursor First, let's talk about the text-insertion point, aka cursor. Previously you'd have to tap, and then hold on the text to activate the cursor. Then you'd have to drag it around inside a movable magnifying glass. It was a pain, adding a delay to every text interaction. Clearly it was built with the then-small iPhone screen in mind, and with the idea that you would only use it rarely. 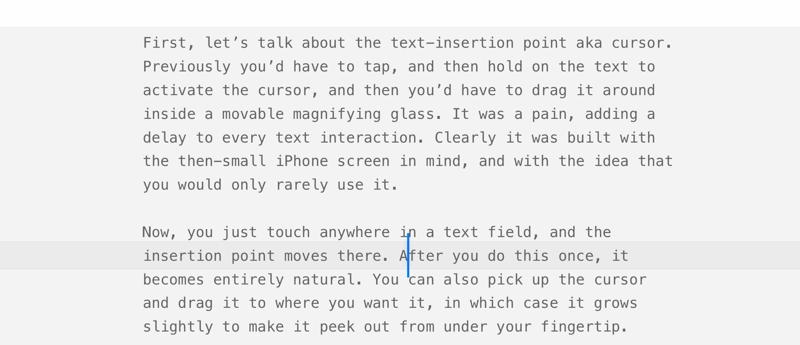 The text insertion point grows when you drag it.. Photo: Cult of Mac Now, you just touch anywhere in a text field, and the insertion point moves there. After you do this once, it becomes entirely natural. You can also pick up the cursor and drag it to where you want it, in which case it grows slightly to make it peek out from under your fingertip. Most important, though, is that this is accurate. The insertion point ends up exactly where you want it, first time. It's ironic that iOS just added mouse support while simultaneously adding gestures that are actually better than using a mouse. Text selection The excellence continues when you select words, parts of words, sentences and paragraphs. Double-tapping a word selects it. Triple-tapping selects a sentence, including the space after the period. And quadruple-tapping selects the entire paragraph. Text selections in iOS 13 are also way more accurate. No more struggling to force iOS to select the two words you want to copy. It just works. I can't tell you how much better it is, both for heavy use and for the odd time you need to grab a single word. So far, I've been talking about text inside a text field, like in a Pages document or a Ulysses sheet1. By "text field," I mean an active text panel that you're typing into, one where the keyboard is also on-screen. Text selection works differently on "non-active" text: text in a PDF or in a Safari web page. In this case, you must long-press on a word to select it. It seems snappier than in previous versions of iOS. Once you've selected a word, you can drag the text-selection handles as before. It works just as well as it does in an active text field. iOS 13 text selection: Copy, paste and undo The other big change in iOS 13 is the new gestures for copy, paste and undo. These work the same everywhere. With text selected, pinch in with three fingers. Or, more likely, two fingers and a thumb. This natural-feeling gesture "grabs" the text. To paste, reverse the gesture, pinching out. These are excellent gestures. They, too, feel natural after a few tries. It feels odd doing such a big gesture over text you just spent time selecting, but it Just Works™. A little label pops up to tell you what you've done, as in this screenshot: 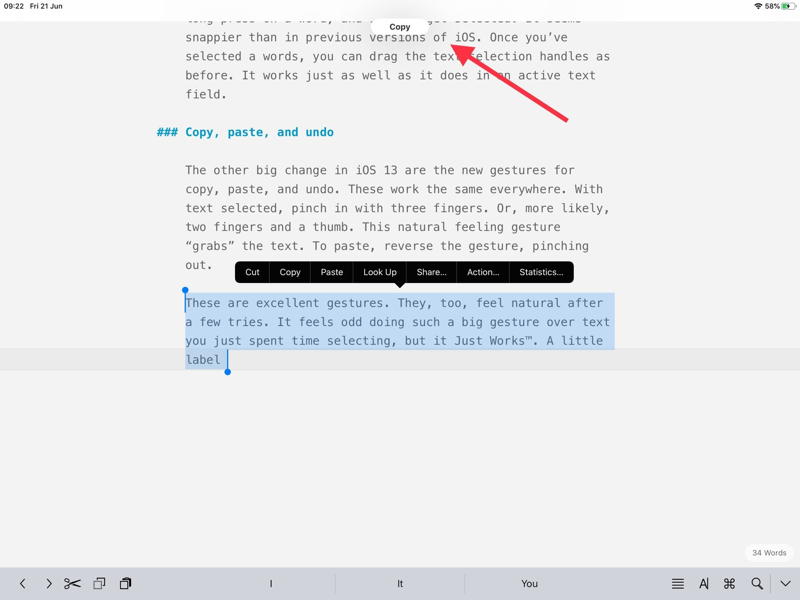 Finally, this just works. Photo: Cult of Mac Undo is equally easy. Just swipe left with three fingers to undo, and swipe right to redo. The undo gesture feels like you're brushing away something from the screen, which is an apt metaphor. The undo gesture can interfere with some other gestures, though. For instance, playing chords in GarageBand, and then moving with your three fingers still on screen, can result in deleting an entire audio track. iOS 13 text tools: Not just for power users Some folks might complain that these gestures are not discoverable, and will be missed by most users. To which one might reply, "So what?" The old-style popover bubbles still work, so people can struggle along the old way. The idea that everything has to be discoverable, and used by a majority of iOS owners, is the kind of thinking that got us into this mess in the first place. iOS has been very weak on powerful features, held back by a need to make everything easy for a majority to discover. I'm happy that the iPad finally diverges from the iPhone with today's launch of iPadOS 13. The inclusion of ever-more-powerful keyboard shortcuts, along with these new gestures, doesn't affect "casual" users at all. On the Mac, you can choose ⌘-C to copy, or you can mouse up to the menu bar and find the command there. Now a similar choice is available on the iPad. The new text tools, then, are excellent. They might be one of the most important updates in iOS 13 for many people. You're going to love them. How to use the ultra wide camera on iPhone 11 and iPhone 11 Proby Michael Potuck. 9to5mac 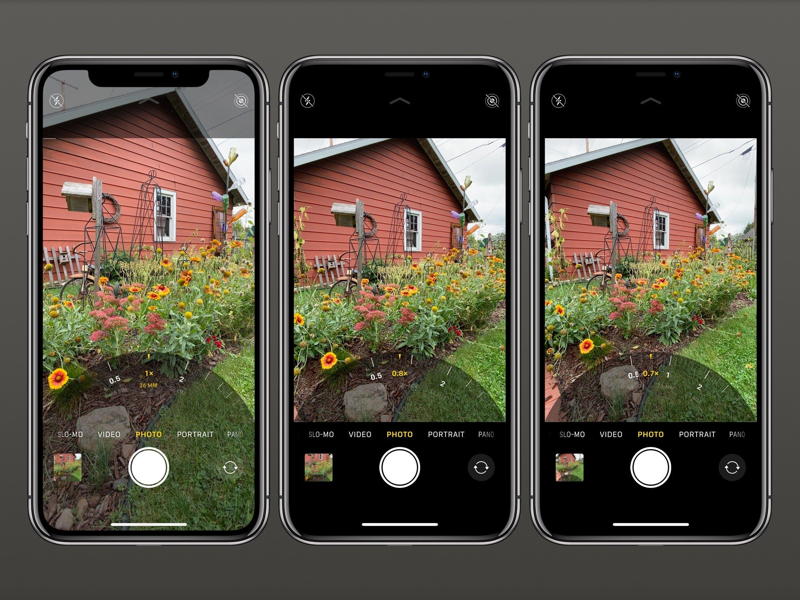 One of the great new additions with the iPhone 11 lineup is an ultra wide camera that allows users to capture a much greater field of view without needing an external lens. Read on for how to use the ultra wide camera on the iPhone 11 and iPhone 11 Pro, including how to manually dial in your focal length. The iPhone 11 and iPhone 11 Pro have a new Camera app that includes exclusive features like Night mode, a fresh interface to make use of the new ultra wide lens, and more. One thing to keep in mind about the ultra wide camera on the iPhone 11 and iPhone 11 Pro is that it doesn't have optical image stabilization (OIS) built in like the wide and telephoto cameras. So the steadier you can hold your iPhone when using the ultra wide lens, the better results you'll get. Also, Night mode doesn't work with the ultra wide camera. As for specs, the ultra wide camera on the latest iPhones has a 120-degree field of view, an f2.4 aperture, and a 5-element lens. For deeper dives on Night mode on all that's new with the iPhone 11 and 11 Pro camera systems, be sure to check out:
How to use the ultra wide camera on iPhone 11 and iPhone 11 Pro
Here's how using the ultra wide camera looks on the iPhone 11 and 11 Pro: 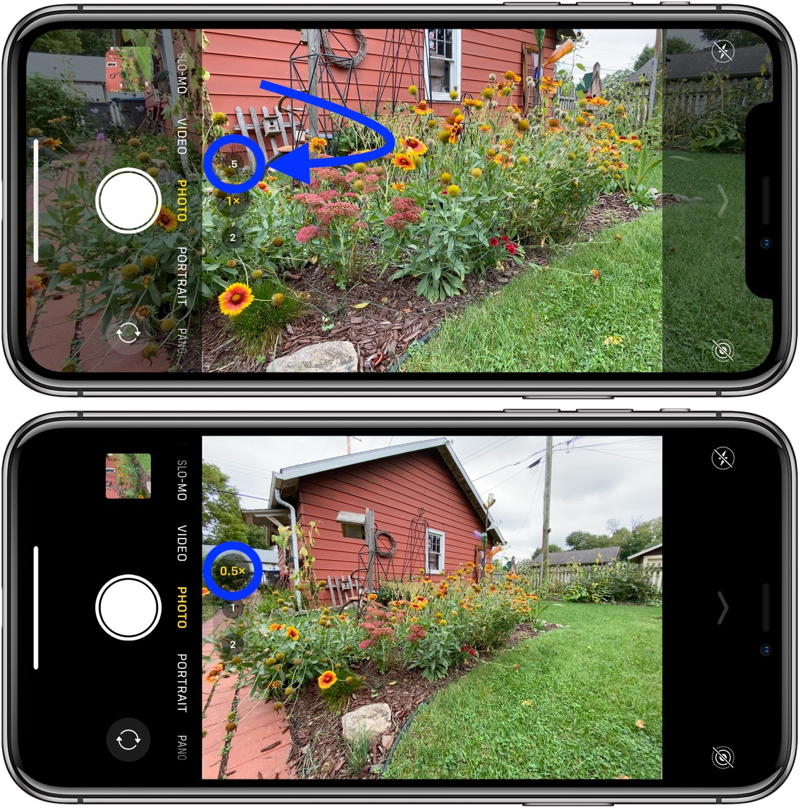 If you'd like to fine-tune the focal length for your shot, press and hold one of the zoom buttons and slide it up or down as shown below. 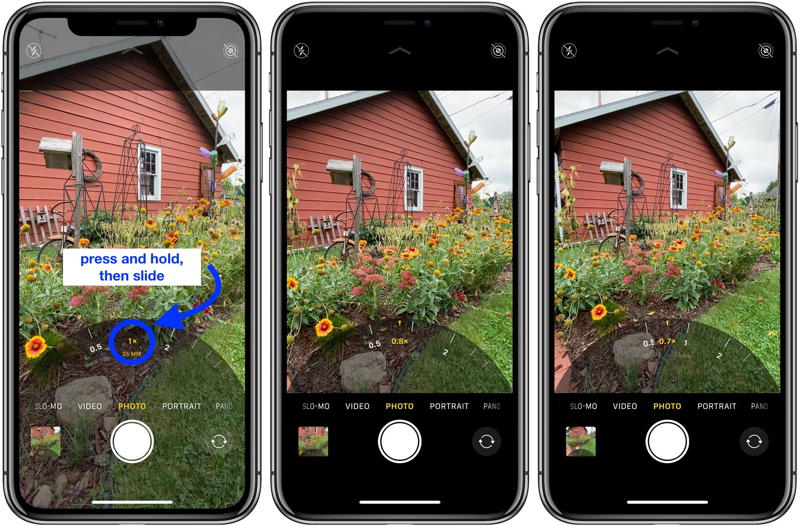 There's a New Simple Swipe to Undo Typing on Your iPhoneby Jake Peterson, gadgethacks Remember when typing without physical keys seemed ridiculous? Now, touch typing is the smartphone norm. That said, mistakes are inevitable on small screens. So before you start hammering on that delete key or shaking your iPhone like a madman, know that there's a better way to undo text you didn't mean to type — no shaking involved. The new gesture is exclusive to iOS 13, Apple's latest update for iPhone. If you haven't updated yet, you'll need to in order to use the gesture. When ready, all you need to do to undo text is swipe left with three fingers. You can swipe anywhere on the display, including the keyboard, to get the job done. If you aren't precise, you might interact with other items on-screen, so practice makes perfect. Undoing texting with just a three-finger swipe left is an excellent example of how Apple tried to simplify the way we edit text on an iPhone. And best of all, it doesn't just apply to text, it works with images and other media in text documents as well. Plus, it works system-wide, so not only does it work in Apple apps like Mail, Messages, Notes, and Safari, but the gesture can be used in Facebook, Twitter, and other third-party apps. You'll more find more gestures like this one, as well as a host of new changes and features when you update to iOS 13. Continue reading and see animation.... What's the best iPad for you? A practical guide to Apple's tabletsby Simon Hill There used to be a lot of different iPad models on store shelves, which could make it tricky to work out which was right for you, but Apple has dramatically simplified the range. The headliner is the sexy iPad Pro, with slim bezels, no home button, and Face ID support, which comes in 11-inch or 12.9-inch flavors, starting at $800 and $1,000 respectively. Then there's the iPad Air, which starts at $500. The 9.7-inch iPad, at $330, is your most affordable option, while the $400, 7.9-inch iPad Mini 5 is the only small one available. While the streamlined iPad lineup makes choosing the right model a little less challenging, you must still weigh your needs carefully. What good is a 12.9-inch screen if you value portability above all else? Why pay more for a top-of-the-line graphics chip if you only game casually? Fear not, we're here to explain each iPad and help you choose the right one for you. Continue reading and see video.... Wizard sez: Thanks to Charles Bradley for telling us about this one. 
How to set up and use fall detection on Apple Watch Series 4 and Apple Watch Series 5by Bryan M Wolfe, imore Apple Watch Series 4 and Series 5 can assist you after a fall and connect you with emergency services personnel if necessary. At the heart of the new feature is the detection of a significant, hard fall when you're using the Apple Watch. When this occurs, the wearable device will automatically tap you on the wrist, sound an alarm, and display an alert. From there, you can decide whether to contact emergency services (from the watch, of course) or dismiss the warnings. With fall detection, your Apple Watch is intuitive enough to know if you're moving. When you are following a fall, it will wait for you to stop to respond to the alert. If you're immobile and not moving, the watch will contact emergency services automatically if you don't answer within 60 seconds. After this, you'll see a 15-second countdown on your watch to the time the automatic call is made. You can tap Cancel at any time to stop the countdown. Once contact has been made to emergency services, those on your emergency contact list will receive a message indicating that a fall has occurred. It will also tell them your current location. Here are the Apple TV+ shows that you can watch at launch, and what's coming soonby Amber Neely, appleinsider 
Apple TV+ is coming out on November 1, boasting an attractive $4.99 per month price tag and a lineup of top talent. Here is a quick look at the shows that will be available at launch and shortly after, updated on October 1 with "Swagger" casting information. Announced at the September Apple Event, Apple TV+ will boast a wide range of shows for everyone from children to adults, including comedies, dramas, thrillers, documentaries and more. Apple TV+ will be available for $4.99 a month, though if you buy new hardware, such as a new Apple TV, iPhone, or Mac, you'll get a year for free. Additionally, even if you don't own any Apple devices, you will be able to watch Apple TV+ from your favorite browser at tv.apple.com. In a press release, Apple has highlighted some of the shows available at launch, and given us the titles and synopses of those to be available shortly after. While these are not the only shows that will be available at launch, it does offer a look into what Apple has in the works. 

by Penny Holland, MAGIC* I was visiting my daughter last night when I asked if I could borrow a newspaper. "This is the 21st century" she said. "We don't waste money on newspapers. Here use my iPad." That fly never knew what hit him... 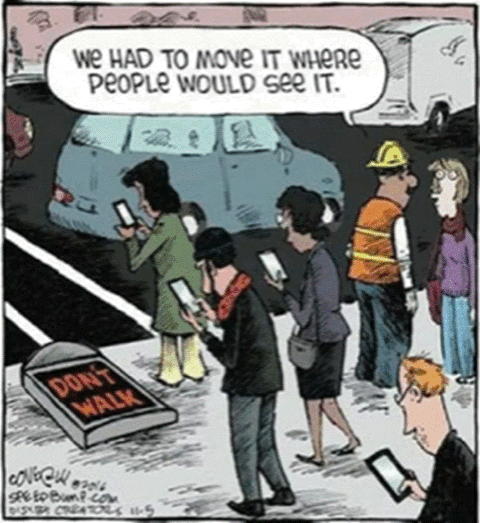


Malware Examplesby Robert Y Elphick, MAGIC * Below is another selection of emails and browser popups that are up to no good. Never click on anything in an email that is even only slightly suspicious. Macs are only vulnerable to malware that you invite in by clicking on the links or zip files in these emails. So don't touch them! 
Versions of this revolting message are popping up. They DO NOT have you password and will not use it so do not respond. If in doubt, change your password(s). Call me if you have questions. 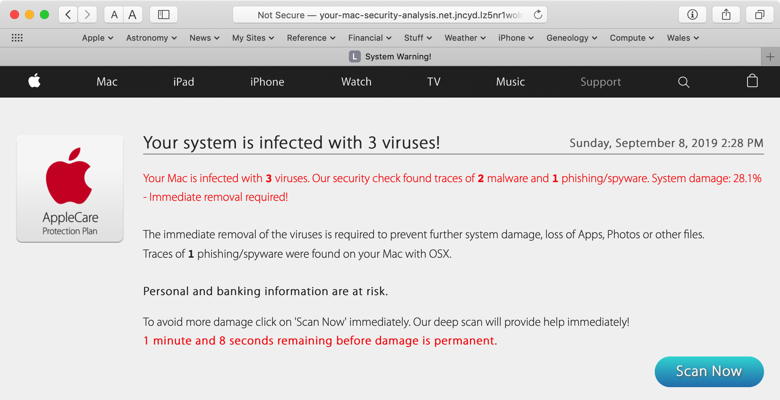
This pretends to be from Apple. It is NOT DO NOT CLICK on the links. 
If you do not know the sender then be suspicious. I looked at this with a byte editor and found it contained evil. Also note the reference to Microsoft - this is sometimes used to make emails look legit! DO NOT CLICK on the links. 
But MAGIC does not have an account!!! DO NOT CLICK on the links. Internet CrimeAny one bothered by internet criminal activity should report it to the Federal Bureau of Investigation Internet Crime Complaint Center (IC3) at this web page. This includes phishing, malware, spoofing, any demand for money. 

Check your iCloud settings…againby Ron Sharp, MAGIC * Have you gotten messages saying your iCloud storage is full even though you don't use iCloud? Well check again. 
One of the most annoying and aggressive things Apple does is to turn on iCloud options when you install updates. Many people have found a bunch of iCloud options turned on when they originally had them turned off. On your Mac go to System Preference and click the iCloud icon. Turn off the things you don't want to go to iCloud and recheck those setting after each update. The two options on the top of the list, iCloud Drive and Photos, have several options of their own. Check that they are set the way you want also. If you don't know for sure, or are concerned about loosing files if you turn an option off then contact someone for help. One of the MAGIC mentors listed on our website can give you a hand. iCloud Drive can be turned on, and have all the options associated with it turned off. That offers you the iCloud Drive folder on your computer to put any documents you want into iCloud to share on your other devices without storing all your Desktop and Documents folder items in the cloud. However, sending Desktop and Documents to iCloud can be useful if you have a very small storage drive on your laptop computer. You'll find what takes up most of your storage space is photos. If you want all your photos to go to iCloud Photo Library then you may have to purchase more storage. It's not expensive, $1 a month for 50 GB. But if you're unwilling to pay for storage then you have the option of using Photo Stream. That will store the last 30 days of photos for you to save to other folders. The Photo Stream option does not count against your free 5 GB. All the iCloud options should be looked at on all your devices too. For iOS, go to Settings, click on the top heading that shows your name and then tap on iCloud. If you use Calendars that might be a good one to turn on and sync with your other devices. Same with Contacts. For backing up your phone or iPad you can turn on iCloud backup or you can backup your device using iTunes on your computer. You can't do both though. Even though you may use some of the apps listed in iCloud you don't need that info going to the cloud. For instance you might use Safari browser on your iPhone but don't care about saving your bookmarks to the cloud or syncing them your desktop computer or other devices. With the Notes app, there may be notes on your device and notes in iCloud. If you intend to turn off iCloud notes then you'll need to save those notes on your device before turning iCloud notes off MAGIC, the Macintosh Appreciation Group of Island County, serves people who use Macintosh computers, software and peripherals. Our goal is to share information and get answers to questions to make us more productive with our use of technology. Our monthly meetings give us a chance to discuss computer problems and share ideas with other Mac users, feature speakers on specific topics, and to keep apprised of Apple news. |