Newsletter
April 2021
Newsletter Editor:
In This Issue:
- MAGIC MUG News
- Software Updates
- News, Information and Stories (Mac OS)
- iPhones, iPods, iPads, AirPods
- Apple Watch, Apple TV, HomePod
- Humor
- Malware and Mischief
- By The Way
* Indicates author is a member of MAGIC

Meeting information
| Date: |
21 April 2021 |
| Time: |
4:00 p.m. |
| Activities:
|
• President Harry will conduct a ZOOM meeting to include Q&A
• Presentation: Time Machine by Ron Sharp |
| Location: |
Online with Zoom |
Minutes - March, 2021
The March meeting of MAGIC was held per Covid rules via Zoom. There were about 21 people in attendance/on line with us.
President Harry Anderson called the meeting to order at 4:00. After explaining the Zoom rules (keep yourself Muted, ask questions at the end or by sending a note in CHAT) Harry explained that since we are not meeting at the church, we are not collecting the $2.00 dues to cover room rental, but anyone who would like to make a donation to MAGIC may do so at the MAGIC website donation page using a credit or debit card. Also a check may be mailed to Treasurer, Gary McIntyre. see Donation Page,
Other business: Our treasurer is out of town so there is no financial report, but as of last month we are in good shape. Note that the minutes will no longer include details of the presentation, as these can be viewed on the MAGIC home page.
A KEYNOTE PRESENTATION on COMPUTER SECURITY was given by Robert Elphick with amusing animated graphics. This presentation may be viewed on the home page of the MAGIC website as a video or keynote presentation.
Following the presentation we decided that the topic for next month's presentation will be about using TIME MACHINE, a backup technique that is built into macs, but many do not know how to use it. No presenter was determined at this time. [It will be Ron Sharp on 21 April]
The meeting was adjourned at 5:00
Respectfully Submitted by co-secretaries, Madelyn van der Hoogt and Penny Holland
MAGIC Musings
by Harry Anderson, MAGIC President
It's supposedly spring by now but the winter chill has hung on longer than normal this year. This is about the time I spend hours in my garden planting vegetables for a bumper fall crop. I've had to bundle up more than usual but my potatoes, onions, beets and peas are in so far. Thanks to the great camera in in iPhone 10, I will share lots of photos as the plants grow.
As I worked in my garden one morning last week, knee pads in place and quilted sweatshirt stretched firmly, I had my phone with me playing smooth jazz on Pandora through my Apple ear buds. Later I took a break and checked the news of the world on my iPad, using my iPhone has a hotspot. And it struck me how great all our Apple technology really is, allowing me to stay as in touch as I wish to be whenever and wherever — even while planting potatoes. And, of course, then I can retire to my iMac to write these musings and send them off. Amazing, isn't it?
Our MAGIC meetings via Zoom continue to draw lots of interest and some great presentations. Our next meeting will be April 21 at 4 p.m. and you can reserve a space to attend live by responding to an email link in this newsletter. You can also catch up by watching the recording of the meeting on our website a few days later. This month's presentation will be a deep dive into Time Machine by Ron Sharp, which should be fascinating.
We have a schedule set for great presentations every month through September, thanks to our experts Ron Sharp, Robert Elphick and Gary McIntyre. I am sure that, like me, you will not want to miss a single one. After Ron's presentation on Time Machine, Robert will do one on cameras in May, Ron will present on "hot apps" in June, Gary will talk to us about Apple Watches in July, Robert will help us understand sharing between devices in August and Gary will talk about updates and how to use them. That's a great line up!
Note: This Software Update section of the newsletter lists the most relevant Apple updates. Not all updates are listed for all products. Additionally, I'll add other pertinent updates on occasion.
Apple releases iOS and iPadOS 14.4.2 with a critical Webkit security fix
by Jason Cross, Macworld
Apple has released a minor update to iOS and iPadOS, bringing the version number to 14.4.2. The release notes are as basic as can be:
This update provides important security updates and is recommended for all users.
As for what those security updates are, Apple's security support site says it's a Webkit security fix, which means that any app that loads content from the web could be impacted:
WebKit
- Available for: iPhone 6s and later, iPad Pro (all models), iPad Air 2 and later, iPad 5th generation and later, iPad mini 4 and later, and iPod touch (7th generation)
- Impact: Processing maliciously crafted web content may lead to universal cross site scripting. Apple is aware of a report that this issue may have been actively exploited.
- Description: This issue was addressed by improved management of object lifetimes.
- CVE-2021-1879: Clement Lecigne of Google Threat Analysis Group and Billy Leonard of Google Threat Analysis Group
In other words, it's an important security fix and you should probably download and apply it right away. Apple is still actively working on iOS 14.5, but don't wait for that release to protect yourself from a serious web vulnerability.
For older devices that do not support iOS 13 or iOS 14, Apple has released iOS (and iPadOS) 12.5.2 with the same fix. That will apply to the iPhone 5s, iPhone 6, iPod Touch (6th gen), iPad mini 2 and 3, and the original iPad Air.
How to update to iOS 14.4.2
To update your iPhone or iPad, open the Settings app, then tap General, then Software Update and follow the instructions. If you don't see the update right away, be patient, as it can take a little while to roll out everywhere.
Click for article.
Apple's Keynote, Numbers, and Pages hit version 11 with precise iOS editing
by Roman Loyola, macworld
Apple updated its iWork suite of productivity apps on Tuesday with helpful new features and tweaks that make the apps easier to use. Most notably, the iOS apps now have "Precise editing controls in the Arrange Inspector" to make it easier to fine-tune projects without a Mac. The update to version 11 affects the iPad, iPhone, and Mac versions of Keynote, Numbers, and Pages. The apps jumped to version 10 last March from 8.2.1.
iPad and iPhone iWork updates
According to the release notes, the iOS iWork apps all have the following updates:
- Precise editing controls in the Arrange Inspector for adjusting the look and placement of objects
- Onscreen keypads for entering exact values for text size, spacing, table size, and more
- Ability to add or remove objects or table cells from a selection by tapping or dragging across them
- Setting to always open documents in edit mode
- Ability to add phone number links to table cells, text objects, and shapes
Numbers specifically now has the option to exclude the summary worksheet when exporting your spreadsheet to Microsoft Excel.
Check out Keynote, Numbers, and Pages on the App Store.
Mac iWork updates
Here's what's new across all the iWork Mac apps, according to the release notes:
- Updated media browser offers enhanced search options and new content categories such as Recents, Portraits and Live Photos
- Ability to add phone number links to table cells, text objects, and shapes
- AppleScript functionality to change a presentation password or open password-protected presentations
Keynote for Mac specifically has two additional updates:
- View your presenter notes, current slide, and next slide in a separate window while presenting
- Thumbnail images in the build order window make it easier to edit complex sequences
- Check out Keynote, Numbers, and Pages on the Mac App Store.
Click for article.
It's Time to Consider Upgrading to macOS 11 Big Sur (Or…read this before you upgrade)
by Small Dog
We're cautious when it comes to recommending upgrades to new versions of macOS. Apple makes the upgrade process easy—though it can be time-consuming—but upgrading can create workflow interruptions, render favorite apps inoperable, and have other consequences. At the same time, it's important to stay in sight of the cutting edge for security reasons and to take advantage of advances from Apple and other developers. Upgrading is not an if question; it's a when question.
We're not saying that everyone needs to upgrade to macOS 11 Big Sur now, but if you want to, it should be safe now that Apple has released several bug-fix updates. However, there are still a few caveats, and preparation is essential.
Reasons Not to Upgrade
Some people should continue to delay upgrades to Big Sur due to software incompatibilities. Most software under steady development will have been updated for Big Sur by now, but some workflows rely on older versions of apps where an upgrade isn't practical or possible (ancient versions of Adobe Creative Suite, for instance), or on obsolete apps that will never be updated. You may be able to learn more at RoaringApps, but those who haven't yet upgraded past 10.14 Mojave may have to upgrade or replace 32-bit apps that ceased working starting with 10.15 Catalina.
The other app category that continues to have trouble with Big Sur are backup apps that make bootable duplicates. Catalina moved macOS to its own read-only volume, and Big Sur goes a step further by applying cryptographic signatures that make it even harder for an attacker to compromise the operating system. Unfortunately, that also makes creating a bootable duplicate difficult. Carbon Copy Cloner and ChronoSync have developed workarounds; SuperDuper remains incompatible at this point, although an older version can create data-only backups. If you rely on one of these apps for critical backups, make sure you know what you're getting into before upgrading or reassess your backup strategy.
Before You Upgrade
Once you've decided to upgrade to Big Sur, you have three main tasks:
- Update apps: Make sure all your apps are as up-to-date as possible. If you regularly put off updates, now's the time to let them complete so you have Big Sur-compatible versions.
- Clear space: Big Sur needs a minimum of 35.5 GB to upgrade, and as of macOS 11.2.1, the installer won't proceed unless there's enough space. Don't cut this close—you should always have at least 10-20% free space for virtual memory, cache files, and breathing room.
- Make a backup: Never, ever install a major upgrade to macOS without ensuring that you have at least one current backup first. In an ideal world, you'd have an updated Time Machine backup, a bootable duplicate, and an Internet backup. That way, if something goes wrong as thousands of files are moved around on your drive, you can easily restore.
- After those tasks are complete, make sure you don't need your Mac for a few hours. There's no telling exactly how long the upgrade will take, especially if it has to convert your drive to APFS, so never start an upgrade if you need the Mac soon.
Initiating the upgrade is just a matter of opening System Preferences > Software Update, clicking the Upgrade Now button, and following the instructions.
After You Upgrade
Part of the reason to set aside plenty of time for your Big Sur upgrade is that there are always clean-up tasks afterward. We can't predict precisely what you'll run into, but here are a few situations we've noticed:
- macOS will probably need to update its authentication situation by asking for your Apple ID password, your Mac's password, and if you have another Mac, its password too. Don't worry that this is a security breach—it's fine.
- Some apps may have to ask for permission to access your contacts and calendar even though you previously granted permission. Again, that's fine.
- If you use your Apple Watch to unlock your Mac and apps (and you should, it's great!), you'll need to re-enable that in System Preferences > Security & Privacy > General.
- If you use Gmail or Google Calendar or other Google services, you may need to log in to your Google account again.
- Websites that usually remember your login state will likely require that you log in again. If you're using a password manager like 1Password, that's easy.
- You may have to re-enable text-message forwarding to your Mac on your iPhone in Settings > Messages > Text Message Forwarding.
- Those who use Backblaze for Internet backups will find their backups have been "safety frozen." Follow these instructions for thawing your account.
Finally, Time Machine in Big Sur now supports and prefers APFS-formatted drives, and all of Apple's development is going in that direction now. You can keep using your existing Time Machine backup in Big Sur, but after you're confident that everything is working well—and you have another backup—it's worth removing your Time Machine backup drive in System Preferences > Time Machine > Select Disk, reformatting the drive as APFS in Disk Utility, and restarting the backup in the Time Machine preference pane.
With all that housekeeping done, it's time to check out all the new features in Big Sur!
 (Featured image based on originals by Apple)
Click for article.
Uncover macOS Big Sur's secrets with these tips and tricks
Big Sur is a monster release, and there are a bunch of new features you may have missed.
by Roman Loyola, macworld
 (from Apple)
It's been a few months now since Apple released macOS 11 Big Sur, and by now you've surely adjusted to its revamped user interface and mastered all of the major new features, dipped into the enhanced Messages and Maps apps, and found your way around the new search bar. But operating systems are huge and there are always a few new features that aren't obvious and you may have missed. Here are some tips, tricks, and hidden features in Big Sur that you need to check out.
Optimize your charging
MacBook users probably know by now that it's not a good idea to charge a MacBook's battery to 100 percent all the time. It's better to charge it to about 80 percent in order to prolong the battery's life. Learn more about charging and how it affects your battery.
But who really wants to keep an eye on the charge level when the MacBook is plugged in and you have work to do? No one. That's why Apple added a new feature in Big Sur called "Optimized battery charging". This feature monitors when you plug and unplug your MacBook over time, and analyzes that data to adjust battery charging so that when you unplug, you'll have a battery that's fully charged. When it's turned on, you'll see "charging on hold" from time to time, as Apple cuts back the juice to extend the life of your battery.
Continue reading....
If you bought a MacBook with a butterfly keyboard, Apple may soon owe you money
by Michael Simon, macworld
Apple's butterfly keyboard was only around for five short years, but it generated enough negative press to last a lifetime. Now, a judge in California has ruled that Apple needs to face the music.
U.S. District Judge Edward J. Davila for the Northern District of California decided Monday that a growing class-action suit spanning eight states can proceed despite Apple's objections. The suit, which claims that "the low-travel design of the butterfly mechanism makes the keys prone to fail when minute amounts of dust or debris enter the sensitive area beneath the switch," includes 11 consumers from California, Massachusetts, New York, Illinois, Florida, Washington, New Jersey, and Michigan, and seeks unspecified "economic injury and aggregate damages."
The suit relies on "a choice-based conjoint analysis" to determine "the price at which a consumer would choose a laptop with a keyboard defect over laptops with no defects." The calculation effectively measures "the discount a customer would demand before purchasing a MacBook with a disclosed keyboard defect" to determine that Apple was overcharging consumers for a laptop with a keyboard that has been known to suffer from stuck, repeating, and unresponsive keys.
It seems like a stretch to say that Apple knowingly charged full price for a laptop that it knew was defective, but the judge found enough the argument "relevant to Plaintiffs' theory of class-wide damages" and certified the class-action suit.
Girard Sharp, the law firm behind the suit, is looking to expand its class-action to more consumers in all 50 states through an online survey.
Apple already admitted the problems with the butterfly keyboard by way of a Keyboard Service Program that covers all laptops using the keyboard. After several "fixes" that failed to alleviate the problems, Apple switched to a scissor-based Magic Keyboard with the launch of the 16-inch MacBook Pro in 2019 and has since switched all of its notebooks over to the newer style, including the newest M1 laptops.
Apple is no stranger to class-action lawsuits. Most notably, it was forced to pay up to $500 million to consumers over battery-related throttling in the iPhone 6, 6 Plus, 6s, 6s Plus, 7, 7 Plus, and SE. If the class-action is successful, it will likely consist of direct payments to affected customers and refunds for any keyboard repairs made that aren't already covered by the Keyboard Service Program.
Click for full article.
How to Type 8 Top Special Characters on a Mac Keyboard
by Erin Smith, iphonelife
Mac keyboard shortcuts for symbols can sometimes be hard to figure out unless you happen upon them by mistake. We'll walk you through the keystrokes required to create several of the top special characters on a Mac, including the Euro symbol, copyright, and several others.
| Symbol |
Keystrokes |
| Square root |
[option] v |
| Degrees ° |
[option] k or [Shift][option] 8 for larger |
| Copyright © |
[option] g |
| Registered Trade Mark ® |
[option] r |
| Trade Mark ™ |
[option] 2 |
|
|
These keyboard shortcuts for symbols on a mac were fun for me to learn—I hope you enjoyed them too! Now you know how to type the most commonly used (and searched for!) special characters on a Mac or MacBook.
Click for article and keyboard pictures.
Microsoft Office Vs. IWork Review: Which Is Better?
by Arch, techjunkie
Yep! You can get Microsoft Office on your iOS device. It's right out there in the App Store. But then, there's also Apple iWork, the company's famous productivity suite.
On the one hand, we have the world's most-used office suite. On the other hand, we have an Apple product that has undergone years of improvement.
So, which one is better for you on the phone? Microsoft Office or iWork?
Overall Features
Both Office and iWork are great productivity suites. They both have spreadsheet, word processing, presentation apps.
As a rule of thumb, iWork is better for people who work with charts a lot, while Office does a better job with presentations and documents. However, iWork is free but not Office, which alone may tip the scale to iWork for a lot of users.
In the department of images, special effects, fonts, and shapes, MS Office takes the cake. It also makes for easier syncing with desktop PCs.
On the other hand, chart reading is much easier on iWork, seeing as how the feature is built-in while the Office app requires the download of Excel.
Compatibility
Naturally, both MS Office and iWork are iOS-compatible. However, Office requires iOS 7.0 or newer but the barrier goes up to iOS 12 for iWork.
Then, there's Windows compatibility. Although iWork has a PC version, it's still nowhere near as functional as with Mac. However, this goes both ways since MS Office works better on PCs.
Word vs. Pages
Everyone has heard of MS Word. For years on end, it's been the top processor. However, at least on iOS, Apple's Pages has eclipsed Word.
Word and Pages boast identical features and are very similar overall. With both of these apps, you get text formatting, footnotes, custom headers, footers, bulleting, numbered lists, images, pictures, paragraphs, tables, etc.
Microsoft Office
However, there's a huge feature that's found in Pages but not Word - adding charts to documents. Not only that, but Pages allows you to edit the data for the charts at any point.
Pages also allows you to easily share the docs using the Open In feature. You can open a Pages file in any app that supports the format. So, yes, you can open a Pages document in Evernote. But even more interestingly, you could open it in Word.
PowerPoint vs. Keynote
Each of the two has its ups and downs, PowerPoint, for instance, is great for creating a presentation, while Keynote does a better job of presenting it.
When it comes to effects, fonts, and similar visual details, PowerPoint is the winner in terms of flashiness, which may or may not be important to you.
With that said, there's a significant downside in PowerPoint that has to do with charts. Most people create a chart in Excel first and then copy it to PowerPoint. With Keynote, you won't have to worry about this as it is perfectly capable of creating professional charts.
As mentioned, Keynote truly excels in the actual presentation. Thanks to the iPad's video-out option, you can have presenter notes appear on an iPad while showing the slides in full-screen. PowerPoint relies on screen mirroring to accomplish the same.
Which One Is Better
Well, if you're an iOS user, iWork is likely a better option than Office. Although there are many advantages in both camps, iWork comes free for all iOS users. If you're working on iOS, go ahead and download iWork. You'll love it like as not.
Have you tried either productivity suites? Maybe you've used them both? Feel free to send your impressions. We'd appreciate your two cents.
Click for full article.
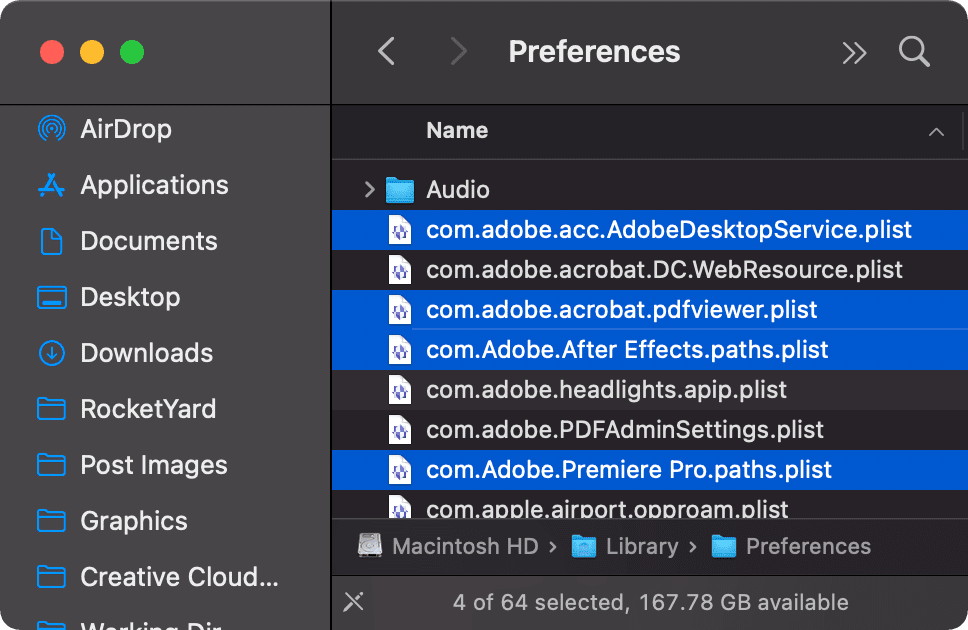
Quick Tip: How to Select Multiple Items in the MacOS Finder
by Dennis Sellers, rocketyard
Have you ever needed to select more than one item in the macOS Finder? It's easy! There are several different ways to select files and folders: click and drag, shift-click, and command-click. They each work differently - here's a description of each one.
Note: Don't confuse the Finder with the Desktop. The Finder is the first thing that you see when your Mac finishes starting up. It opens automatically and stays open as you use other apps. It includes the Finder menu bar at the top of the screen and the Desktop below that. The Desktop is the space where you see file, folder, and application windows.
Click & Drag
Multiple files can be easily selected in macOS using Click+Drag. You click and continue to hold down the click while you drag within a window to draw a selection box and select more files.
 Click and drag across multiple files to select them
Shift (⇧) + Click
You can also use Shift+Click to select groups of contiguous files in the Finder. Select the first file, hold down the Shift key, then click the last file. All files between those two will be selected.
Command (⌘) + Click
If you want to select files that aren't directly grouped together, use Command+Click. Scroll through a Finder window and select items as you go by holding down the Command key when selecting (clicking) a new file.
Deselect Files
You can also use Command+Click to remove or unselect files that have been selected. You can use Command+A to select all, or Shift+Click to select a large group of files, then use Command+Click to deselect the ones you don't want to be included in the group.
Click for full article.
How secure is a Mac? Best Mac security settings
by Karen Haslam, MacWorld
Macs are safer than PCs, but how much more secure are Macs, and what should you do to protect yourself? We run through the options
While it's true that Macs are less likely to be attacked on the basis that there are fewer Macs than PCs - in fact Malware on Macs is decreasing, Mac users can be a very lucrative target and hence considered worth the effort. As a result Macs do get viruses and are just as vulnerable to attack as a PC.
Macs are generally safer, though. This is because the operating system is Unix-based and therefore more difficult to exploit. Apple also has a number of security measures built into the macOS and the Mac hardware.
Another thing to note is that the M1 Chip that Apple started using in Macs in November 2020 is considered more secure than Intel processors. However, malware known as Silver Sparrow has already been found on the M1 Mac!
Apple antivirus
On the software side, macOS includes its own antivirus software built in. XProtect detects and blocks any known malware. Apple monitors for new malware infections and updates XProtect regularly. XProtect will check for malware when an app is first launched and if it has been changed. If XProtect detects malware it will block the software and remove it.
In addition to the protection offered by XProtest is Gatekeeper. Gatekeeper is a feature of macOS that is designed to stop users from installing malware in the first place. Gatekeeper checks that any app you download from the internet has been verified by Apple and checked for malicious code. If the app is considered a risk Gatekeeper will stop you from installing it. For more advice about downloading and installing apps read: How to install apps on the Mac
Gatekeeper isn't infallible, it has been bypassed in the past, and XProtect isn't always right up to date, so malware has slipped through. But both offer a level of protection that should give you peace of mind.
Privacy and phishing
If you want to be really confident about any app you install you would be wise to stick to apps on the Mac App Store. Every app in Apple's Mac App Store has been reviewed by Apple, so you can be confident that it will not pose a risk to you. In fact Apple goes a step further by ensuring that apps are upfront about how they are using your data, so you can be sure that there is no risk that any of your information will be shared with anyone without your knowledge.
Also, since macOS 10.15 Catalina launched in 2019 it has been a requirement for all Mac apps to get your permission to access your files - whether they are on your Mac, in iCloud Drive or on an external volumes. The macOS will also ask for your permission before an app is able to access the camera or microphone, or log what you type, for example.
The above is designed to protect you from rogue apps, but the biggest threats can be from phishing emails, websites and services you might use online.
Apple's web browser, Safari also offers various ways of protecting you online. Safari will warn you if a website is suspicious and will prevent it from opening. Every web page is loaded as a separate process in a separate tab - so if there is a problem it will be possible to close that tab without Safari itself crashing.
Safe surfing
Another way Apple protects Mac users is by keeping Flash off Macs. Flash is one of the most common means of malware getting onto computers. Apple stopped preinstalling Flash with Safari back in 2010. Following that the only way of adding Flash was for users to install it themselves - which meant that people got used to living without it. In early 2020 Apple stoped supporting Flash and as of 31 December 2020 even Flash developer Adobe is no longer supporting Flash. JavaScript also brings a number of vulnerabilities. It is easy to disable JavaScript in Safari. Just click on Safari > Preferences > Security > and deselect the box beside Enable JavaScript.
As well as protecting your security online Apple also protects your privacy. For example, Apple allows users to stop advertisers tracking them around the web. You can see a Privacy Report including details of all the cross-site trackers Apple has stopped from profiling you.
Password protections
Apple also monitors your passwords, helping you change them to a more secure option, and you'll even see an alert if Apple believes your password is involved in a data breach.
On that note, Apple also offers iCloud Keychain, a password management system that works across all your Apple devices so that you can log into software and services on any of your devices without having to remember individual passwords and log in details. The benefit of this is that you can have strong rather than memorable passwords (which Apple can generate on your behalf). All your passwords are locked away behind your main password, which is protected by two factor authentication (2FA) for added security.
Protecting your Mac
As we mentioned earlier, Apple also builds protection into the Mac hardware. This is particularly true of the Macs that gained Apple's M1 Chip back in November 2020. The M1 system on chip has a built-in Secure Enclave that protects your login password and automatically encrypts your data. But even Intel-powered Macs with the T1 or T2 security chip are able to encrypt storage and offer secure boot, for example.
Apple also has other technologies to assist you if your Mac is stolen, from Find My which enables you to track, and potentially locate your lost Mac, and wipe it so that your data can't fall into the wrong hands. The Macs with the T2 chip and M1 Macs also offer Activation Lock, a feature of Find My, to remotely lock your Mac so that only you are able to use it.
The Touch ID fingerprint scanner available on some Macs also adds another layer of security. It can be used to unlock your Mac, to log onto software and services, and for Apple Pay.
Thus Apple protects your Mac if it is stolen, or if someone with malicious intent gains access to it. Apple also protects you from malicious software, and gives you a say over whether you data is accessible and control over how it is used. All of these measures help to make the Mac much safer than a PC, but there are measures you can put in place to protect yourself further and we will run through these below.
Robert Elphick referred to this article during the March presentation.
Click for article.

Be Safe: Medical ID and Emergency SOS on iPhone and Apple Watch
by Steve Sande, rocketyard
Do you have your iPhone or Apple Watch set up to provide first responders with critical information in case of an emergency? Medical ID has been a feature of iOS for many years, but it's still not used by many people — either iPhone owners or first responders. In today's article, I'll show you how to set up Medical ID on your iPhone. I'll also give a quick lesson on finding Medical ID and Emergency SOS on a locked iPhone or Apple Watch.
Setup of iPhone Medical ID
Medical ID information is captured in the Health app of your iPhone. Launch the Health app, and tap the Summary tab. At the upper right corner of the screen is your profile picture — either a photo you've entered or the generic icon seen at right.
Tap the profile picture. Near the top of the page is a button for Medical ID. Tap it, then tap Edit in the upper-right corner.
 The Health App Medical ID Edit Screen
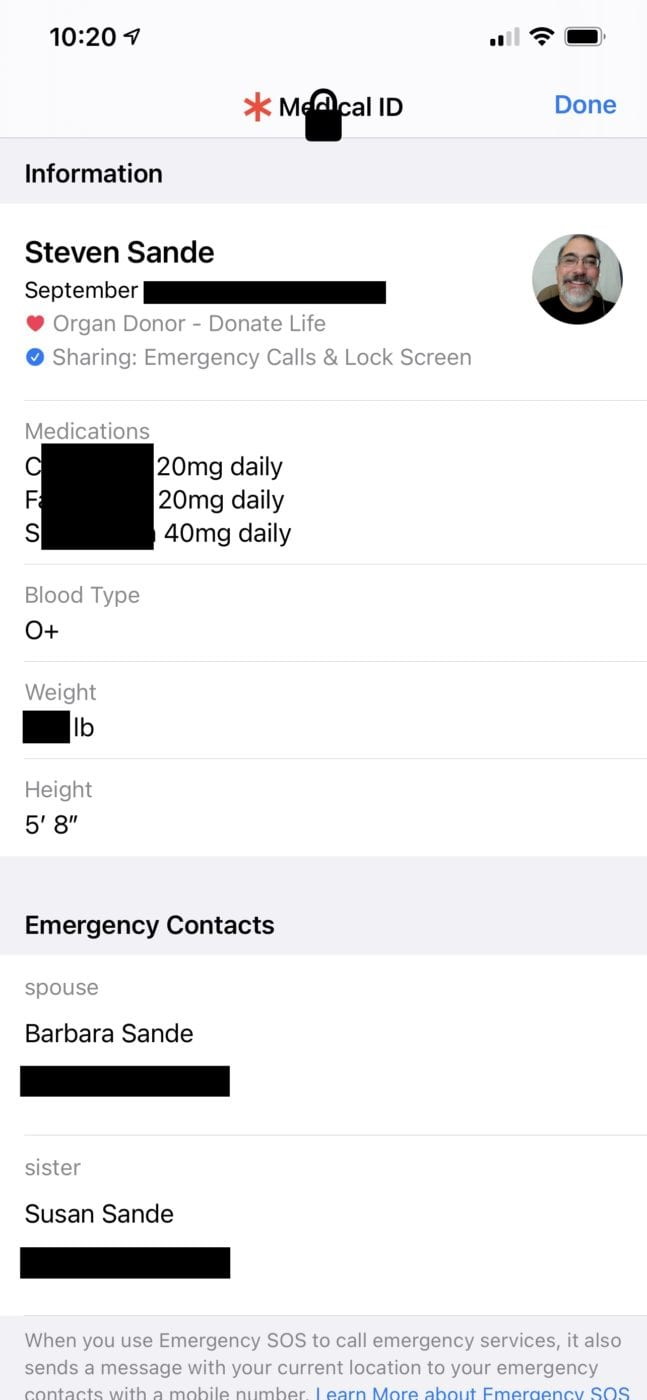
You can enter as much or as little information as you wish. If you have any medical conditions, allergies, or get reactions to certain drugs, those should be listed. It's also wise to list any medications you take, both the amount and how many times a day.
Other items such as blood type, weight, and height are useful. If you're an organ donor or wish to be, that information should be entered. You can also register with the U.S. Donate Life donor network through the Medical ID page.
Emergency Contacts
Wouldn't you want your loved ones or friends to know if you had been in an accident or had a health issue? Be sure to list at least one (and preferably more) emergency contact on the Medical ID screen.
If you use the Emergency SOS feature of the iPhone or Apple Watch to call emergency services, emergency services and the persons listed as contacts receive a text message noting that you've been involved in an emergency. That message also includes location information.
Set Up Emergency Access
The emergency information you've entered won't do much good if you do not allow first responders to see it. Under the Emergency Access section of the edit screen, be sure to enable Show When Locked and Share During Emergency Call by tapping the button to turn it green.
Show When Locked allows first responders to use the method described later in this post to view your medical info, while Share During Emergency Call shares your Medical ID if you call emergency services (911 in the United States).
Viewing Medical ID on an iPhone
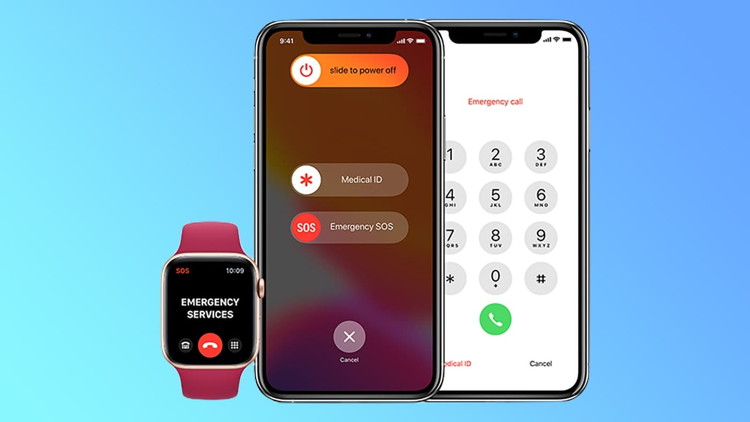
Let's say that you come across a person who has fallen and is not responding. If you have access to their iPhone, try to unlock it and you'll see an Emergency button at the lower left of the passcode screen (highlighted in the image below). Tap it.
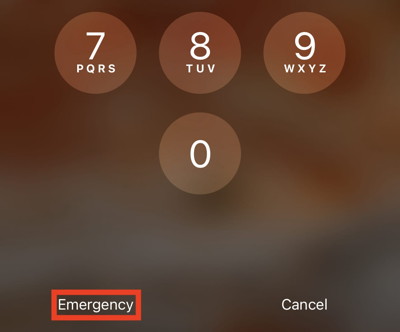 Even when you can't unlock an iPhone, the Emergency button provides access to Medical ID
This takes you to the Emergency Call screen, which can be used to call 911. At the lower left of the dial pad is a red Medical ID button (see image below).
 Tap the Medical ID button to view the Medical ID
 Medical ID on a locked iPhone
Viewing Medical ID on an Apple Watch
The same information can be viewed on an Apple Watch. Press and hold the side button (not the Digital Crown, but the flat button) and three sliders appear:
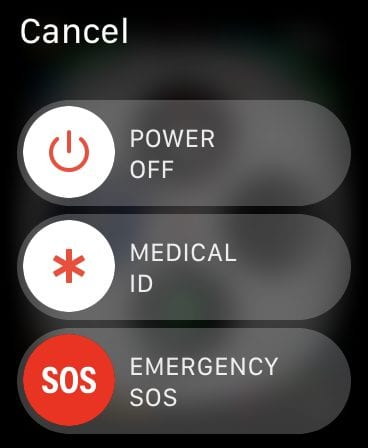 Press and hold the side button to view these sliders
Swipe the Medical ID button to the right to view the Medical ID screen:
 Medical ID on an iPhone (info redacted)
Emergency SOS on iPhone
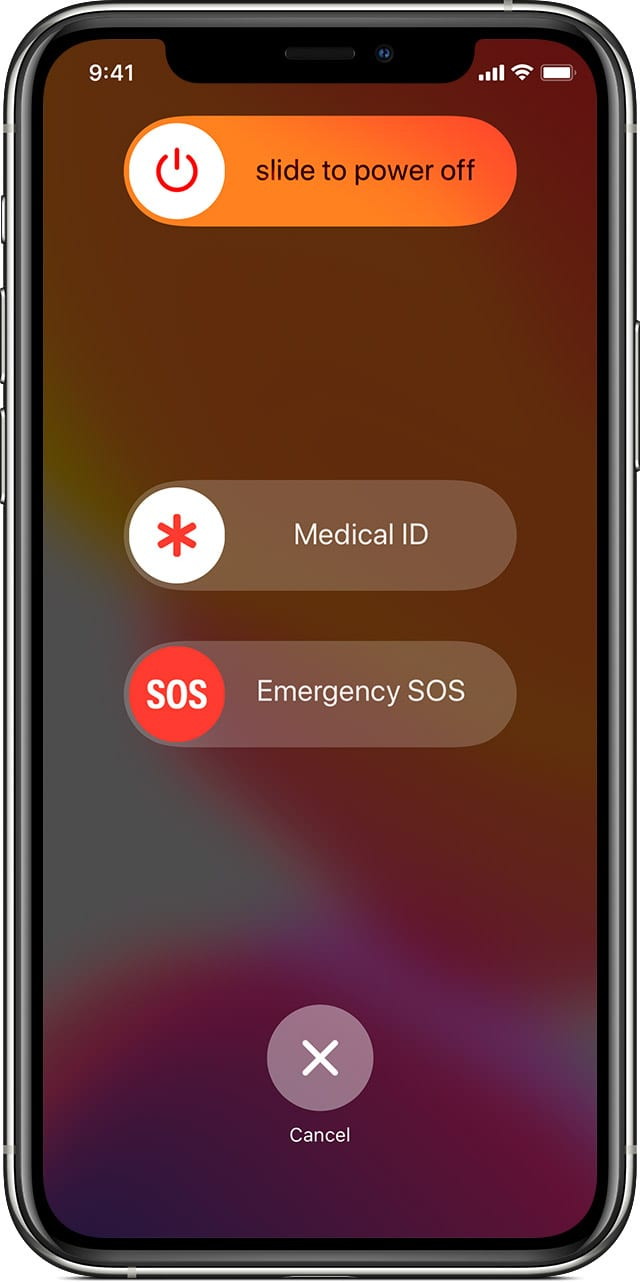
Need to send an emergency call automatically? On an iPhone 8 or later, hold down the side (power/sleep) button and one of the Volume buttons until the Power Off, Medical ID, and Emergency SOS sliders appears on the screen.
For an iPhone 7 or earlier, rapidly press the side or top (power/sleep) button five times to make the sliders appear.
Now drag the Emergency SOS slider to the right. The iPhone makes an emergency phone call and sends a notification to your emergency contacts as well.
On iPhone 8 or later, continuing to hold down the side and Volume button counts down and makes the emergency call without having to drag the Emergency SOS slider.
Emergency SOS on Apple Watch
Sending an Emergency SOS on an Apple Watch is quite easy. Hold down the side button for about three seconds until the three sliders (see Viewing Medical ID on an Apple Watch above) appear.
Slide the Emergency SOS slider to the right to have the Watch automatically call emergency services.
Medical ID is an important thing to set up on your iPhone. Doing so could save a life! It's also useful to know how to access someone else's Medical ID and send an Emergency SOS.
Be a lifesaver and set up Medical ID for a friend or relative, and show them how to use Emergency SOS.
Click for article.
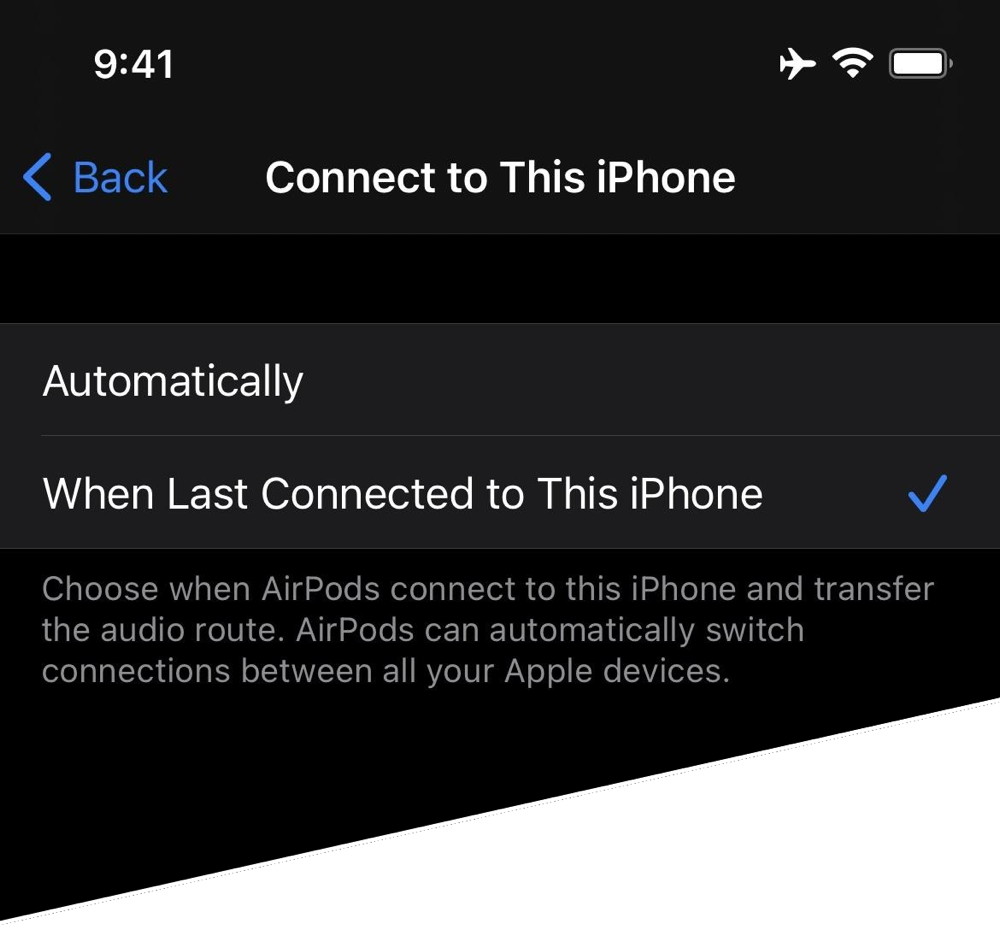
Stop AirPods from Annoyingly Auto-Switching Between iPhone, iPad & Mac So They Stick to One Device
by Jake Peterson, gadgethacks
You're watching a YouTube video on your Mac, then go to check something on your iPhone. Of course, because you had a video queued on iOS, your AirPods automatically switch from your Mac to your iPhone. Now, your Mac's YouTube video is playing out loud, and you have to reroute your AirPods back over to macOS. Luckily, there's a hidden setting you can change that fixes this whole issue.
Apple introduced AirPods automatic switching with iOS 14, iPadOS 14, and macOS Big Sur as a seamless way to shift your AirPods between multiple Apple devices. In theory, it should work great — if you're productive on your Mac with a podcast running in the background, then pick up your iPhone to go for a run, your AirPods can automatically join you as you blast some workout tunes.
The problem is, we don't work like this most of the time. What ends up happening more often than not is we use multiple devices at once, and as we use those devices, our AirPods, AirPods Pro, or AirPods Pro Max annoyingly switch between them. If you're trying to watch something on your iPad and check an app that has audio on your iPhone, your AirPods are going to switch on their own, even though you don't want your iPad experience interrupted.
Fixing this issue is actually pretty simple, although it requires action on all the Apple devices connected to your AirPods. Let's check it out.
iPhone, iPad, iPod Touch
With your AirPods model connected to your iPhone, iPad, or iPod touch, head to Settings -> Bluetooth. Select the info (i) button next to your AirPods model, then check out "Connect to This iPhone," "Connect to This iPad," or "Connect to This iPod," depending on the device you're currently using.
Finally, choose "When Last Connected to This [Your Device]" to fix the issue.
MacBook, Mac Mini, iMac, Mac Pro, Etc.
With your AirPods model connected to your Mac, head to System Preferences -> Bluetooth. Find your AirPods model, then click "Options." Now, click the drop-down menu next to "Connect to This Mac" and choose "When Last Connected to This Mac."
Enjoy Non-Auto-Switching AirPods
With the setting changed for each device type you have, your AirPods, AirPods Pro, or AirPods Max will only connect to a device if it was the last device those AirPods were connected to. For example, you switch your AirPods to your iPhone, then disconnect. The next time you pop your AirPods in your ears, they'll automatically connect to that iPhone if in range.
Of course, the best part is that if your AirPods are currently occupied on one device, starting a video or audio source on another device won't trigger your AirPods to be diverted without warning.
Click for article.
How to change Siri's voice
by By Jason Cross, macworld
Siri has multiple voices to choose from, and even different accents.
Siri sounds great. It's one of the more natural-sounding virtual assistants, and she's full of personality, too.
She? Is Siri a "she?" Not really! Siri actually has no gender (if you don't believe us, just ask it). Siri had a default female voice for many years, but you had the option to change it to a male voice instead. You can even give Siri six different accents: American, Australian, British, Indian, Irish, or South American. (If you're using Siri in non-English language, your choices will probably differ).
In iOS 14.5, Apple is changing the Siri voice options to promote diversity. There are now two additional American English voices, and they're just labeled Voice 1-4 instead of Male and Female. In addition, Siri will no longer default to a Female choice, but will instead prompt you to pick one of the Siri voice options during setup.
Updated 03/31/21: Apple is adding new Siri voices and a change to the default behavior in iOS 14.5. This article has been updated to reflect that.
Change Siri's voice in iOS
Here's how to make Siri sound the way you want.
- Open the Settings app, then tap Siri & Search.
- Tap on Siri Voice.
- Choose the accent and voice you wish.
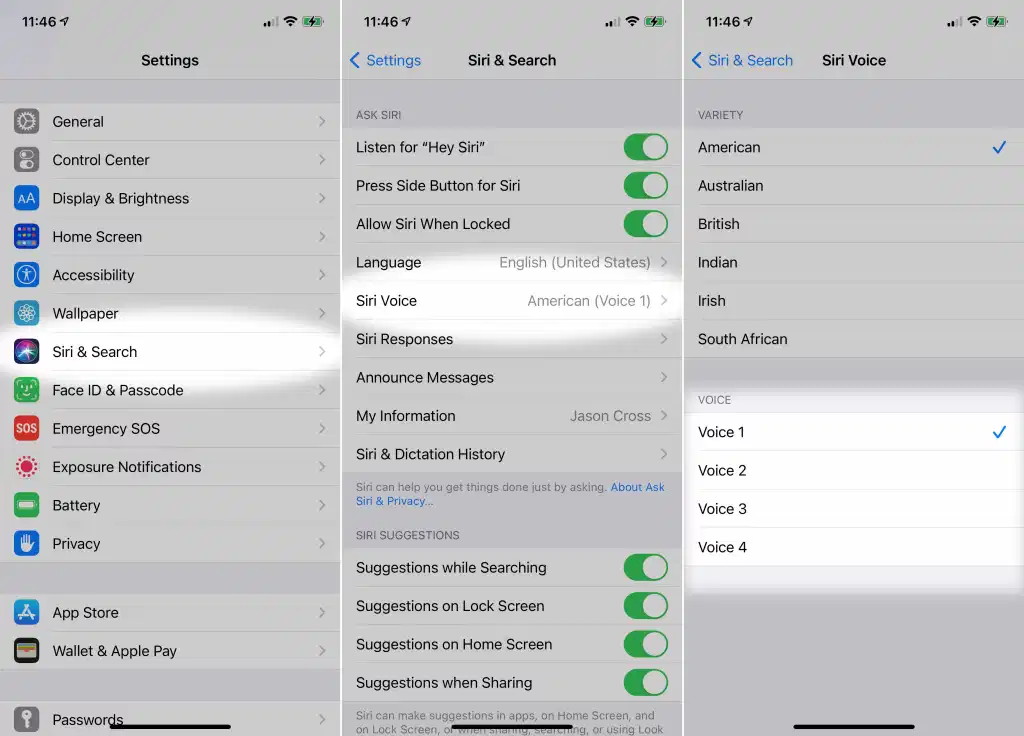 You can change the way Siri sounds at any time.
You can also go to the Siri menu by asking Siri to change its voice. Siri will tell you it can't do that, but will provide a button to hop right to the appropriate Settings menu.
Note that the Siri menu also contains a Language selection, which allows Siri to speak and listen in a different language. If you change your language, you'll have to re-train "Hey Siri" in order for it to work. It can be useful for those with a strong accent to check out this menu. If you've got an Irish brogue, you will want to make sure Siri's language is set to English (Ireland), for example. That's different from selecting the Irish "variety" in the Siri Voice menu.
Change Siri's voice in macOS
Now that the Mac has Siri, you can of course change its voice there, too.
- Open System Preferences.
- Click Siri.
- Use the Siri Voice drop-down menu to select a voice, or the Language menu to select a language.
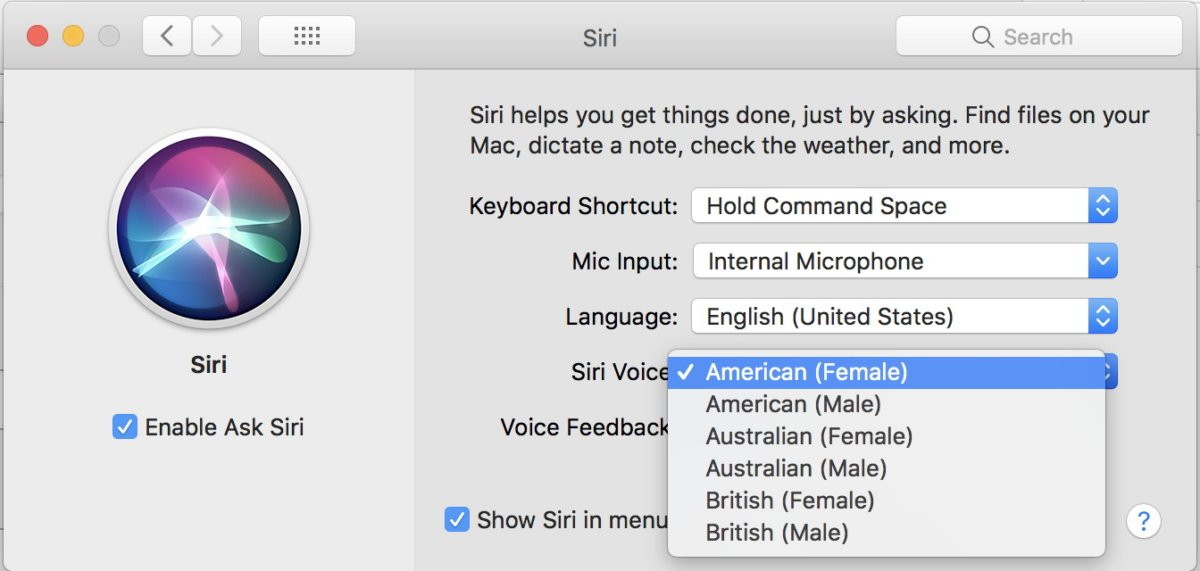 You can change Siri's voice on your Mac, too.
Click for article.
Apple presses ahead with aim to replace paper passports and ID with iPhone
by William Gallagher, appleinsider
Apple is continuing to research how to ensure the identity of someone presenting an iPhone to a passport official, or using any other digital ID document.
This is coming — your passport, drivers' licence, and probably all paper ID is going to go digital. The iPhone has already replaced everything from wallets to compact mirrors, and if it doesn't know when ID will make the move to digital, Apple is certain it's going to happen.
The company has already applied for multiple patents on related issues, including how an official can request what ID data from an iPhone. Now a newly-revealed patent application is concentrating on authenticating that the person holding an iPhone with digital ID is the real owner.
"User authentication framework," is about how to "securely perform a user authentication" when asked by "an issuing authority."
"[This patent application] describes embodiments in which a person may present identification information through a mobile device instead of presenting a traditional form of identification," says Apple. "[It] begins with a discussion about storing identification information (e.g., of a passport, driver license, government-issued ID, student ID, etc.) on a mobile device... [And] then describes an authentication framework for performing a user authentication at the mobile device."
The issues, detailed in around 13,000 words of patent application, range from the communications protocols, through secure storage, and on to making the process "tamper-resistant."
Apple does not want to limit its patent application too specifically, but for examples of communications protocols, it does refer to both NFC and RFID. It also describes the use of a biosensor — such as Face ID — to authenticate the user, plus a secure enclave to hold private data.
Nicely, it also discusses just how much information to give up when asked. Just as payment systems today can ask Apple's T2 chip to confirm identity and that processor will solely return a yes or no, so ID could sometimes work the same way.
"[For instance], the mobile device may perform an authentication," says Apple, "that includes the secure element confirming whether a holder of an identification document has an attribute satisfying some criterion without providing that attribute (or at least providing some information about that attribute without providing all information about that attribute)."
"For example, in one embodiment, a person may be attempting to purchase an item that requires the merchant to confirm whether an age of the person satisfies some threshold value," continues Apple. "[Rather] than having the user present the identification document (e.g., a driver license), the reader of the merchant may ask the secure element to confirm whether the user of the mobile device is old enough to purchase the item."
If the owner has been positively identified by, for instance, Face ID, and if their date of birth is stored in the secure enclave, the vender just needs a thumbs up or thumbs down. "In doing so, the mobile device is able to protect a user's identification information, yet still adequately answer the merchant's inquiry."
Most of the patent application's detail describes more complex scenarios, or where much more information is needed. At passport control, for instance, a user's full ID may be crucial — but so is the need for that user to be certain they're talking to authorized officials.
So the patent describes different combinations of security keys and authentication, where both user and official have their ID authenticated.
If it sounds as if digital ID is at risk of being stolen, it is. But that's why Apple is sweating these specific details. And if it doesn't want to point out that your passport can be taken from your hands, it does want to note that we already have digital ID.
"For example, modern passports (called e-Passports) may include an electronic chip that stores a passport holder's name, date of birth, and other forms of information," says Apple. "When a person is passing through customs, the person may present the passport to a customs officer, who places the passport on a reader to extract information stored in the passport."
"Upon verifying the information printed on the passport against the internally stored information, the officer may confirm the identity of the holder and allow the holder passage through customs," it continues.
Having that confirmation instead take place between the customs system and the user's iPhone, unlocked with Face ID, is immediately going to be more secure.
This patent application is credited to three inventors, including Ahmer A. Khan, who previously worked on a related filing about securely presenting ID wirelessly.
Click for article.
Wi-Fi not working on your iPhone or iPad? Here's the fix!
by Luke Filipowicz, imore
In theory, wireless connections and cellular networks should live happily in harmony on your iPhone or iPad. Your device uses automatic switching technology to pop you on known Wi-Fi networks and send you back to cellular when you're out of range, and it works great... most of the time.
But let's be honest: Wireless networks — especially those with interstitial signup sheets — can be finicky. If you're Wi-Fi is not working on your best iPhone, it may prevent you from getting some important work done or just enjoying your technology as you want. If you're running into problems with your Wi-Fi network on your iPhone or iPad, there are some troubleshooting steps you can do in iOS 14 and iPadOS 14 to try and solve the problem.
Continue reading....

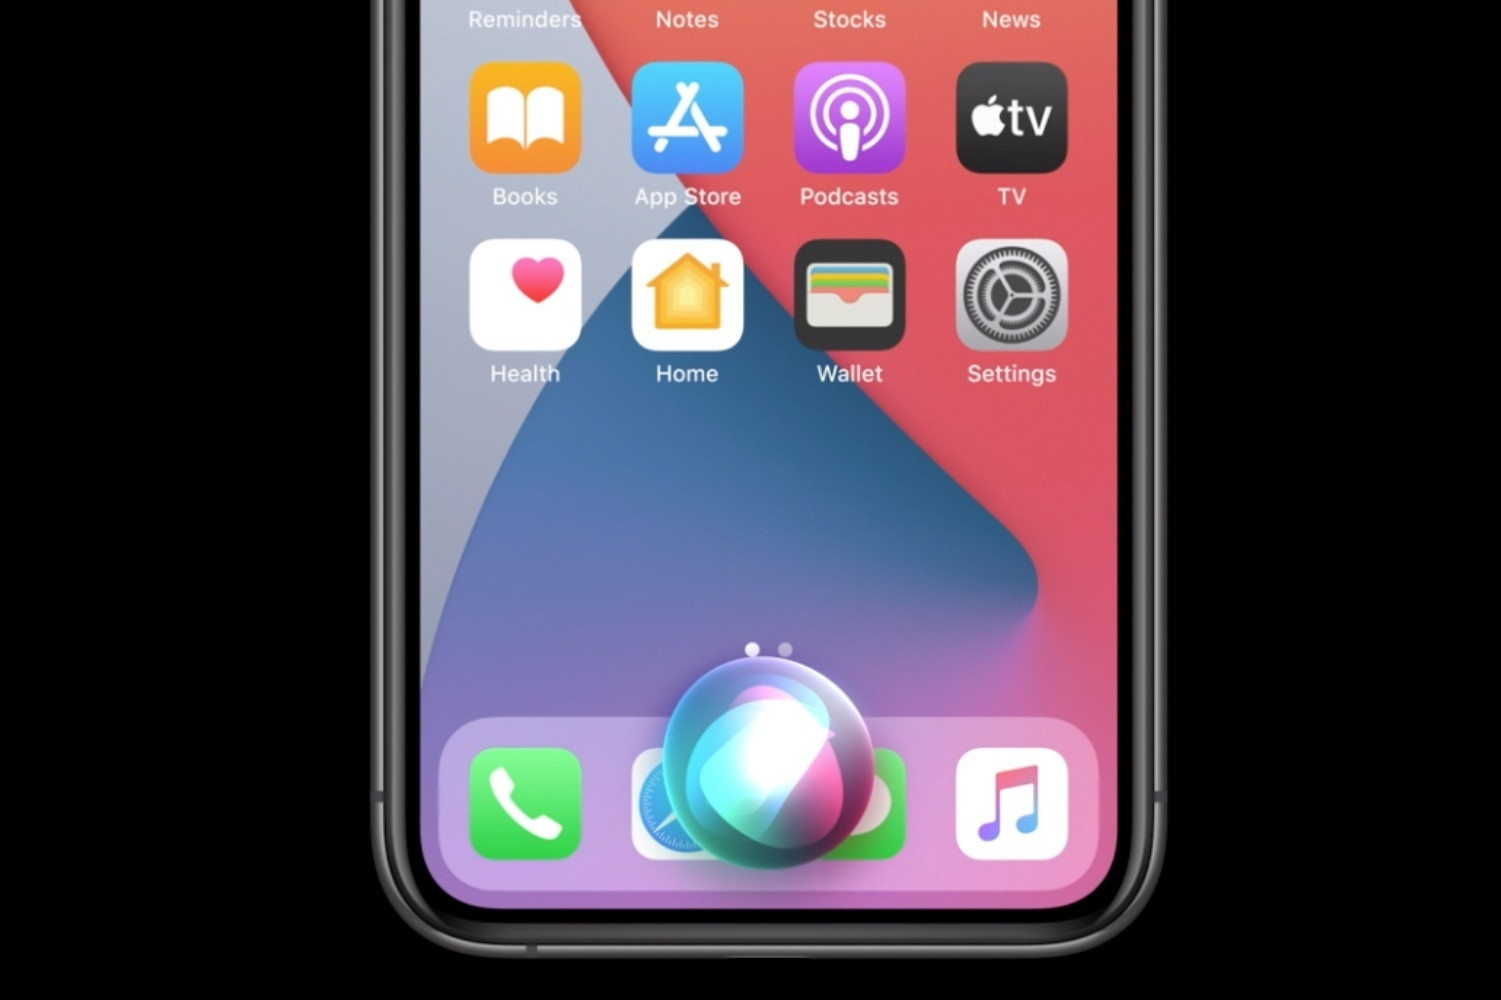
Stop Apple Watch Timer Alerts with a Press of the Digital Crown
by Small Dog Electronics
For those who cook, the Apple Watch provides a helpful Timer app that ensures we don't forget whatever's in the oven until it's burnt to a crisp. Setting the timer is easy from the app's interface, but even easier is using Siri: just hold the Digital Crown and say, "Set a timer for 8 minutes." When the timer goes off, the watch makes a sound or vibrates and presents you with Stop and Repeat buttons. But often, when a timer goes off, you're wearing oven mitts or moving quickly, making it hard to look at the watch and tap the Stop button. There's a no-look alternative you may not have known about—just press the Digital Crown once (if the display is active) or twice (if the display is dimmed) to stop the timer.
Click for article.
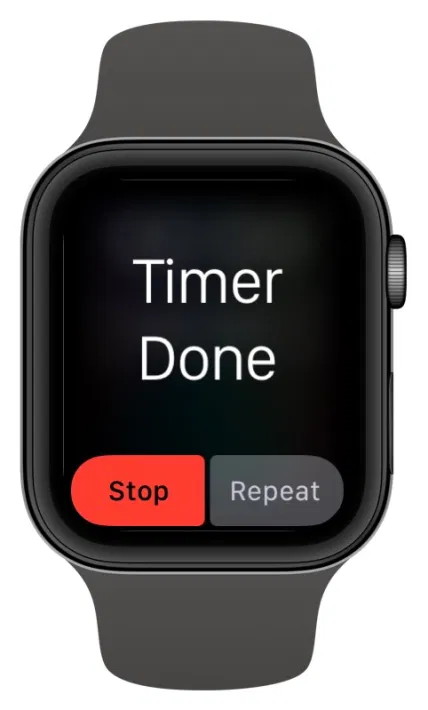
How to Change Your Apple Watch Band
by Olena Kagui, iphonelife
Learn how to remove your Apple Watch band and change the band to suit your needs!
There are so many exciting Apple Watch band options out there; it's a shame to stick to just one. That is why you should learn how to take off an Apple Watch band and how to put on an Apple Watch band. Once you master taking a band off and putting it back on, you will be ready to change your Apple Watch whenever the mood strikes. Because life is too short to wear the same old band day after day!
Continue reading....
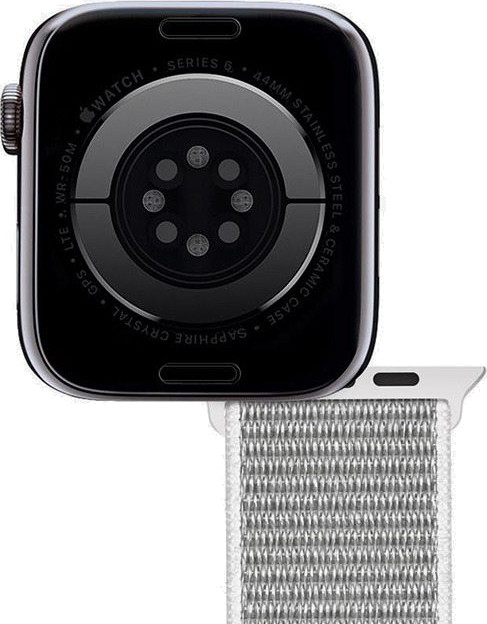
Is Your Apple Watch Waterproof: All Your Questions Answered
by Olena Kagui, iphonelife
Can you shower with your Apple Watch? Take it to the beach? Wear it while scuba diving? Find out once and for all!
Water to most electronics is like kryptonite to Superman. Liquid spills can cause permanent damage; oxidation is notorious for destroying devices. Between different Apple Watch models and unclear terms like "water resistance" and "water ejection," many people ask, "is my Apple Watch waterproof?"
Questions:
- Are All Apple Watches Waterproof?
- Can You Swim with an Apple Watch?
- Which Apple Watch Is Best for Swimmers?
- What Is the Water Drop on Apple Watch?
- How to Get Water Out of an Apple Watch
- Do You Have to Use Water Lock on Apple Watch?
- Can You Shower with an Apple Watch?
- Can You Wash Your Hands with Apple Watch? (or Handwash Laundry?)
- Can I Wear My Apple Watch for Water Aerobics & Other Water Sports?
- Will My Apple Watch Always Be Water-Resistant?
Continue reading....
How to reset the Apple TV app on your smart TV
by Jose Adorno, 9to5mac
Back in 2019, Apple announced it would launch the Apple TV app on Samsung's smart TVs. With time, other manufacturers joined the club, such as LG and Sony. If you have a television with the Apple TV app and are wondering how to reset it, it's really simple.
The Apple TV app gathers everything from movies and TV shows to Apple Originals and your iTunes library. In it, you can watch shows within the app and with the Apple TV Channels, you can subscribe and watch some streaming services without the need to leave the app.
These smart TVs also bring support to AirPlay 2, giving you the ability to AirPlay content for your iPhone, iPad, or Mac right into your television.
If for any reason, the Apple TV app is not working properly, there's always a way to reset it on your smart TV. These are the steps:
- Open the TV app on your smart TV;
- On the TV app, go to "Settings";
- Access "Reset Apple TV and Apple Music" then confirm.
When you do that, all the Apple TV app settings are reseted and you have to login again to start using it.
This app is a way for you to buy and rent movies and TV shows from the iTunes Store, as well as enjoy Apple TV+ content. Here's everything you need to know about Apple Originals.
Click for article.
How to Start a Timer On Your Apple Watch
by OSXdaily staff
How'd you like to start a timer, right from Apple Watch?
The Apple Watch might be the best thing to happen in personal fitness in a long time, but where the wearable really shines is in making it super easy to do things that we do multiple times a day, week, or month. Checking the time is obviously one of those things, but so is starting timers. And starting a timer on an Apple Watch is both useful and easy.
Sure you can use your iPhone to start a timer, and you can start one with HomePod as well, but doing it on your Apple Watch means you'll be able to see the timer's status at any moment, just by lifting your wrist. You'll also get a tap on the wrist when the timer comes to an end, too.
Things don't get any more convenient than that! Let's get started.
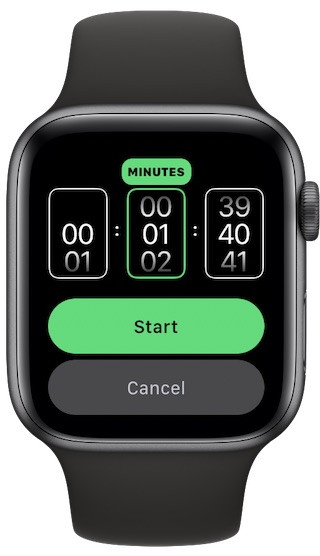
Starting a Timer Using the Timer App on Apple Watch
To start, open the Timer app on your Apple Watch:
- Tap one of the on-screen options to quickly start a timer for that period of time.
- Alternatively, scroll down by swiping the screen or turning the Digital Crown to select a recently used timer instead.
- Tap Scroll down and tap "Custom" to enter any other time for your new timer.
- Tap the hours, minute, and seconds and turn the Digital Crown to adjust it as required.Set the time you want the timer to run for
- Tap "Start" to begin the timer.
That's one way to start a timer on Apple Watch, but you can use Siri too.
Starting a Timer on Apple Watch Using Siri
Siri is ready and waiting on your Apple Watch, so why not make use of it?
Starting a timer on your Apple Watch is as easy as saying "Hey Siri, start a timer for [the time you want]".
Siri will confirm the timer has been started and you can see its current status on your Apple Watch's screen.
You can also use Siri to start a timer on your iPhone and iPad, too. If you'd prefer to use the Clock app and tap your iPhone or iPad, that's also possible for those devices.
Happy timing! Do you have any helpful Apple Watch tips or tricks you'd like to share? Let us know in the comments.
Click for article.
by Penny Holland, MAGIC*
I changed my iPod's name to Titanic. It's syncing now.
Windows vs. Ford
For all of us who feel only the deepest love and affection for the way computers have enhanced our lives, read on. At a recent computer expo (COMDEX) : Bill Gates reportedly compared the computer industry with the auto industry and stated:
"If Ford had kept up with technology like the computer industry has, we would all be driving $25 cars that got 1,000 miles to the gallon."
In response to Bill's comments, Ford issued a press release stating:
If Ford had developed technology like Microsoft, we would all be driving cars with the following characteristics:
- For no reason whatsoever, your car would crash.........twice a day.
- Every time they repainted the lines in the road, you would have to buy a new car.
- Occasionally your car would die on the freeway for no reason. You would have to pull to the side of the road, close all of the windows, shut off the car, restart it, and reopen the windows before you could continue. For some reason you would simply accept this.
- Occasionally, executing a maneuver such as a left turn would cause your car to shut down and refuse to restart, in which case you would have to reinstall the engine.
- Macintosh would make a car that was powered by the sun, was reliable, five times as fast and twice as easy to drive - but would run on only five percent of the roads.
- The oil, water temperature, and alternator warning lights would all be replaced by a single "This Car Has Performed An Illegal Operation" warning light.
- The airbag system would ask,"Are you sure?"before deploying.
- Occasionally, for no reason whatsoever, your car would lock you out and refuse to let you in until you simultaneously lifted the door handle, turned the key and grabbed hold of the radio antenna.
- Every time a new car was introduced car buyers would have to learn how to drive all over again because none of the controls would operate in the same manner as the old car.
- You'd have to press the "Start" button to turn the engine off.

How to Spot a Phishing Email
from Alaska USA Federal Credit Union
It's getting harder to tell real from fake messages. The number one rule: be skeptical and double-check everything, even if it looks real. A phishing email may ask you to click on a link, confirm personal information, pay for something you didn't order, claim free merchandise, update your account information, and more. Just because the email contains a recognized name or logo doesn't mean it's real.
Here are some things to look for in a phishing email:
- Claims that your account is on hold because of a billing problem or from 'suspicious activity'
- Request to verify personal information for an existing account
- Slightly altered website URL addresses, such as paypal.net or AlaskaUSA.security.com
- Familiarity with a company or organization you may have done business with ("We have a surprise for XYZ members/shoppers")
- Many (but not all) are addressed generally, such as 'Dear Valued Customer' instead of to you personally, and they often (although not always) have misspelled words and grammatical errors
Phishing emails are often TGTBT (too good to be true); trust your instincts on this!
Click for article.
Did Norton Send Renewal Offers for Devices Infected With Viruses?
by Jordan Liles, Snopes.com
Watch out for this fake email renewal scam that was created to look as if it was official correspondence from Norton Internet Security.
Claim
Norton Support and Norton Internet Security are sending email renewal offers that notify customers their devices are infected with viruses.
Origin
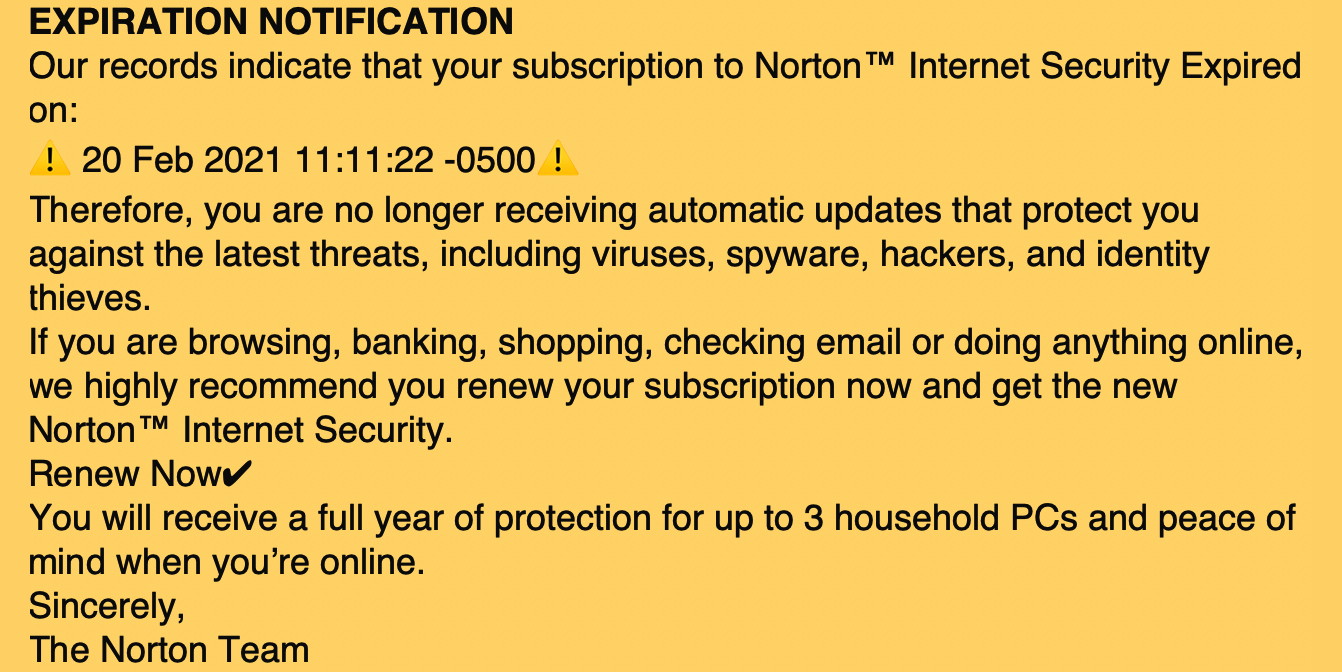
In March 2021, fake email renewals for Norton Internet Security landed in inboxes and spam folders, and warned of devices infected with viruses. An example email had the subject line: "your norton subscription has expired your device has been infected with viruses n°020953."
The Fake Email From 'Norton Support'
The email that appeared to be from "Norton-Support2021" notified users that their supposed subscription to Norton Internet Security had expired.
 The Norton renewal offer was a scam.
The headline claimed that recipients' devices had become infected with viruses. However, that seemingly important item didn't appear in the body of the email:
This was not a legitimate email from Norton AntiVirus or Norton Internet Security.
Investigating the Suspicious Email
In an example email we reviewed, all links in the message pointed to a website hosted on a Brazilian domain. The "unsubscribe" link at the bottom of the message led to the scam as well.
If readers receive a suspicious email that claims to be from Norton, desktop users can safely hover over links (but not click on them) in order to see where they lead. If they don't go to an official Norton website, such as "norton.com," do not click the link.
Also, the email address the message came from appeared to begin with "Norton-Support2021@" and end with a long string of random letters. The email address did not end in "@norton.com" or anything similar.
Advice From Norton
The company published a page to help keep Norton users safe from these kinds of renewal email virus scams. For example, it listed several email addresses they used to send official correspondence: norton@nortonlifelock.com, norton@secure.norton.com, ems@norton.com, lifelock@secure.norton.com, and information@mail.nortonstore.hk.
It's true that Norton may send renewal offers. However, such offers will never arrive with completely lowercase subject lines. Further, there was no indication that Norton notifies customers "your device has been infected with viruses" in renewal email offers.
"The URLs in our emails point to the server at: https://secure.norton.com. Make sure that the URLs begin with https:// and has a norton.com or lifelock.com domain."
Norton users who run the company's apps will potentially receive official emails from noreply@norton.com, no-reply@nortonlifelock.com, NortonAccount@norton.com, norton@nortonlifelock.com, and management@norton.com.
Other email addresses are covered on the Norton Support page.
Virus Hoaxes and Threats Are Nothing New
We've covered concerns regarding computer viruses since the 1990s. For example, the purported virus in a Budweiser frogs screensaver first made the rounds in 1997. Thankfully, it was a hoax.
Twenty-four years later, the Norton emails being received by readers were not a hoax. We recommend proceeding with caution when reviewing potentially harmful messages. Hovering over links to see where they lead is safe, but clicking on them may not be.
In sum, fake renewal email offers appeared to be from Norton Internet Security and claimed that devices were infected with viruses. This was not official correspondence from the company. The scams should be avoided.
Click for article.
Malware Examples
by Robert Y Elphick and Ron Sharp *
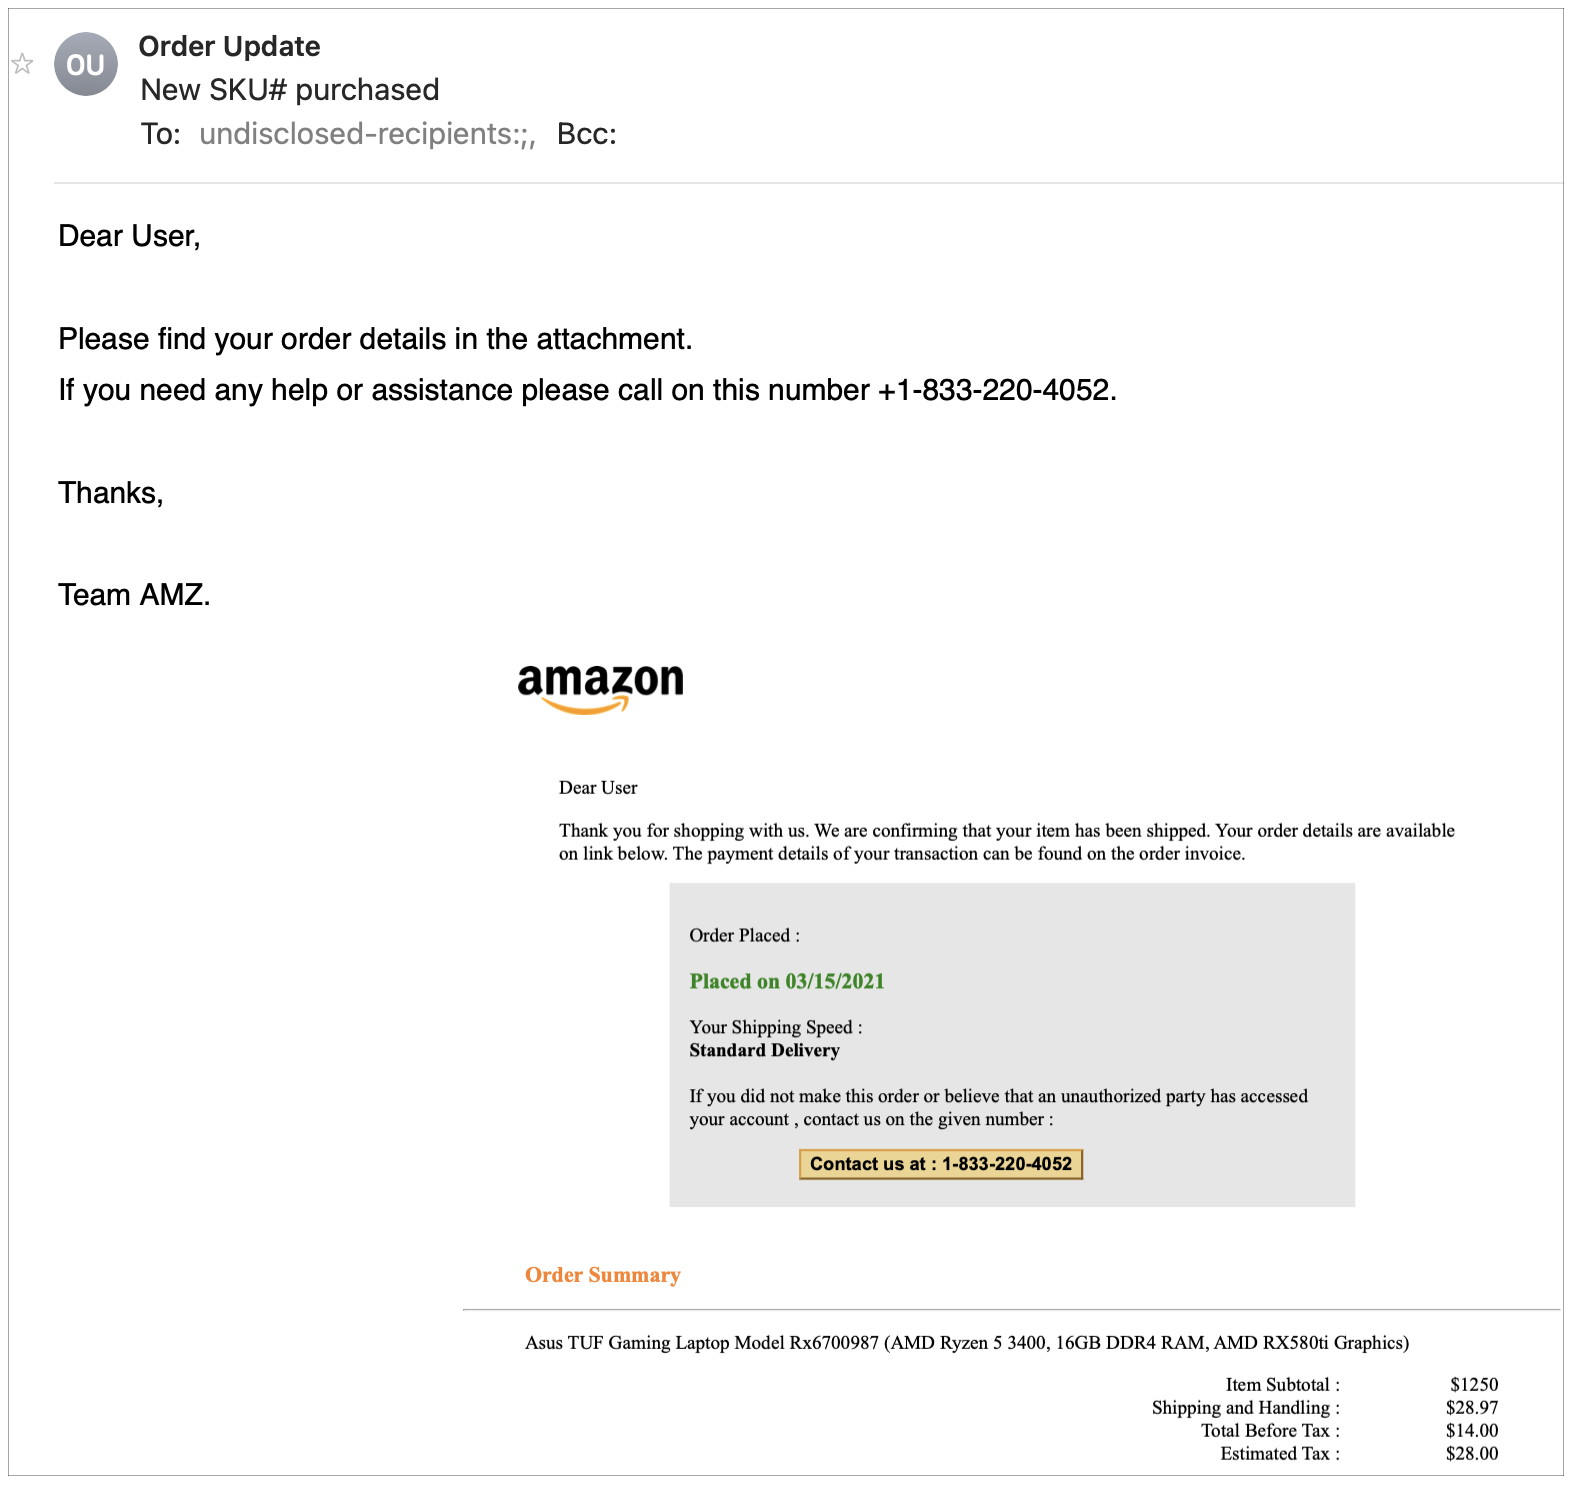
DO NOT CLICK! DO NOT CALL!
Notice that this email is to undisclosed-recipients
Beware of any email referring to a purchase or order that you did not make. They are usually phishing. Do not respond.
Internet Crime
Any one bothered by internet criminal activity should report it to the Federal Bureau of Investigation Internet Crime Complaint Center (IC3) at this web page. This includes phishing, malware, spoofing, any demand for money.

Entertaining sites For April *
by Ron Sharp, MAGIC
Another set of entertaining websites.
Lou Costello figures 7 into 28
Sinatra and Elvis
Larry Griswold old humor skit
Backing up your stuff *
by Ron Sharp, MAGIC
I hope you backup your computer to an external drive or to a cloud storage system. Computers fail occasionally and data gets deleted inadvertently. We enable our computers to handle an amazing amount of our daily lives. It's our music storage, photo storage, correspondence storage, bill payer, entertainment device and finance file cabinet, and more. You wouldn't want to lose it all.
So you need a backup system. Apple's iCloud does backup some data but it is designed to sync your devices for convenience more than backup a system. Time Machine is Apple's backup application that comes with your Macs operating system. It's easy to use and ready to go.
There are other backup applications you can use and there are cloud storage backup companies that can be used. Decide what you want and get it set up. If you want simplicity I recommend Time Machine.
If you do use a cloud service the disadvantages are that it cost money and it uses your internet and may slow down your other internet uses like browsing for new computers. The advantage to a cloud service is that it's off site. So if, for instance your house was in a flood or burned down your data would be saved. A local external drive would not survive.
There are aspects to how backup drive software stores your data but it's not a concern to most people. For instance, Time Machine does an hourly, weekly and monthly backup and stores data via it's unique software. Other backup programs will make a complete copy of your hard drive. With an exact copy, a backup drive can be used to start up your computer right from that drive, but you can't boot up a computer from a Time Machine backup. Realistically though, it's not much of a concern to able to start up your computer from the backup drive. And, I should add, a bootable backup will not work with the M1 Macs without considerable setup peramiteres.
In purchasing a backup drive, typically you should get one twice the size of the computers hard drive. Then just plug it into your Mac. Most often with new drives your Mac will ask you if you want to use it for Time Machine backups. If the drive is not formatted properly for Macs, it will ask if you want it formatted. Just click through the prompts to set it up. That's it. The first backup will take hours but additional backups are quick.
If your Backup drive becomes disconnected or damaged, your Mac will warn you that the backup drive is missing and/or when your last backup was. It's convenient for desktop computers to just leave the backup drive plugged in. But for portables, plugging the backup drive in a couple times a week or a few times a month is one approach, and how I use my backup drive. But you have to remember to do it. If your device is portable and gets moved around a lot, then it's a bit of convenience to use a cloud backup.
Many people use Apple's iCloud for the convenience along with a backup drive. With iCloud features enabled you'll know that at least your photos and contacts will be backed up in case of a backup drive failure. You would need to turn those items on in iCloud preferences.
By the way, you should check your iCloud settings after every Mac OSX update. Apple has a habit of turning on iCloud features that you may prefer not to use.
MAGIC, the Macintosh Appreciation Group of Island County, serves people who use Macintosh computers, software and peripherals. Our goal is to share information and get answers to questions to make us more productive with our use of technology. Our monthly meetings give us a chance to discuss computer problems and share ideas with other Mac users, feature speakers on specific topics, and to keep apprised of Apple news.