• Meeting and Q&A with Harry
• Q&A with "A" Team based on questions emailed prior to meeting
Location:
by ZOOM on-line
Minutes for February 15, 2023
by Madelyn van der Hoogt, Secretary
The meeting was called to order at 4:01 p.m. by Ron Sharp, newly elected vice-president. (President Harry Anderson is currently out of the country). 23 members were in attendance. Ron welcomed everyone to the meeting and announced that as we had voted in our last meeting, for the foreseeable future our meetings will consist of questions directed to experts Robert Elphick, Ron Sharp, and Gary McIntyre. For today's meeting, a number of questions came in at the last minute.
Gary gave the treasurer's report: Last month we had one bill for web hosting; the balance in the treasury is now $8,859.68.
Greetings, everyone. I am looking forward to seeing many of you at our MAGIC meeting on March 15 at 4 p.m. via Zoom. As you know, our format will be a general Q&A as our team of experts — Robert, Ron and Gary — will respond to questions that you pose in advance of the meeting. Send your questions before March 15 by email to magicmug@whidbey.net and our experts will pick them up there.
I have been away for the last two meetings and I appreciate that Ron, as our vice president, has presided at them. I was gone most of February on very long cruise to Antartica, where the scenery was unbelievably beautiful. I really appreciated having my iPad and my iPhone with me to record as much as possible. And the dozens of photos I took transferred automatically by iCloud to my MAC at home. The wonders of modern technology! Of course, my task now is to sort all those photos, delete the duplicates and write down what they are — before I forget.
See you on March 15!
Note: This Software Update section of the newsletter lists the most relevant Apple updates. Not all updates are listed for all products. Additionally, I'll add other pertinent updates on occasion.
macOS 13.2.1 update fixes WebKit security breach that has been 'actively exploited'
by Filipe Espósito, 9to5mac
Apple has released iOS 16.3.1 and macOS Ventura 13.2.1 to all users. While the company wasn't clear on what changed with the updates at first, it has now been revealed that macOS Ventura 13.2.1 fixes a security hole in WebKit that has been "actively exploited" by attackers.
Security exploit fixed with macOS 13.2.1
According to an Apple Support webpage, today's macOS update fixes an exploit affecting WebKit - the engine behind Apple's Safari web browser. More specifically, Apple says that it is aware that attackers have been using this exploit to execute arbitrary code. Here's exactly how the company describes the security update:
WebKit
Available for: macOS Ventura
Impact: Processing maliciously crafted web content may lead to arbitrary code execution. Apple is aware of a report that this issue may have been actively exploited.
Description: A type confusion issue was addressed with improved checks.
But users running older versions of macOS can also get the patch for the same security exploit. That's because Apple has also released Safari 16.3.1 for macOS Big Sur and macOS Monterey. As expected, the update includes the same security patches that come with macOS Ventura 13.2.1. A similar exploit was also fixed on the iPhone and iPad with the release of iOS 16.3.1.
Last month Apple released macOS Ventura 13.2 with over 20 security fixes that prevent apps from accessing user-sensitive data, executing arbitrary code with kernel privileges, and more. The update also introduced the ability for users to set a physical key as their Apple ID two-factor authentication method.
Both macOS 13.2.1 and iOS 16.3.1 also fix multiple other security exploits. For example, today's updates fix a bug in the Shortcuts app that could let apps "observe unprotected user data." That's why it's always important to keep your devices updated with the latest version of the operating system.
You can now download macOS Ventura 13.2.1 by going to the Software Update menu in the System Settings app. As for iOS 16.3.1, you can download it by going to Settings > General > Software Update.
Night Shift automatically shifts the colors of your display to the warmer end of the color spectrum after dark.
Studies have shown that exposure to bright blue light in the evening can affect your circadian rhythms and make it harder to fall asleep. Night Shift uses your computer's clock and geolocation to determine when it's sunset in your location. It then automatically shifts the colors in your display to the warmer end of the spectrum. In the morning it returns the display to its regular settings.
How to set up Night Shift
Make sure that your Mac meets the system requirements for Night Shift, then follow these steps:
Choose Apple menu > System Settings (or System Preferences).
Click Displays.
Click Night Shift.
From here you can create a custom Night Shift schedule, schedule Night Shift to turn on automatically from sunset to sunrise, or manually turn Night Shift off or on until sunrise or the scheduled time. You can also make the color temperature more or less warm when Night Shift is on. Warmer color temperatures show more yellow and less blue.
System requirements for Night Shift
Night Shift requires macOS Sierra 10.12.4 or later and one of these Mac computers, using the built-in display or the displays listed:
How to Create an iCloud Shared Photo Library With Family and Friends in macOS Ventura
by Dennis Sellers, macsales blog
With iCloud Shared Photo Library in macOS Ventura (as well as iOS 16 and iPadOS 16), you can create and share a separate photo library with up to six members.
iCloud Shared Photo Library
You can choose to share all of their existing photos from their personal libraries, or share based on a start date or people in the photos. To help keep their Shared Library up to date, you'll receive intelligent suggestions to share relevant photo moments that include participants in the library and any other people they choose.
You can choose what to include based on a start date or the people in the photos. Once the Shared Photo Library is set up, you can share photos manually or get smart suggestions for adding photos to the shared library in a new For Your Shared Library sidebar item.
How to implement an iCloud Shared Photo Library
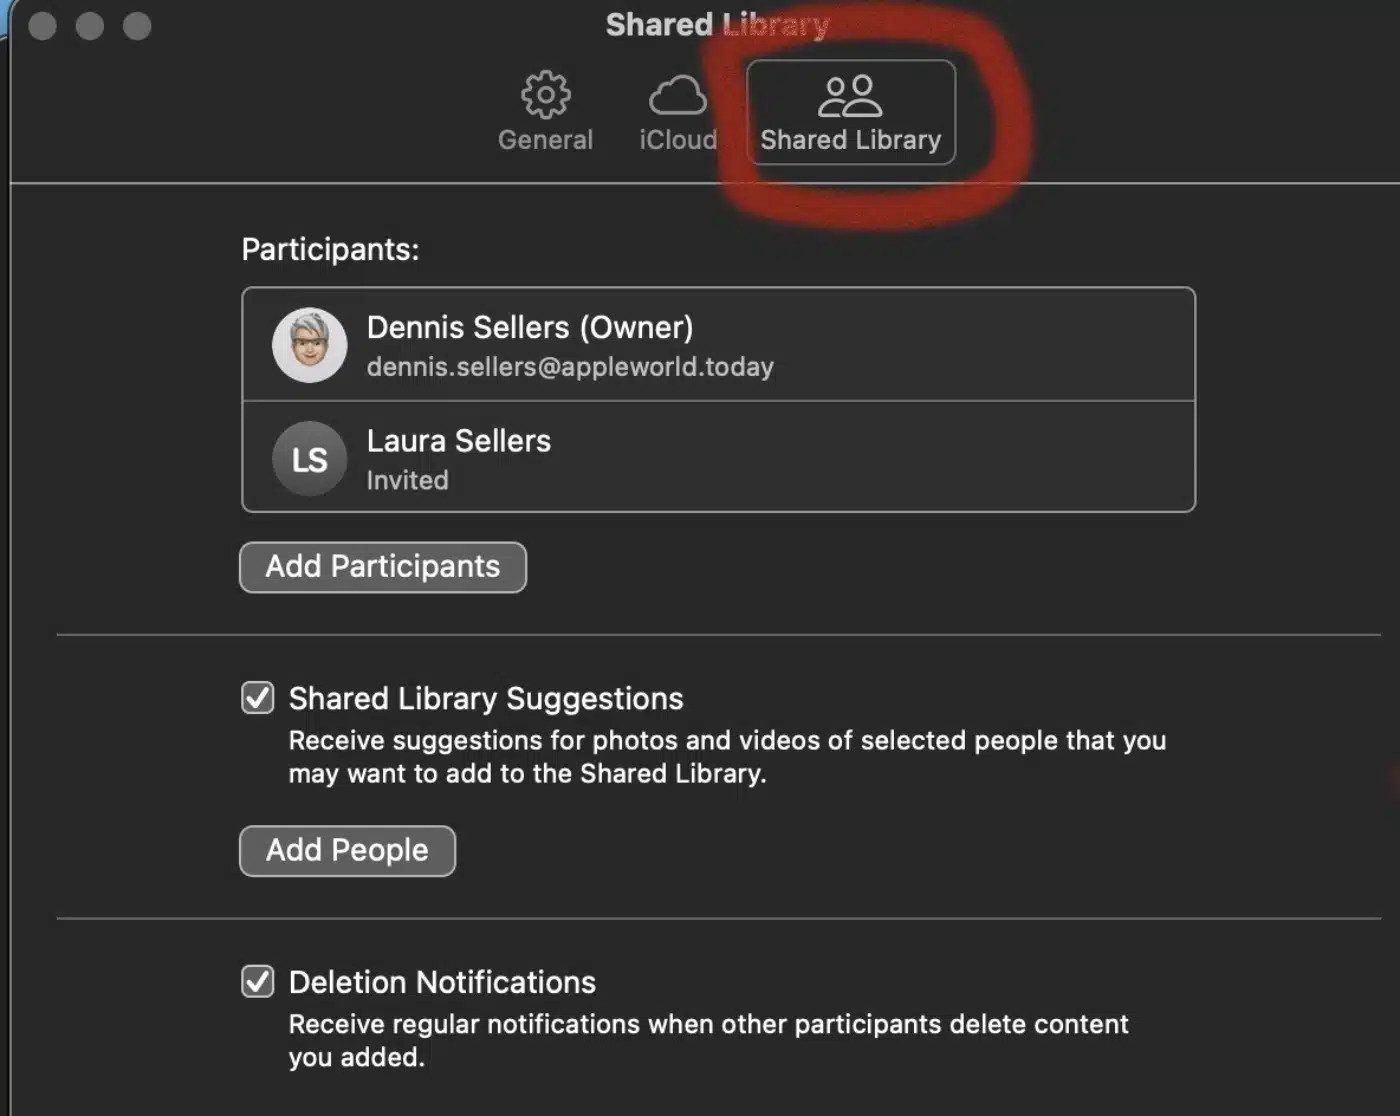
To set up an iCloud Shared Photo Library, launch the app, choose Settings, then Shared Library.
Settings > Shared Library
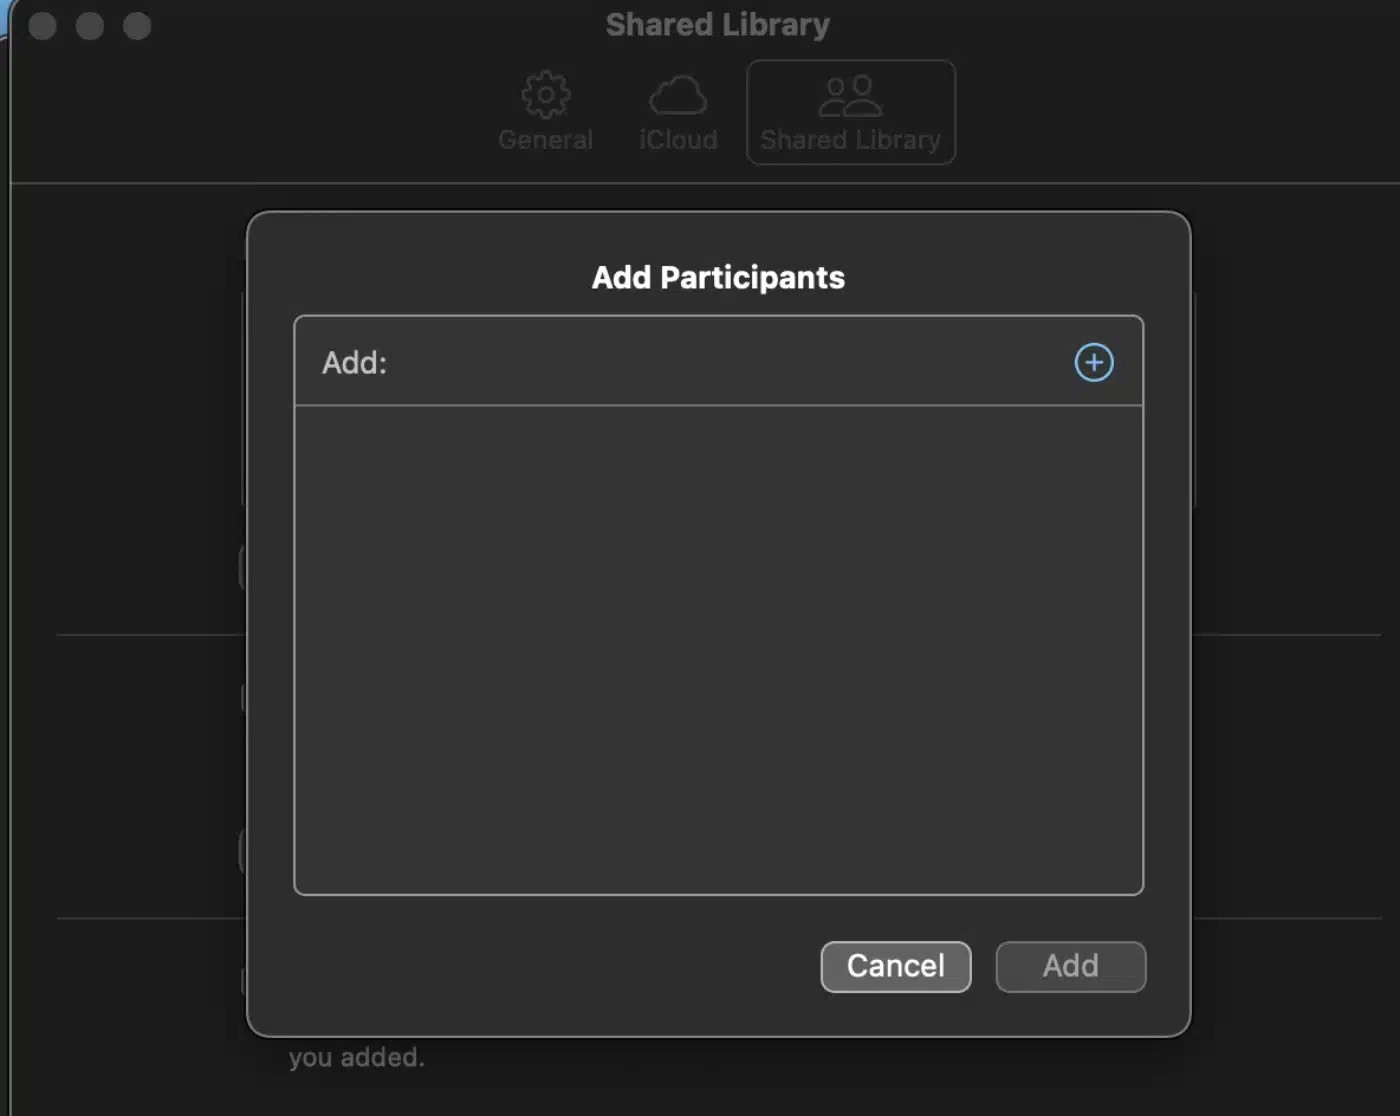
Tap on "Add Participants" to add folks you want to share with.
Add Participants
Those you add will get a Message with a Shared Library invitation. Note: Users under 13 can only join or create a Shared Library with members of their iCloud Family Sharing group.
After picking the folks you wish to share with, you can choose to move which items to move to the Shared Library. You can choose from: All My Photos and Videos; Choose By People or Date; or Choose Manually. There's also an option to "Move Photos Later."
Once your photos and videos are are added, you can preview the library before it's shared. If its looks good, you can proceed to invite more participants using the macOS Messages app or a shared link.
Everyone will have equal permissions for adding, editing, and deleting photos in the shared library. Favorites, captions, and keywords sync across your Macs, iPhones, and iPads — though it may take a little time to do so. The syncing isn't always instantaneous.
iCloud Shared Library automatically sends notifications to everyone with whom its shared when new photos are added. If someone doesn't want to receive them, they can go to Settings > Shared Library and unclick "Delete Notifications."
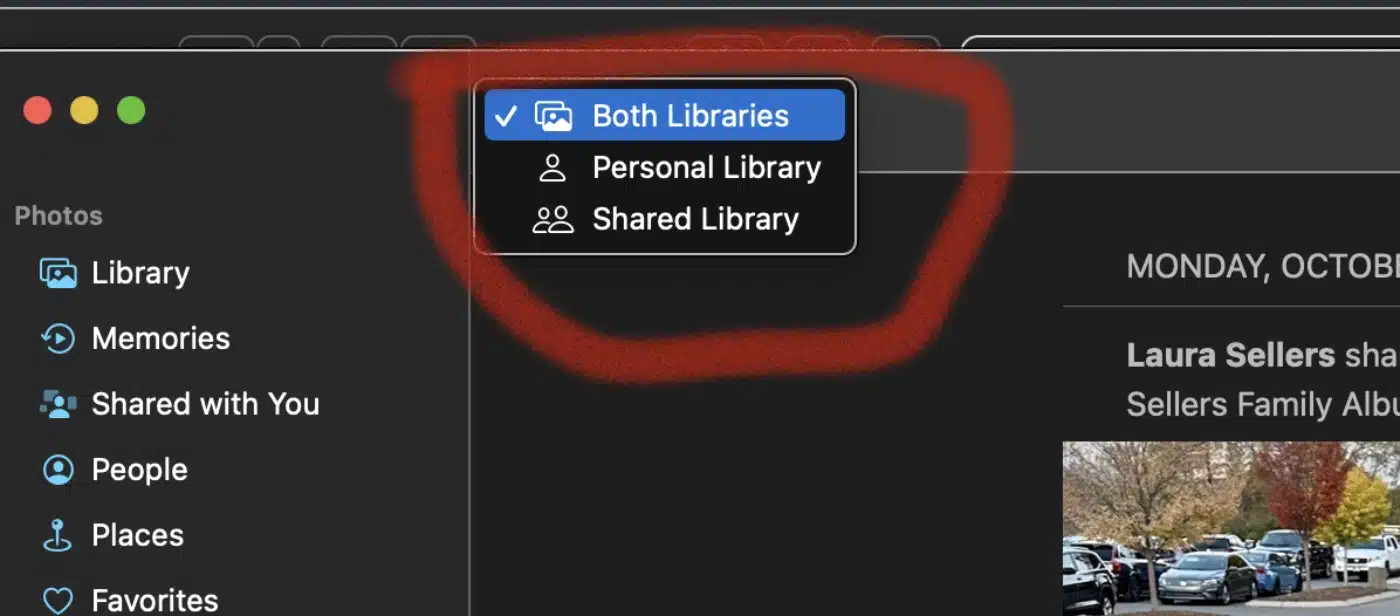
How to Switch Between Your Personal Library and Shared Library
Launch Photos
At the top, choose Personal Library, Shared Library, or Both Libraries.
Choose a Library
In Both or Shared Library view, photos that are in the Shared Library are badged with an icon. To turn this off, choose View > Metadata > Show In Library.
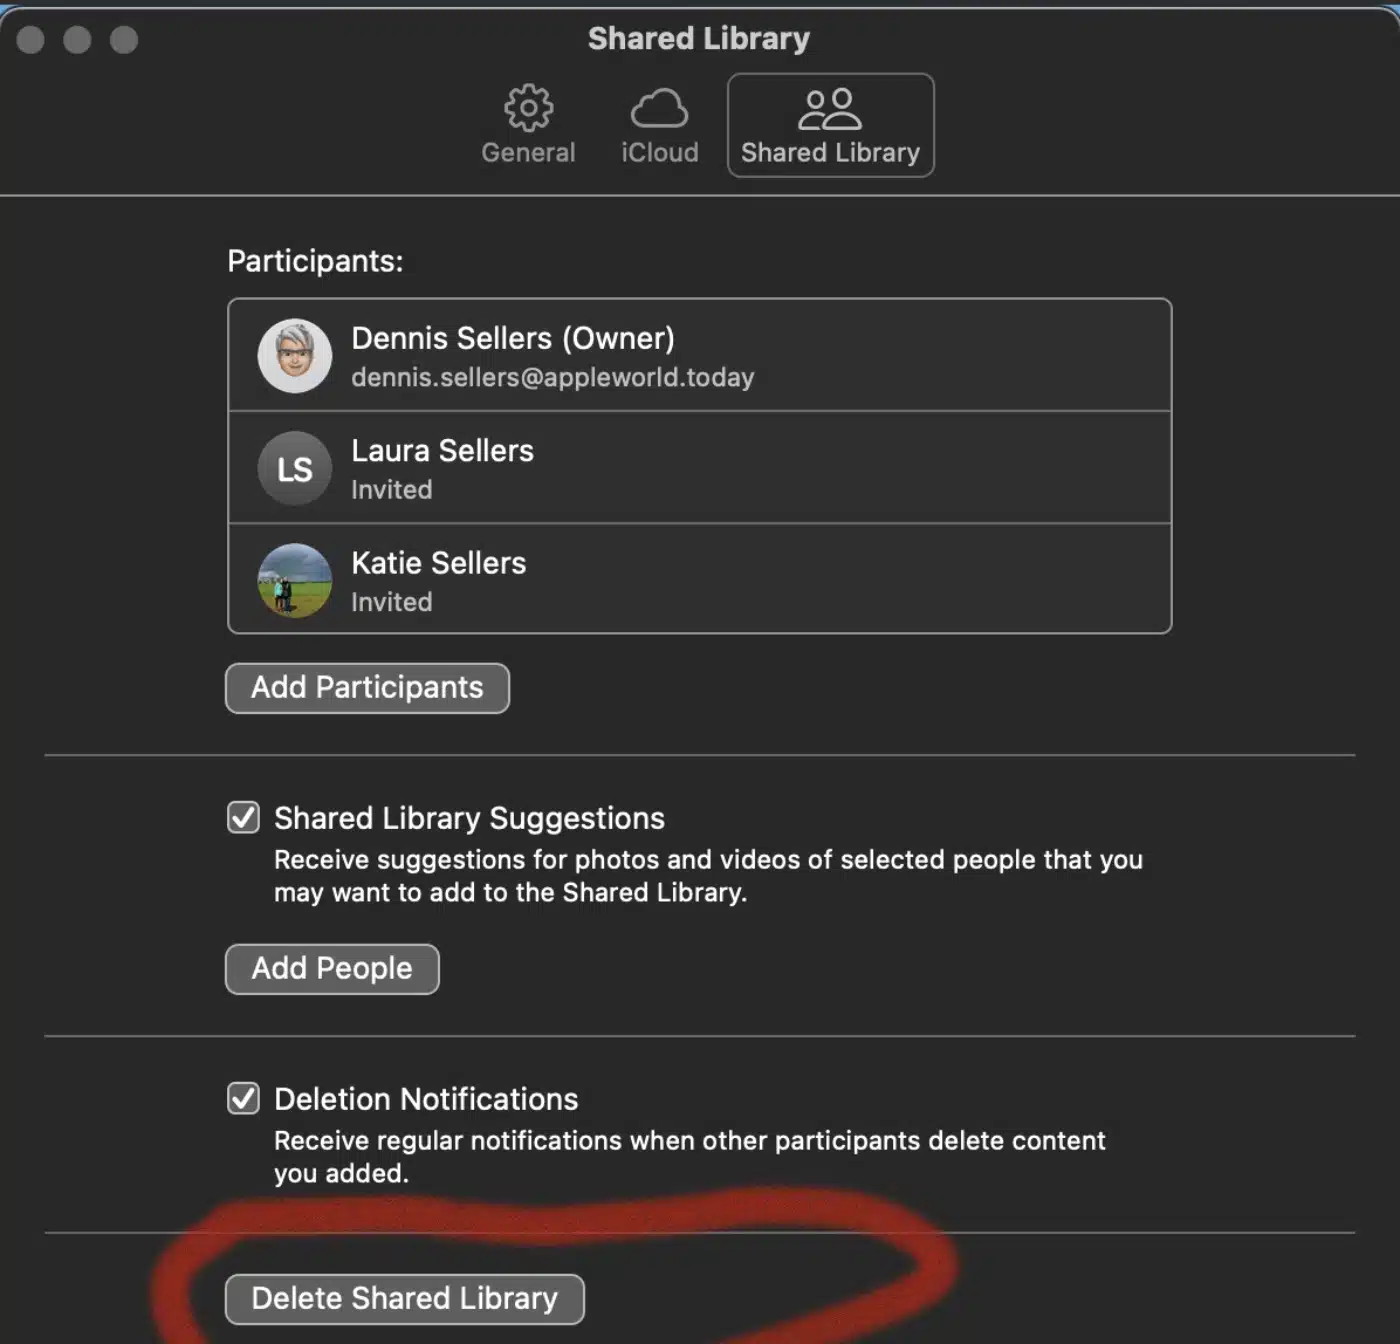
How to Leave a Shared Library
If you created an iCloud Shared Photo Library, you can remove a participant or delete the Shared Library anytime you wish. After you delete the Shared Library, all participants receive a notification.
If a participant has been in the Shared Library for more than seven days, they automatically receive everything from the Shared Library in their Personal Library. If they've been in the Shared Library for less than seven days, they receive only the photos and videos that they contributed.
If you're a participant, you can leave a Shared Library at any time. You can choose to receive a copy of everything from the Shared Library in your Personal Library, or just what you contributed.
Delete Notifications
To delete a Shared Library, go to Settings > Shared Library and click "Delete Shared Library."
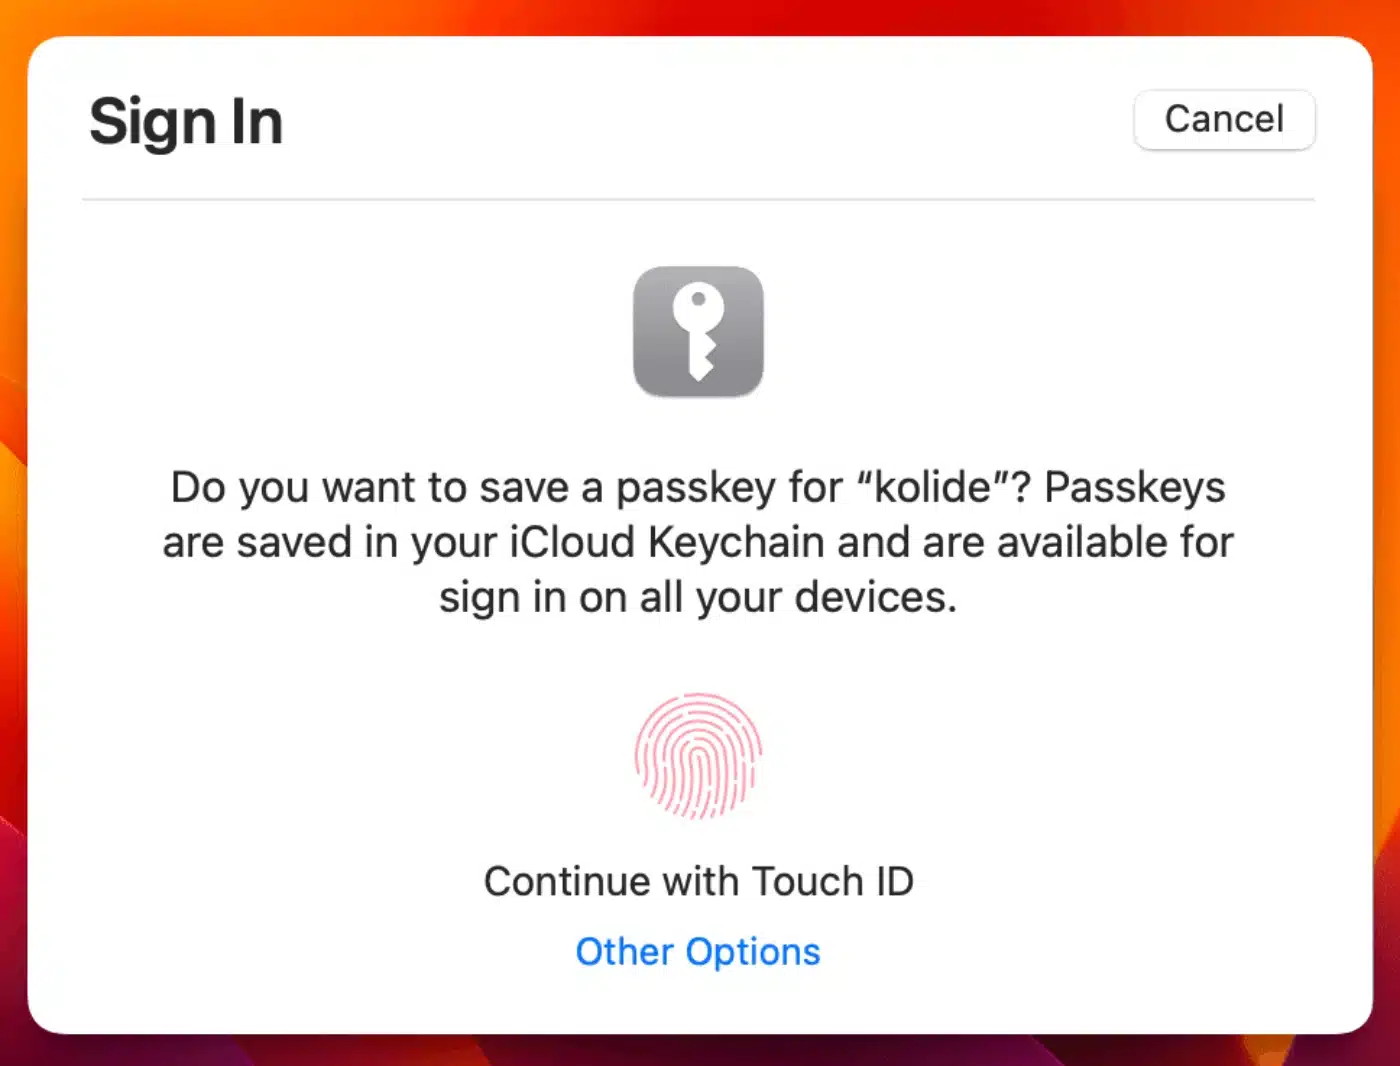
How To Use Passkeys Instead of Passwords - in MacOS Ventura.
by Dennis Sellers, macsales blog
macOS Ventura (and iOS 16 and iPadOS 16) introduces Passkeys, a replacement for passwords that are, in the tech giant’s words, “designed to provide websites and apps a password-less sign-in experience that is both more convenient and more secure.”
About Passkeys
Passkeys are a new industry standard created by the FIDO Alliance and the World Wide Web Consortium that replace passwords with cryptographic key pairs, offering customers a simple and secure way to log in to PayPal based on technology that is resistant to phishing and designed so that there is no shared passkey data between platforms.
At this summer’s Worldwide Developer Conference, Apple announced Passkeys (with a capital “P”). The tech giant says that Passkeys are a standard-based technology that, unlike passwords, are resistant to phishing, are always strong, and are designed so that there are no shared secrets. They’re designed to simplify account registration for apps and websites, are easy to use, and work across all of your Apple devices, and even non-Apple devices within physical proximity. Users can use Face ID and Touch ID to authenticate their account.
Passkeys are end-to-end encrypted and sync across your Apple devices through the iCloud Keychain. Passkeys work by using your Mac or iPhone’s Face ID/Touch ID sensors to securely verify your identity, then, for example, log you in to a website.
This means whenever you’re prompted to create a new account online, instead of using the stand “email and password” set-up, you can create a Passkey instead of the password. When you log back into the account you’ll be prompted to verify your identity via Face ID or Touch ID.
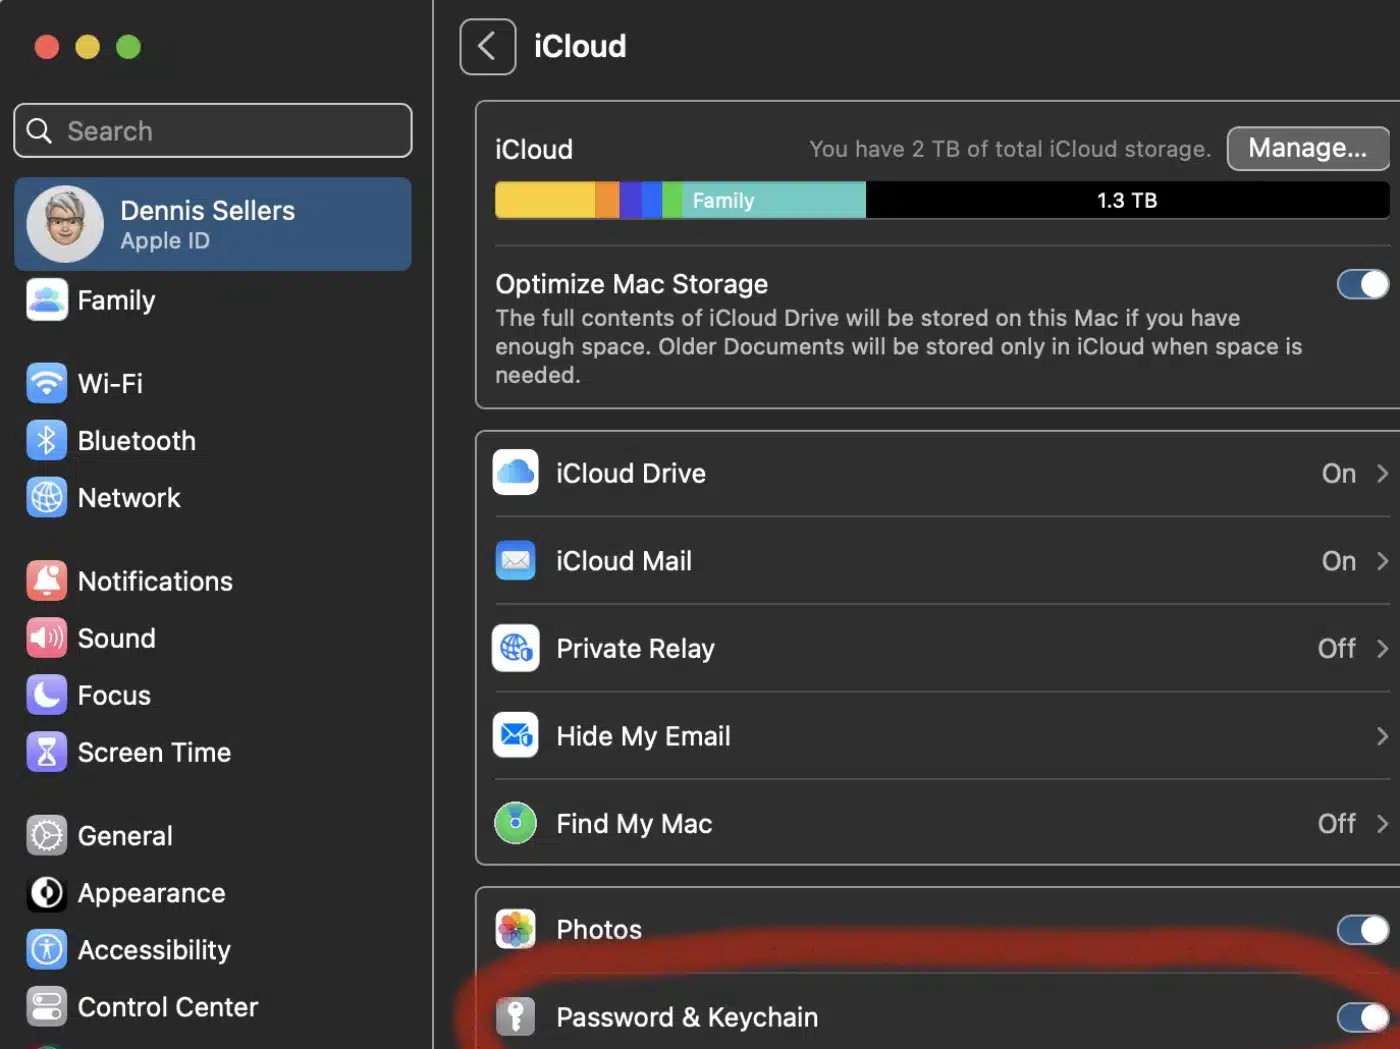
How to turn on iCloud Keychain in macOS Ventura
Choose Apple menu > System Settings (or System Preferences).
Click your name, then click iCloud. In earlier versions of macOS, click Apple ID, then click iCloud in the sidebar.
iCloud > Password & Keychain
Turn on Password & Keychain.
Note that if/when you turn off iCloud Keychain, password, passkey, and credit card information is stored locally on your device. If you sign out of iCloud on that device while Keychain is turned on, you’re asked to keep or delete that information.
Setting Up Apple Passkeys
When you first access an app or website (and they’re not exactly abundant yet) supporting the FIDO Standard, you’ll be asked to register or set up an account.
Tap the button.
Enter your login information (a username, an email address, or an Apple ID).
Create a passkey
A prompt will be ask you to authenticate using Touch or Face ID. Now your passkeys will be created.
A notification or prompt will ask if you wish to sign in using the saved passkey on your device the next time you sign in to the website or app.
Click Continue.
Now your Mac, iPhone, and iPad will require your biometrics (Face ID or Touch ID) for authentication once you go to the website or use the app.
Note that, per Apple, Passkeys are only stored locally on your Mac and not on a server. This should add another level of security.
There are a few hidden gestures on your iPhone that you absolutely need to know. You're typing out a long text on your iPhone and you need to go back to fix a typo. Tapping on the screen to move the cursor feels like a shot in the dark — but there's a secret gesture to move around and select text.
Here are three top iPhone tips for your weekend. Also in this article: how to select and delete a bunch of emails, text messages, anything in a list at once; and the secret gestures that undo and redo. Like, for example, if you accidentally delete a bunch of emails.
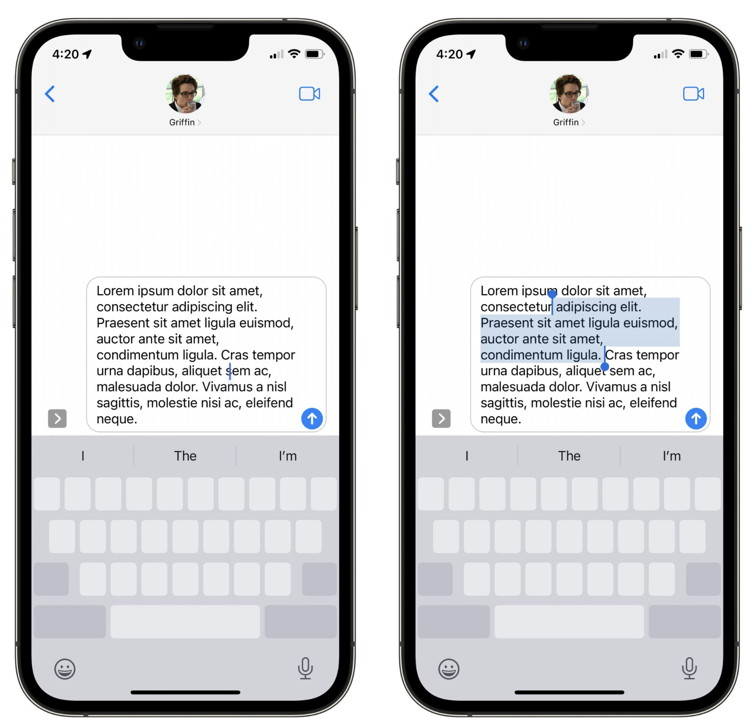
No. 1: Edit text faster
Hold down on the spacebar to precisely edit text.
Screenshot: D. Griffin Jones/Cult of Mac
If you're pecking out a paragraph of prose, tapping on the screen to move the cursor around feels like a crapshoot. But there's a better way.
Tap and hold down on the space bar. The letters on the keyboard disappear — that's because it's turned into a trackpad. Move your finger around and you can control the cursor, putting it exactly where you want.
Use a second finger and you can select text. This isn't very precise; usually, I regret trying it, but if you have steadier hands than me, you might be able to make it work.
On the Mac, there's a similar set of keyboard shortcuts that can help you out here, too. Check out that video here.
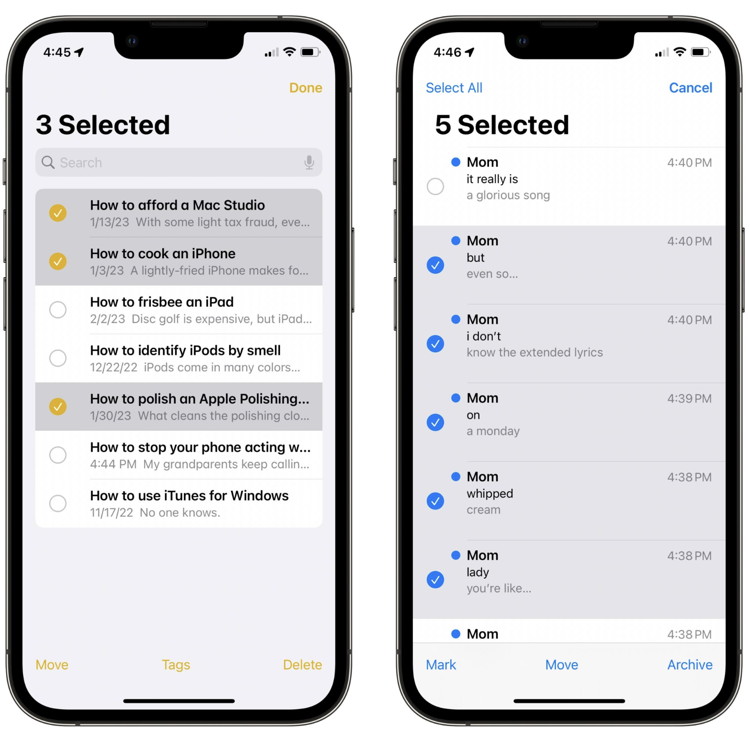
No. 2: Select a bunch of things in a list
Drag with two fingers to select a bunch of stuff at once.
Screenshot: D. Griffin Jones/Cult of Mac
You have too many emails. You just want to get rid of them all. You could just swipe to delete, one by one, but that takes forever.
With two fingers, swipe down on the screen. That instantly starts selecting a bunch at a time.
This works almost anywhere there's a big list of things. You can select a bunch of messages and mark as read, select a bunch of photos and share them, select a bunch of Notes and delete them, select a bunch of Reminders and mark them as completed.
No. 3: Undo and redo gestures
No, I'm not talking about Shake to Undo, a weird feature from the early days of the iPhone. There's a system-wide three-finger gesture for Undo and Redo.
Take three fingers and swipe to the left. If you want to undo deleting a bunch of pictures at once, as you might have done in trying out the previous tip, just swipe to the left and they'll all be moved out of the trash. You can keep going to undo several actions in a row.
Swipe with three fingers to the right to redo.
One more thing … the hidden gesture to cut and paste
Not a lot of people know this one: you can make a "pinch" gesture with three fingers and you can copy; the reverse of this will paste.
Now, it's actually a bit harder to do this than just tapping the Copy button in most situations, which is why I tacked it on at the end.
However, there are some situations where it's useful, like when the Copy/Paste menu doesn't show up. This happens sometimes in weird third-party apps that don't use a standard text field.
It's also very handy on iPad, where there's more room to make the gesture.
One more one more thing
You can tap with three fingers on the screen to bring up a shortcut menu with buttons to control all of these (instead of the somewhat convoluted gestures). Tap the screen with three fingers and hold for about a second. A shortcut menu will appear at the top of the screen with buttons for undo/cut/copy/paste/redo.
These hidden gestures on the iPhone might help you write faster, manage your email faster, or correct your horrible mistakes.
Apple's native Notes application is, by far, my most used Apple app. I use it for jotting down ideas, scripting out videos, hand-drawing rough drafts of thumbnails, bookmarking websites, and so much more. I want to show off some Notes features that will really help the everyday user maximize their experience!
Before we start
I wanted to mention that I will be using the iPad Pro to explain these Notes features, but these will all also work with any iPad and any iPhone as well. Make sure you are on the latest version of iOS & iPadOS to avoid any issues with these features! Let's get started!
Apple bumped how much it will pay for trading in used products. An iPhone 13 series model now brings in as much as $600, a previous-generation iPad Air is worth up to $320, while the trade-in value for a MacBook Pro is as much as $730.
The payouts have increased up to $160 when compared to what Apple was offering last week.
Apple shells out more for your old iOS, macOS or iPadOS device
iPhones are expensive but hold their value. A unit from multiple years ago can still be traded in for a welcome amount. And the same goes for Macs and iPads — an older unit is certainly not junk. And on Wednesday, Apple increased the amount it pays for many previous-gen products.
An iPhone 13 Pro Max is now worth up to $600, a $30 increase. A Pro went up $30 to $500.
The trade-in payout for an iPad Air took a jump, too. Apple is offering up to $320 for one, a $90 increase.
And a MacBook Pro is now worth up to $730 to Apple, an increase of $60 from the trade-in value a week ago. A MacBook Air maximum value is now $515, up from $460.
Visit Apple's trade-in page to see how much your older Apple device is now worth.
A real improvement for Mac and iPad
Today move comes a couple of months after Apple lowered the trade-in values for some iPhone models. The company seems to have decided it went too far and bumped them back up a bit. But not to the levels they were in late 2022.
The same is not true for Mac and iPad, Apple is now offering more for some Mac and tablet models than it was months ago.
Tips on trading in Apple devices
The exact amount Apple pay's for trade-ins depends heavily on condition. If the device looks like one that's been through a war, it's not getting top dollar. And keep in mind that you don't have to be in the market for a new iPhone to sell your old one to Apple. The company will give you an Apple Gift Card to be used on other products.
Track your medications on iPhone in the Health app
by Griffin Jones, cultofmac
The Apple Health app on your iPhone will help you track your medications. It has a lot of advanced options for all kinds of medicine — you can set up schedules, log your activity and even get advice on drug interactions. If you can connect with your health care provider through the Health app, setting it up is incredibly simple. Otherwise, you can just scan the label on the bottle using the camera to import it.
Apple shares 5 security steps you should take 'right away' to protect Apple Card
by Michael Potuck, 9to5mac
Apple Card has a number of security improvements compared to many credit cards with features like the number/expiration date not being printed on the card, control in the Wallet app on iPhone, and a focus on Apple Pay. Today Apple has shared 5 steps to take "right away" to "protect yourself from fraud and make the most of Apple Card's security features."
Apple highlighted the important security features in an email to Apple Card users this morning with the recommendation of using/being aware of them immediately.
Here's the list of things Apple says "you should do right away to keep your Apple Card safe."
5 Apple Card security features you should use now
Turn on Advanced Fraud Protection. The 3-digit security code for your Apple Card will change periodically for even more secure purchases on the web. Don't worry, recurring charges will still go through
Go to Apple Card in Wallet, tap the card number button, then scroll down to Advanced Fraud Protection and turn it on. Use Advanced Fraud Protection with Apple Card
Enable transaction notifications. You will get an alert every time your card is used so you can catch suspicious activity as soon as it happens
Go to Apple Card in Wallet, tap the More button, then tap Notifications and turn on Transactions
Lock your titanium card if it's ever lost or misplaced (you could also lock it as a default and only unlock it when you need it if you normally use Apple Pay)
Go to Apple Card in Wallet, tap, tap Card Details, then tap "Lock Card" under the Titanium Card section. If you find your card, you can easily unlock it. Lock or unlock Apple Card
Remove lost or stolen devices from your Apple account and change your Apple ID password if you believe it's compromised
Head to appleid.apple.com and log in to manage your devices (click "Devices" on the left side of your screen)
Security awareness
Fraudsters sometimes impersonate credit card companies in an attempt to gather customers' account data and make unauthorized purchases.
Don't accept unsolicited calls or texts urging you to take immediate action on your Apple Card account
Don't share one-time passcodes sent from Apple or Goldman Sachs with anyone
Don't provide your virtual card number to unverified merchants or websites
If ever in doubt, hang up and call Apple Card support at 1-877-255-5923 to ensure you're talking to a verified Apple Card specialist.
Apple Card specialists will never ask for your Apple ID password, Apple ID verification codes, device passcode, recovery key, or any account security details. Learn more about how you can help keep your Apple ID secure
If you don't have Apple Card yet (and are in the US) and would like to apply, you can find a link in the Wallet app on your iPhone or on Apple's website.
Here's how to use the full 48MP iPhone 14 Pro camera
by Michael Potuck, 9to5mac
One of the biggest upgrades for the iPhone 14 Pro camera system is the main lens being increased to 48MP with what Apple calls an "advanced quad-pixel sensor." However, the camera defaults to taking 12MP images. Read on for how to use the 48MP iPhone 14 Pro camera.
Shooting with the full 48MP resolution main camera on the iPhone 14 Pro isn't something you'll want to do all the time with a single image ranging from 75 to 100MB+ in size.
But when you want to capture the most amount of detail possible - allowing for impressive crops and edits - using the full power of the main iPhone 14 Pro camera is key.
Offering 8064 x 6048 pixels, that's 4x the resolution of 12MP shots. And Apple says "with a new machine learning model designed specifically for the quad-pixel sensor, iPhone now shoots ProRAW at 48MP with an unprecedented level of detail, enabling new creative workflows for pro users."
How to use 48MP iPhone 14 Pro camera
Note: 48MP image sizes range from 75-100MB+ each
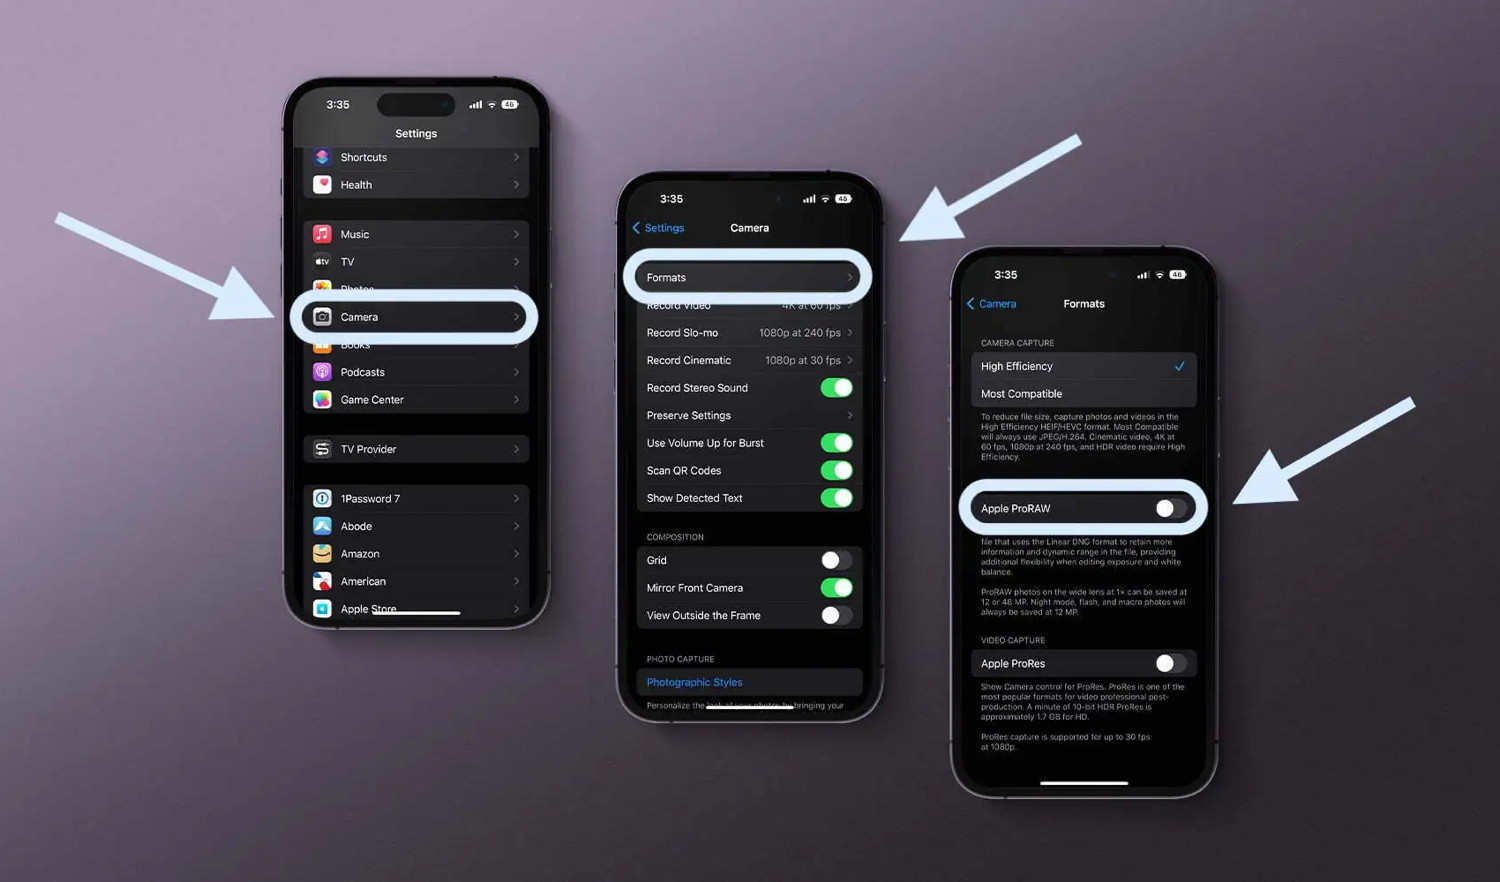
If it's not turned on already, enable Apple ProRAW
Open the Settings app on your iPhone 14 Pro or Pro Max
Swipe down and tap Camera
Now choose Formats at the top
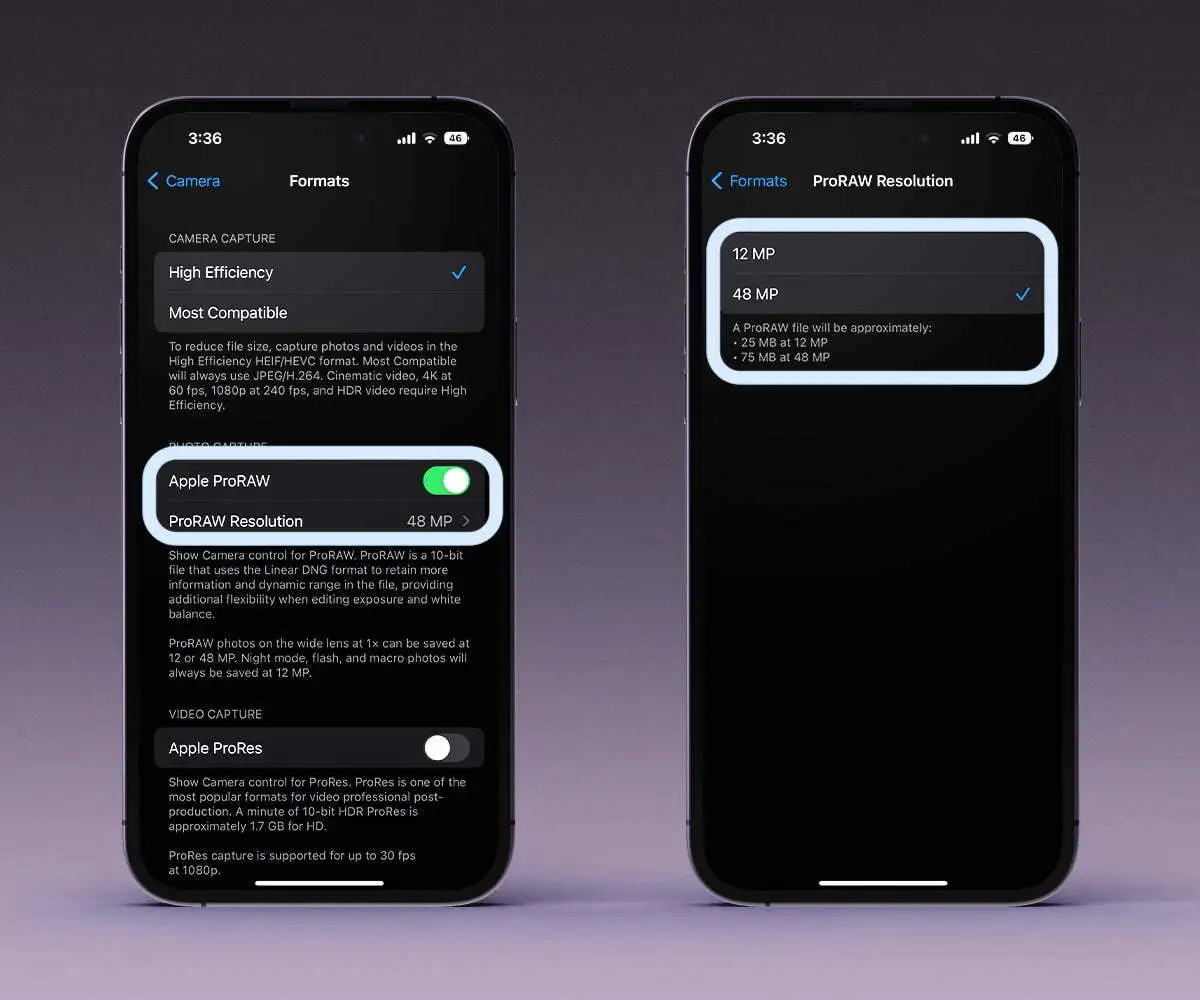
Tap the toggle next to Apple ProRAW - the default resolution for Apple ProRAW should be 48MP
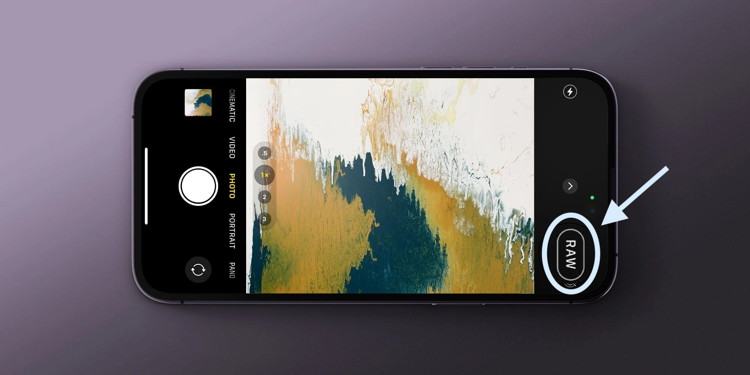
Now open the Camera app, make sure RAW shows in the top right or bottom right corner and is not crossed out - fire away! Just remember to use the 1x focal length, changing that will switch you to 12MP shots even though they'll still be RAW
You can also use third-party apps like Halide or Camera+ to take full 48MP images
You can also choose to Preserve the ProRAW setting to on in the camera app instead of it resetting to available but off when you open the default camera - Settings > Camera > Preserve Settings > Apple ProRAW.
Here's how this looks on iPhone 14 Pro:
With Apple ProRAW turned on, you should see 48MP as the default resolution for iPhone 14 Pro and Pro Max (this is optional - tap to switch back to 12MP for ProRAW).
However, that's only when shooting with the 1x focus, if you change to 0.5x, 2x, or 3x you'll be auto-switched to 12MP images but it will still be in the RAW format.
Now when you take a picture with the default Camera app, make sure RAW is not crossed out:
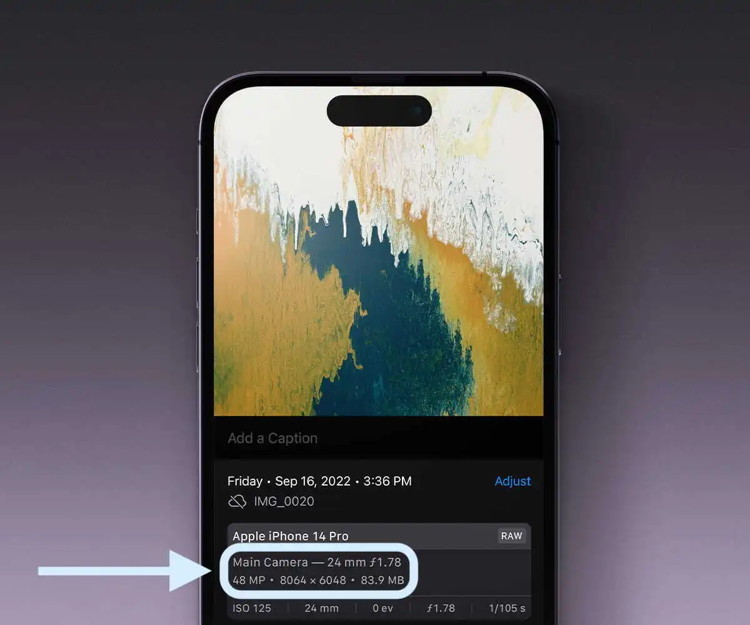
If you tap the "i" info button after taking a photo, you can confirm you're shooting with the full 48MP 8064 x 6048 resolution. This image for example is 83.9MB.
Inside the secret mission to add glucose monitor to Apple Watch
by David Snow, cultofmac
In a possible groundbreaking new product, Apple Watch could monitor blood glucose with the help of device strapped to the bicep.
Photo: Apple
Apple Watch is well-known as a health tracker, but a new report said a secret project dating back to Steve Jobs' era — to use the wearable to monitor glucose without pricking the skin to get blood — has made headway recently. And that has major implications.
The secret effort, known as E5, could involve a device that straps to the bicep and works with the watch. If it comes to market, it could disrupt industries and help millions of diabetics.
Report: Apple closing in on continuous blood-glucose monitoring with Apple Watch
Apple's longtime effort to develop blood-glucose monitoring technology takes places through its Exploratory Design Group (XDG) employing hundreds of engineers, a report by Bloomberg said Wednesday.
"After hitting major milestones recently, the company now believes it could eventually bring glucose monitoring to market, according to people familiar with the effort," the publication said.
It's a big deal because so many people would benefit from it. Namely, they are millions of diabetics around the world who currently need to prick their skin to draw blood for testing. Instead, they would be able to use the noninvasive Apple Watch system.
And that will include those who may be pre-diabetic or even unaware of their risk of Type-2 diabetes, which arises when the body stops using insulin as it should.
System uses lasers
The system relies on Apple-designed silicon photonics chips and sensors. Bloomberg described how the new system would work:
Apple is taking a different approach, using a chip technology known as silicon photonics and a measurement process called optical absorption spectroscopy. The system uses lasers to emit specific wavelengths of light into an area below the skin where there is interstitial fluid — substances that leak out of capillaries — that can be absorbed by glucose. The light is then reflected back to the sensor in a way that indicates the concentration of glucose. An algorithm then determines a person's blood glucose level.
The project has seen 12 years in development and recent testing on hundreds of subjects. Now it "is considered to be in the proof-of-concept stage," Bloomberg's confidential sources noted.
Efforts to make a such a system viable involve reducing its size. Engineers are working on an iPhone-sized device prototype that straps to a person's bicep. Previously, it was a tabletop device.
Along the way, rumors arose that glucose monitoring would come with new Apple products, like Apple Watch 8 equipped with special sensors. They proved untrue.
'Moonshot goal'
Bloomberg described Apple's glucose-monitoring efforts as a "moonshot-style project" and a "moonshot goal." That's because many others have tried over time to accomplish it and failed. That included Google's aborted 4-year effort to do it through contact lenses.
Apparently Apple brass figured the company was well-suited to the task, what with its hardware brilliance and massive cash reserves. CEO Tim Cook, COO Jeff Williams and Apple Watch hardware chief Eugene Kim have all involved themselves in it, with hundreds of millions of dollars spent, Bloomberg's sources said.
But the goal itself dates back about a dozen years to Steve Jobs. He directed Apple to buy a startup named RareLight in 2010, amid his own struggles with pancreatic cancer. It took his life in 2011.
The small company worked on noninvasive glucose monitoring. Then it became part of a secret Apple project under the auspices of Avolonte Health, headquartered about a dozen miles from Apple HQ. That kept it under wraps for a while.
But Avolonte dissolved in 2015 with the departure of Apple veteran Michael Hillman, and the work transferred to XDG.
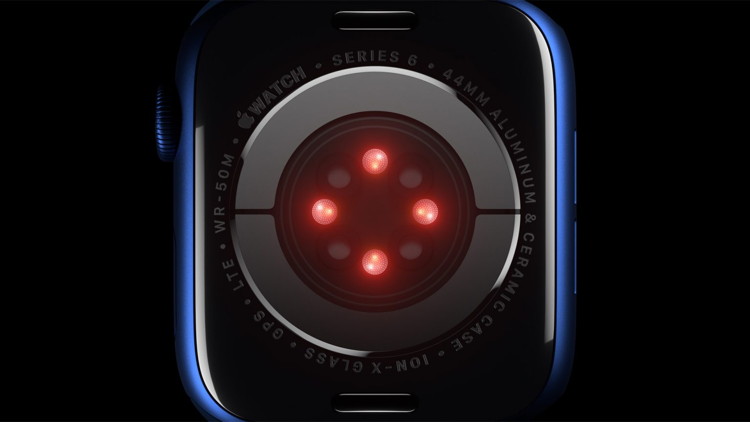
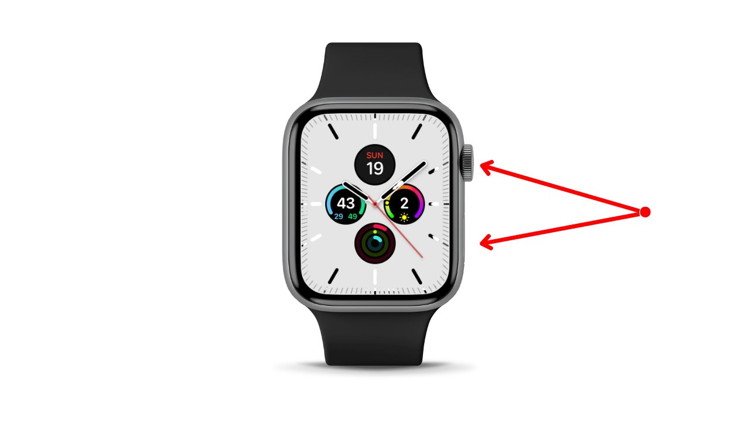
Taking a quick screenshot on an iPhone or iPad is well-documented, but there are times when you need to do it on Apple Watch as well. Here's how to get it done.
Before taking a screenshot on your Apple Watch, you must first enable the feature in the settings on your iPhone.
Open the Settings app on your iPhone.
Tap on General.
Scroll down to Enable Screenshots and tap the slider to enable.
Now that the feature is enabled, you can take screenshots on your watch.
Taking a screenshot on your Apple Watch
The process of taking a screenshot on an Apple watch is the same regardless of model.
On the side of your Apple Watch, with two fingers at the same time, press the Digital Crown and the Side Button. There's no need to hold; a press is enough to capture the screenshot.
Screenshots you take on your Apple Watch end up in your iPhone's photo album, where you can manipulate them.
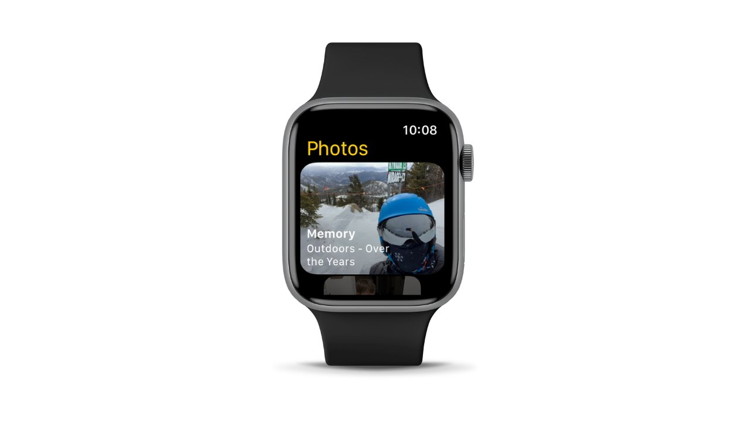
How to view your screenshots on your Apple Watch
You can view photos on your Apple Watch, but only those synced with your iPhone. The default photo album viewable on your watch are favorites and memories, but you can change what album syncs and is viewable.
View your synced photos on your Apple Watch.
Open the Apple Watch App on your iPhone.
Scroll down and tap on Photos.
Ensure Photo Syncing is enabled
Tap on Sync Album and select the album you want to use.
You can also choose how many photos your Apple Watch syncs by selecting the Photos Limit. Photo limit options range from 25 photos to 500, giving you plenty to view.
Your HomePod is a lot more than a simple speaker — it's a whole computer. And like any computer it has an operating system that needs occasional updates. Here's how to make sure your Apple smart speaker has the software version released on Monday.
Version 16.3.2 is minor "bug fix" update, but it fixes a serious bug for HomeKit users. Plus, it comes just three weeks after a major update, especially for those who use HomePod as the hub for a smart home. Version 16.3 enabled some "hidden" sensors in HomePod mini and made other significant changes.
If you depend on automatic updates, it's possible your smart speaker hasn't yet installed either update. Here's how to do so manually.
6 Apple Watch tricks you'll wish you knew all along
by José Adorno
The Apple Watch has been out for almost a decade, and there are some great Apple Watch deals available right now. It can obviously tell time, display notifications, and run apps. But it can also track your sleep, your workouts, if you have been in a car accident, if you fell, how your heart is doing, and more. While some of these features don't need an explanation, a few tips and tricks can improve your experience.
Since the Apple Watch is made for quick interactions, here are the best tips and tricks to help you get the most out of your Apple Watch.
Hide third-party Apple Watch apps: Automatically, the Apple Watch downloads every app supported by your iPhone to it. But if you don't find it helpful to see Yelp or Foursquare in your Apple Watch, you can open the Watch app on your iPhone, scroll down on your "My Watch" tab, then "Installed on Apple Watch," and remove the third-party apps you don't want to have.
Change the layout of your Apple Watch apps: This is a feature that you can have your Apple Watch for years and never notice. You can change the Grid View to a List View with this trick. Just tap Settings app on your Apple Watch, then "Select App View," and "Select List View." Done.
Apple Watch SE announced during Apple's iPhone 14 event. Image source: Apple Inc.
Apple Watch SE announced during Apple's iPhone 14 event. Image source: Apple Inc.
How to unlock your iPhone with Apple Watch: If you're wearing a mask or a scarf in front of your face, you can still unlock your iPhone using your Apple Watch. As long as you have the latest software version of both devices, open the Settings apps on your iPhone, select "Face ID & Passcode," type your passcode, then select "Unlock with Apple Watch."
How to make your Apple Watch a few minutes ahead: If you're usually late, you can make your Apple Watch a few minutes ahead of you on purpose. Open the Settings app on your Apple Watch, select Clock, tap the "+0min" bar, and spin the digital crown. This way, you can be late but also arrive on time for your appointments.
How to take a screenshot with your Apple Watch: Did you know you can take screenshots with your Apple Watch? This trick is very simple, and you can do that by pressing the Digital Crown and the Side button at the same time. If it doesn't work, open the Watch app on your iPhone, tap "General," scroll down, then "Enable screenshots."
How to activate Fall Detection: If you own an Apple Watch Series 4, this trick is for you. In the Watch app on your iPhone, tap "Emergency SOS," then allows Fall Detection. With that, if you fall during a workout or out of nowhere, the Watch will detect that. If you don't say you're fine, it will call your emergency contact and 911.
These are some of the most interesting tricks for your Apple Watch. BGR will keep bringing the latest tricks so you can take advantage of your Apple products.
Type "do a barrel roll" into Google, and hit enter.
Malware Examples
by Ron Sharp and Robert Elphick, MAGIC *
If it offers money DO NOT CLICK! This is another scam.
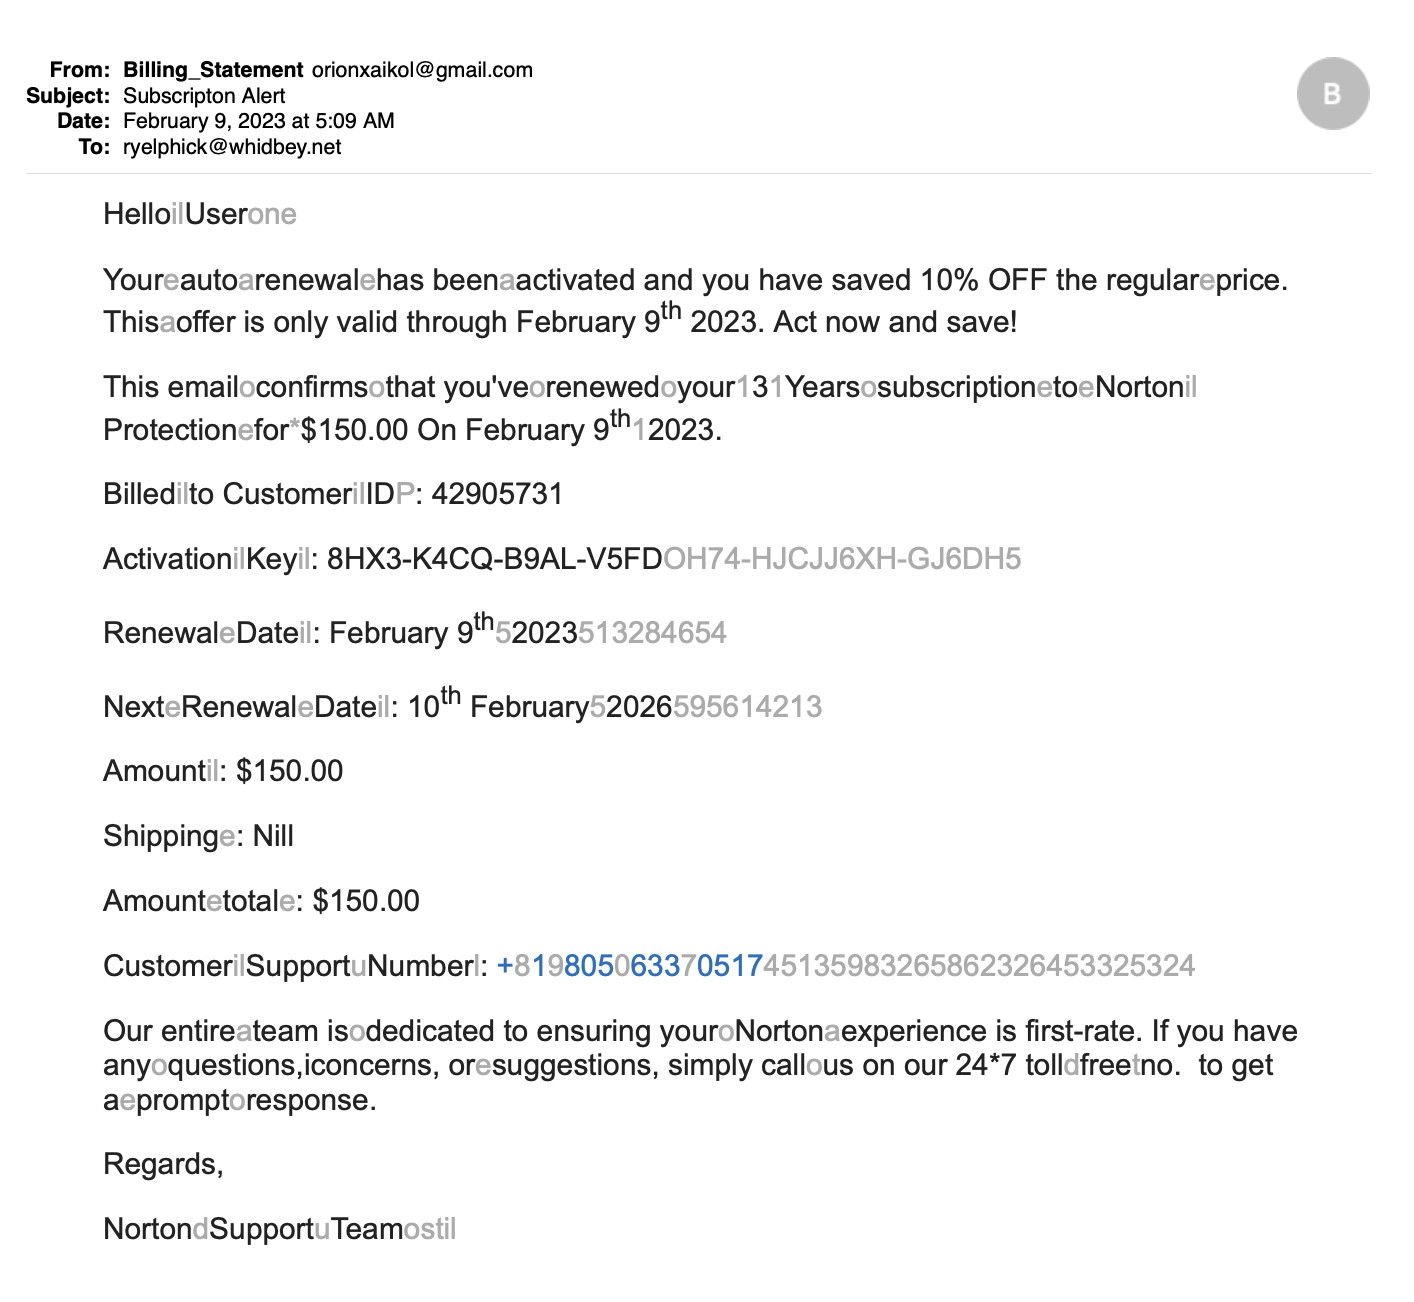
This is a SCAM Note the senders address. In this one I have rendered 'invisible characters' in grey so that you can see that the sender is trying to hide from filters by disguising some of the words and numbers.
A MAGIC member got this recently DO NOT CLICK Somebody again trying to pretend they are from Whidbey Telecom.
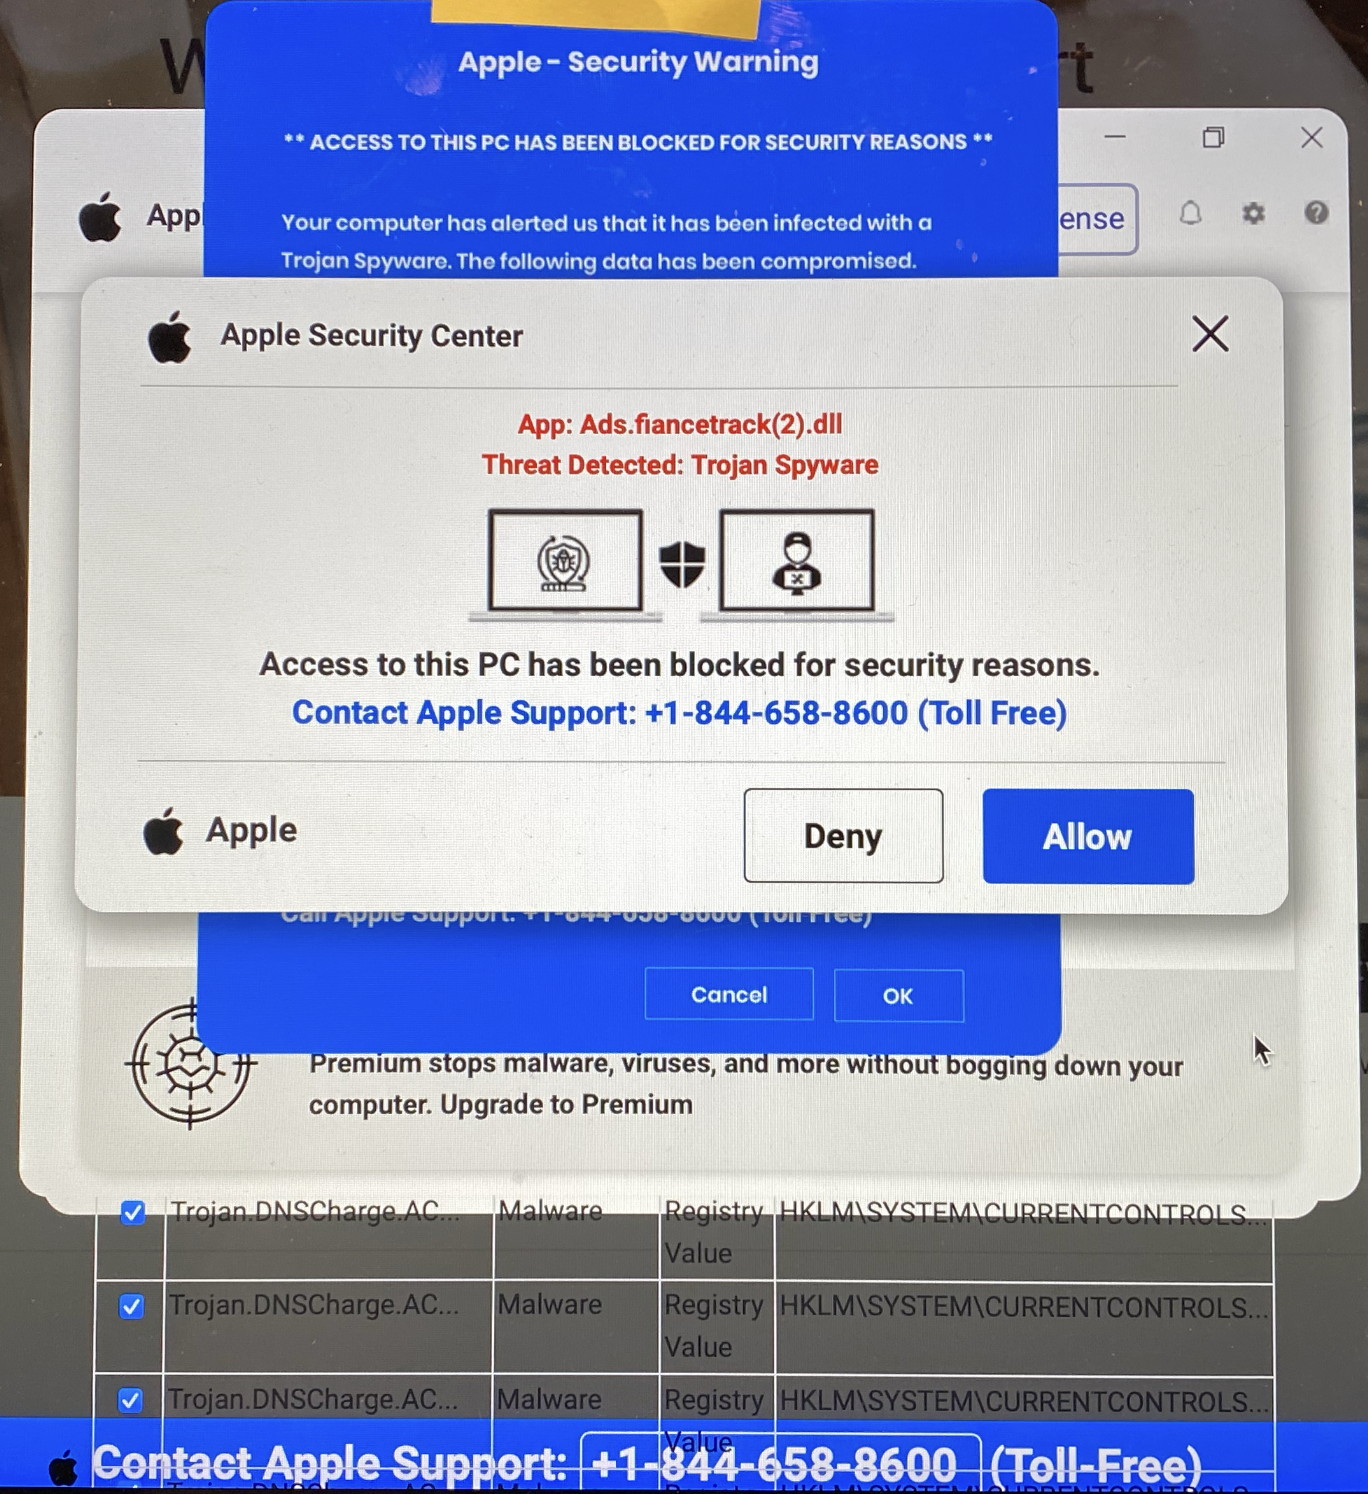
This appeared on a Members computer in the browser. Calling the number got someone who claimed to be with Apple and spun a whole elaborate story of how a virus was doing incredible damage. She transfered the call to a "Government Agent" who did his very best to keep our member on the phone and extract as much information as possible. In fact it was all bogus and the malware tried to put a 'dual linked library' onto the Mac, but they only work on PCs and the Mac blocked it. If you see something like this, DO NOT CALL THE NUMBER. These people have become very clever at identity theft. Always verify any phone number you see on your browser and if you are in doubt, DO NOT CALL
This is pretty obviously malware. DO NOT CLICK
Another one!
And one from Mexico! DO NOT CLICK!
Internet Crime
Any one bothered by internet criminal activity should report it to the Federal Bureau of Investigation Internet Crime Complaint Center (IC3) at this web page. This includes phishing, malware, spoofing, any demand for money.
I was reading the news on my iPad when the sun came out, although briefly, and decided I needed to get out and go for a walk, get some exercise. I hate it when I look at the health app on my phone and it says I walked less today than yesterday. Or that I walked less this week than last week. Then I noticed an article in the News app about new features in the iOS Notes app. I like using Notes and it does have some great features. "Oh, I see a video with the article also." I watched the video and I did learn a couple new things. Now I have to check them out on the app…. "Wow, that's cool, I might use that feature. Let's see how the app captures live text. "
Forty five minutes later I realize I'm not getting any exercise and missed the window of sunlight. Well I'll get going anyway, but I'm going to check email first. "Oh, shoot, I forgot to reply to an earlier email. I'll just take care of that now. But look at all this junk mail. I have to log into the mail server and adjust the junk mail filter."
"I better plug my phone in to charge before going outside. Whoops, my notification shows my calendar event, friends may be stopping by soon. That reminds me, I have some photos to show them." So naturally I glance at the photos and see some that need editing. Later I realize I'm having too much fun with photos and decide to stop where I am. This project is not so important.
I love all this stuff. I've always been interested in technology as long as I remember. I started fixing things early on. One incident I recall with my dad's 64 Dodge Polara, family sedan. He had work done on it at a garage and afterwards the car sat un-level. The left front was much lower. It looked stupid, definitely not right. He took it back to the garage and they told him they couldn't do anything about it. So he drove it that way. I decided to look at it and fixed it. It wasn't so difficult to adjust the front left torsion bar suspension. (This car had torsion bars in front instead of coil springs.) I think my dad was impressed although he didn't really express it. It was more like "Huh."
I got into auto repair, and for many years diagnosed and repaired drivability problems on cars. It became more interesting to me as engines became more electronic controlled. Now I've been diagnosing and repairing Mac computers for over 15 years. I guess that the term "geek" might apply and although it's often used derogatorily I think actual geeks don't mind the term. We love this stuff.
Now I guess I will get out for a walk and maybe a little gardening. I'll take my phone with me though in case I want to photograph something, or get a message from someone that surely is important… or not!
In last months MAGIC newsletter I wrote an article on safety checks for iPhone. Here's more on iPhone safety checks that I'm adding in particular to recent articles about iPhones and Apple accounts being stolen. I'm referring to an article where thieves would watch an iPhone user enter their passcodes at a public location such as a bar or coffee shop, and then swipe the phone right out their hands. Before the victim can even get to their other device to track it via "Find My iPhone" the perpetrators have already changed their Apple account password locking the victim out of their own account. How can they do that? Easy, even with two factor verification. They simply click on forgot password and they have the victims phone for the verification.
So here are some security thoughts in retrospect. First I recommend using Face ID or finger print ID if your phone has the option. That way no one will see you entering a code. In addition I recommend turning on "Attention Aware Features" in Settings> Face ID & Passcode. This requires you look right at the phone to unlock and has a couple other features like lowering the volume of a phone ring when you pick up or look at the phone. This option may be turned on by default but I recommend checking to be sure.
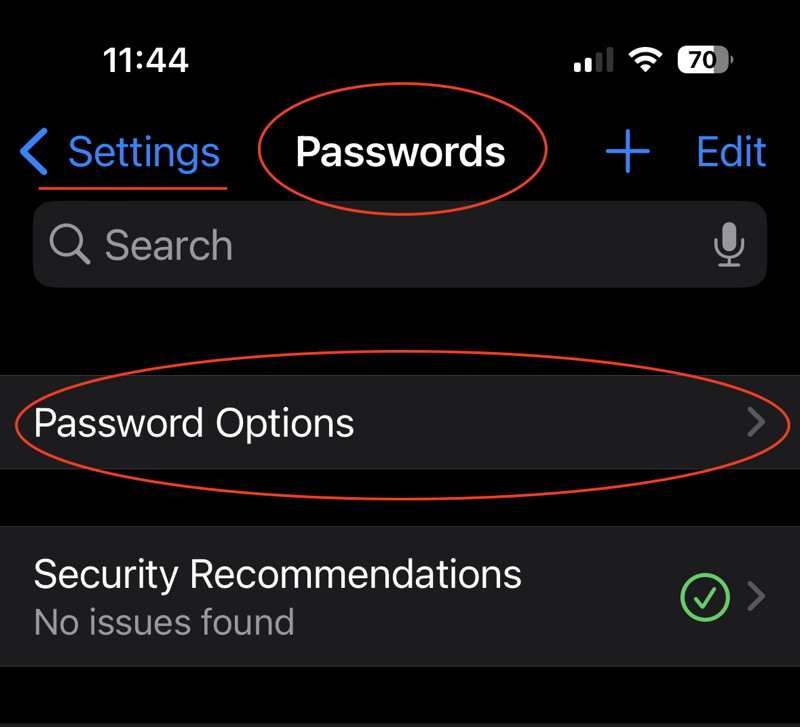
Another setting to check is in Settings>Passwords>Password Options>AutoFill Passwords. Turn off Auto fill Passwords unless you are particularly password challenged. But be aware of the security issue. And while you're on the Passwords screen, also click on "Security Recommendations" and make sure "Detect Compromised Passwords" is turned on.
And if you haven't already, check on the "Safety Checks" from last months article and set your phone to your preference. The three main headings there are seeing who you are sharing your data with, what apps are using your data, and what devices are associated with your Apple account.
Another recommendation is to change your important passwords occasionally. Like twice a year. And write down the date each time you change a Password. Then you'll not only know which is the most recent password but will be able to see how long it has been since you changed it last.
Another password issue I'd like to mention is having your browser save your password. This is really handy. After all nobody really likes to deal with passwords. But be selective about what passwords you'll allow to be saved. No banking or financial accounts for sure. On your laptop or desktop Mac, check to see what passwords are saved by Safari or other browsers. There are usually a lot more than you think and the ones that are week passwords or reused are flagged. You should go through them and reset any account password that you've reused. It can be time consuming, but not half as bad as getting hacked. So open Safari, click on Safari Settings>Passwords and take a look.
Must Try Features That Makes The Notes App Worth Using!
How to Unsend a Message on an iPhone
MAGIC, the Macintosh Appreciation Group of Island County, serves people who use Macintosh computers, software and peripherals. Our goal is to share information and get answers to questions to make us more productive with our use of technology. Our monthly meetings give us a chance to discuss computer problems and share ideas with other Mac users, feature speakers on specific topics, and to keep apprised of Apple news.


 iCloud > Password & Keychain