In This Issue:

Meeting information
Helpers are welcome to come early and help set up. The featured program for the Macintosh Appreciation Group of Island County (MAGIC), for the Wednesday, April 19 meeting demonstrates various capabilities of Apple's Preview app. It is an image and PDF viewer for the Macintosh computer operating system. It enables users to view and print digital images and Portable Document Format (PDF) files, and MUCH more. Presenters are Penny Holland and Sue Keblusek who will share some of their fun and "secret" tips and tricks with PREVIEW. The meeting runs from 4 to 6 p.m.at the Unitarian Universalist Congregation, 20103 State Route 525, north of Freeland. A brief business meeting follows the presentation, then an hour is spent answering questions unique to attendees. The public is welcome and membership is free, but a $2 donation is welcome at the door. This helps with facility rental. Do not forget to bring your used ink cartridges. Minutes of the March 15, 2017 Meetingby Penny Holland * The monthly meeting of MAGIC, held at the Freeland Unitarian Congregation Meeting House, was called to order at 4:00 by President Robert Elphick. There were approximately 38 people present at the meeting. PRESENTATION Today's presentation, TIPS AND TRICKS ON THE IPAD, was given by Bethany Kennedy. She was introduced by our new VP/Programs, Ron Norman. Bethany says her favorite iPad is the mini. The regular iPad, iPad Pro and iPad Air are the other choices. MY iPAD FOR SENIORS by Michael Miller can be bought on Amazon, is a highly recommended book. WHAT iPad SHOULD I BUY? Bethany's iPad is a 2012 refurbished that can only go up to OS9. This doesn't seem to be a problem yet. On the larger iPads, the bigger screen is good for larger hands. iPad Pros come in 9.7 and 12.7 inches. With the pros you can use a bluetooth Apple Pencil for sketching. Decide what size and other features are best for your needs. iPad SETTINGS:
TIPS Troubleshooting. If things are crashing or stuck, double click on the HOME BUTTON to show all the APPS that are open, stacked behind each other. Slide each visible APP screen upward to turn off that APP. If too many APPS are open, they are possibly using battery power and can sometimes cause complications. To connect to WiFi, go to SETTINGS>WiFi and turn it on. In most any text block, you can click on a word and get a little balloon above the word with choices: COPY, DEFINE, SHARE. If you select SHARE, for instance, and then go to an email or another document and click there and you get another balloon with lots of choices. If you select PASTE that word will appear there. SCREENSHOT, Press and hold the On/Off button simultaneously with the Home button. A picture of the screen will be displayed in Photos. To share an URL with someone, press on the URL to get the choices to SEND and then click on the Share icon and you can, for instance, choose email where you can share this URL with someone else. Questions Q: Can you discuss the debate on the separate keyboard with the iPad? A: A separate keyboard is good to have. There are various brands you can get. Some people can type easier on a keyboard, others like to press the buttons or keys on the screen, without the separate keyboard. Q: How do you make folders on the iPad to organize APPS? A: Press and hold any APP until they all wiggle. Then the APPS can be moved around. If you move them together, one on top of another, they will automatically be put into a newly made folder. The iPad will decide a name for the folder, or you can choose your own folder's name. When you are done you press and hold the Home button and the APP shaking and editability will stop. Q: When I turn my iPad on the APPS are in different places from where I left them (especially the "commercial ones" like Netflix). Why? A: Nobody really knew the answer. Possibly Google that question to see if other people have had the same problem. (You can also go to Settings and under General>Reset all Settings. But don't do this until you've backed everything up!) Robert added that turning the iPad off every 24 hours is a good idea. Q: How to turn iPad off? A: Press and hold the ON/OFF button for about 10 seconds until a message appears at the top: SLIDE TO TURN OFF. Slide the slider to turn it off. (NOTE: just pressing the ON/OFF button does not turn off the iPad, it just puts it to sleep, which is different.) Q: What is LOCK SCREEN? vs. LOCK ORIENTATION A: LOCK SCREEN is the first screen you see before unlocking your iPad. LOCK ORIENTATION is where you rotate the iPad and the items on the screen rotate to always be upright. If orientation is locked, then rotating the iPad will not rotate the visuals. Q: I pushed LOCK ROTATION on and now I can't get it off. Help! A: Swipe up to get the lock rotation symbol. (a lock symbol with a round arrow surrounding it.) Then you can turn off Lock Rotation Q: How do I backup my iPad to my computer? A: Use a USB connecting the iPad to the computer. Joel Kennedy did this demo. He said there is a new update that uses a new encryption method. Everything on your iPad is being converted to this new method of encription. Be sure to back your iPad up one way or another. Go to System Preferences on the Mac and then iCloud to see what, if anything, you are backing up to iCloud. On iPad, go to Settings/iCloud and look for Backup. If that is OFF that means the iPad is set to back up to the computer. You need to physically plug the iPad into your computer to do a backup. You can't do it both ways; it's backup to Cloud or to the computer, not both. DEMO: Start in iTunes on your Mac and tell it either to BACK UP with iCloud or to the computer. Using WiFi is necessary to backup to the Cloud. You can also Sync between the device and your computer IF iCloud is turned OFF!
The confusion is from the wording on the iTunes window. It says "A full backup of your iPhone will be stored on this computer." This is not quite accurate. This added after research on the question bt Ron Sharp: 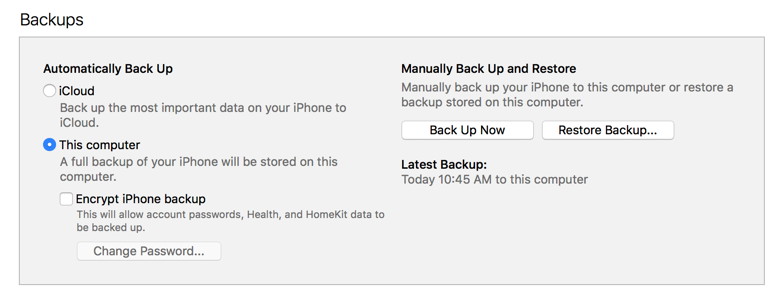
BUSINESS MEETING led by Robert Elphick CLASSES: Dates for the upcoming Essentials Classes are the same, but location is changed to the Unitarian Church in one of the classrooms starting this Friday at 1:00. Register by going to MAGIC website where you push a button to get the class application form. There is still room in the class. iMovie classes begin on May 2, also held at the Unitarian church. We will be including blue or green-screen photography. Sue Keblusek, Gentle Mac Coaching, will be starting online classes on her website sometime in the last half of this year. TREASURY: Gary McIntyre gave the treasurer's report: We have $5612.31 in our account as of the first of the month. FOR SALE OR FREE: JOEL announced he has a free printer/scanner Canon [Note: This printer has now gone]. And Ron Norman has an Epson 3800 printer. Our website has once again been renewed by WhidbeyTel, who kindly gives it to us for free. Be sure to thank them. ANNOUNCEMENT BY JOEL: STARTING midnight tonight A-TECH is starting an online forum called TECH SMART.me which allows people to ask questions and get answers within a small community. It's not just Mac exclusive. Sign up on techsmart.me. It is free until April 30. Q&A Q: I ran my phone out of memory last month. Verizon confirmed the memory was full and I had to take off about 500MG from my phone. (I had backed up my phone to iTunes just before this.) During all this I lost all my custom ringtones. I think iTunes should be trashed and not be used for backups. A: One thing is to never let your device get close to being full. Better to shut off APPS when not being used. Do this daily. Also Keep an eye on the bottom line of the screen to see what amount of memory you have left, and manage your memory so it doesn't get to 90% full. Q: I would like to take photos off of one device and not lose them off another. If I am on iCloud for syncing, that doesn't seem to work. A: PHOTO STREAM just puts all the "recent" photos on all devices. If you delete photos off of the PHOTO STREAM it will delete them off of all devices. IF you delete photos not in Photo Stream, then they just are deleted from the chosen device. COMMENT: Ron Norman shared a tip. On a photo shoot of 300 photos, plug your SD card into your iPad, and all the thumbnails are downloaded. You can then select several chosen photos and download only these to the iPad. Use the low cost APP called SNAPSEED (get at APP store) and easily share these photos with others via emails. Q: Will my iPad work in China? A: In theory it works anywhere in the world. You may not get the internet access that you'd like. You may want to turn off DATA ROAMING. Q: Can I check on my iPad to see how much storage I have left? A: Go to Settings> General> Storage or CAPACITY AND AVAILABLE.
Q: When I try to sign in to Apple ID, I find I have several of them. How can I get back to one ID? A: Apple assumes you will have only ONE ID. If you get rid of an ID you may lose an APP. You need to be with someone who knows how to do this. Call APPLE SUPPORT for help or get a MAGIC helper. Q: How does Ron Norman get photos from iPad onto an external hard drive? (See his comment above. Or…) A: You have to sync to iTunes on your Mac. (is it an up-to-date version?) Once photos are on your Mac you can move them to a HD. Q: We used to have a PC. that had a nifty utility called DEFRAG to clean up the HD. Is there such a thing for a Mac? A: Yes, if you have an old (mechanical) HD. Get iDefrag. You have to pay $30 to buy the whole program to do the defrag. Some people say you should defrag once a year. (IF you have an SSD (solid state drive) you don't need to defrag.) Q: Backing up your backup. How do you do that? A: Use SuperDuper to backup everything from one disk or HD to another HD. The second time you do a backup, it will only move the differences over. The meeting was adjourned at 5:50. MAGIC MomentsClassesby Bethany Kennedy, VP Education * The ever popular Macintosh Essentials classes ran in March. The next one is likely to be held in the Fall. The iMovie classes will run in May on the 2nd, 3rd, and 4th at the Unitarian Universalist Congregation of Whidbey Island. Details and application can be found on this page of the MAGIC website. Requests for classes in something that interests you are welcome. Please send an with your ideas or requests. Everything considered! New MAGIC computerMAGIC has purched a new MacBook Pro with a Touch Bar. Like all the other MAGIC equipment, this will be available for rent. Since the Touch Bar version of the MacBook Pro is expensive, members might like to use this one for a couple of days before committing. Note that Editor Ron Sharp has been using the computer and has written a Review in this issue of the Newsletter. If you are interested in renting the computer, then contact me at Swaps and SalesDon't forget to check out the swap page of this website. 
Note: This Software Update section of the newsletter lists the most relevant Apple updates. Not all updates are listed for all products. Additionally, I'll add other pertinent updates on occasion. Four New Operating System Featuresby Don Mayer, smalldog.com Apple just released new versions of all its operating systems—iOS, macOS, watchOS, and tvOS—fixing bugs, plugging security holes, and, best of all, adding a few new features. Here are four things you can do once you've updated. 1: Sleep better after using your Mac late at night To set up Night Shift, open System Preferences > Displays > Night Shift and choose Sunset to Sunrise from the Schedule pop-up menu. Night Shift knows when the sun rises and sets wherever you are, but if you prefer, you can also set custom on and off times. (If you don't see the Night Shift button in the Displays preference pane after upgrading to 10.12.4, your Mac is unfortunately too old to support Night Shift.) If you're working with graphics at night, or if video looks odd, you can to turn off Night Shift manually. Do that either in the Displays preference pane or by scrolling down in Notification Center (click it in the upper-right corner of the screen) to see the Night Shift switch. 
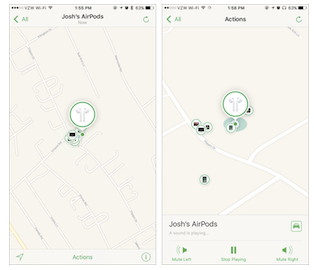
2: Find the AirPod that fell between the couch cushions Note that Find My AirPods works only when in range of a paired iOS device, so it may not help if you lose an AirPod while running. 3: Don't be "that person with the Apple Watch" at the theater To enable Theater mode, open Control Center by swiping up from the bottom of the screen. Then tap the Theater Mode button, which is emblazoned with theater masks. After the performance, you'll need to disable Theater mode manually by tapping its button again. 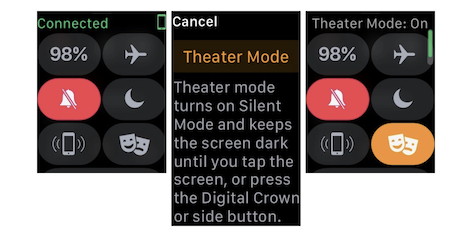
If you do need to check the time surreptitiously (who knew this performance would go so long!), tap your Apple Watch's screen, or press the Digital Crown or side button. 4: Ask Siri to find your car in a humongous parking lot. Apple fixes wireless-based remote code execution flaw in iOS (10.3.1)by Lucian Constantin, MacWorld 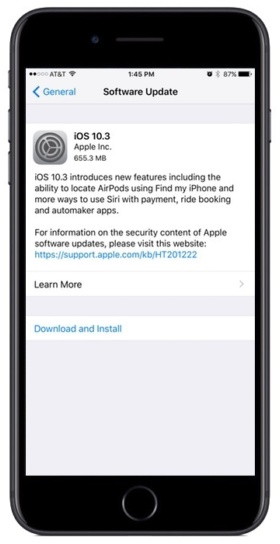
Apple released an iOS update Monday to fix a serious vulnerability that could allow attackers to remotely execute malicious code on the Broadcom Wi-Fi chips used in iPhones, iPads, and iPods. The vulnerability is a stack buffer overflow in the feature that handles authentication responses for the fast BSS transition feature of the 802.11r protocol, also known as fast roaming. This feature allows devices to move easily and securely between different wireless base stations in the same domain. Hackers can exploit the flaw to execute code in the context of the Wi-Fi chip's firmware if they're within the wireless range of the targeted devices. The issue is one of several flaws found by Google Project Zero researcher Gal Beniamini in the firmware of Broadcom Wi-Fi chips. Some of these vulnerabilities also affect Android devices and have been patched as part of Android's April security bulletin. The iOS 10.3.1 update released Monday is a bit unusual because it only fixes this one flaw and comes just one week after Apple released iOS 10.3, a larger update that patched a wide range of vulnerabilities in various components. The explanation for the short time interval between these two releases might come from Google Project Zero's timeline for this flaw. According to an entry on its bug tracker, the team reported the vulnerability to Broadcom in December. The chip vendor later requested an extension to Google's standard 90-day disclosure deadline and was given a grace period until April 1. Because the flaw was in Broadcom's code, not Apple's, the iPhone maker had to wait for a patch from the chip vendor before testing it and pushing it out to its own user base. The iOS 10.3.1 update is available for the iPhone 5 and later, iPad 4th generation and later, and iPod touch 6th generation and later. Even if there is no public exploit yet, users are advised to install the update as soon as possible. 
What's Slowing up my Mac? Look Closely with Activity Monitorby Don Mayer, smalldog.com Does it seem like your Mac is running slowly? It's always possible that you need more RAM, a speedy SSD to replace a slow hard drive, or even a new Mac. But you might just have a rogue app that's hogging your Mac's CPU. Activity Monitor shows the processes that are running on your Mac, so you can manage them and see how they affect your Mac's activity and performance. Activity Monitor is a kind of task manager that allows you see how apps and other processes are affecting your your CPU, memory, energy, disk, and network usage. Activity Monitor is bundled with every Mac. Open your Applications folder and scroll down until you see the Utilities folder. Open that to find and double-click Activity Monitor. The processes shown in Activity Monitor can be user apps, system apps used by macOS, or invisible background processes. Use the five category tabs at the top of the Activity Monitor window to see how processes are affecting your Mac in each category. Activity Monitor can seem daunting because it lists every "process" running on your Mac. In many cases, a process is the same as what you think of as an app, so you'll see processes for apps like Mail and Safari. However, some apps use multiple processes, and macOS itself relies on a ton of processes too. You can limit the processes you are looking at with the View menu. There you have the choice of limiting your view to: Those views show the impact each process has on those aspects of the Mac. For now, we'll focus on the CPU view that's the default, but if you were trying to figure out why your MacBook Pro's battery was draining so quickly, you'd look in the Energy view. At the bottom of the CPU view is a graph of CPU load, and numbers that correspond to how much of that load comes from the system and how much from the user (apps you've launched). As long as the sum of those numbers stays under 100% most of the time, you're probably fine. But if you're near or at 100%, you'll want to hunt for rogue processes. 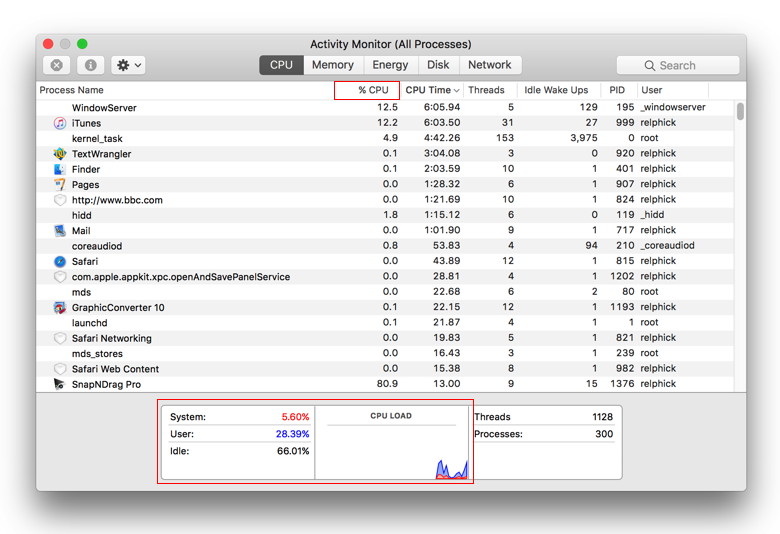
To identify them, click the CPU column header to sort the process list by CPU power. If necessary, click again to change the direction of the sort so the arrow next to CPU is pointing down, so those processes using the most CPU power are at the top. Be aware that the percentages in this column are by core (unlike the graph and numbers at the bottom), so a runaway app on a 4-core iMac could claim to be using as much as 400% in the CPU column. Now watch the list for a while. If one process is sucking CPU power, you'll see it at the top of the list. If it matches an app you've launched, quit that app to give other apps a chance at the CPU. That often solves your problem quickly. In the most extreme case, the process name will be in red, which means it's not responding, at which point you can force quit it by selecting it and then clicking the X button at the left of Activity Monitor's toolbar. You can use Activity Monitor to quit a process, even if it's in a loop or not responding. You can also send a signal to a process to terminate it. If you attempt to quit a process you don't own, you may be required to authenticate as an administrator.
To see if a process is used by another process, choose View > All Processes, Hierarchically. Equally likely, though, is that the top process will be one you don't recognize immediately, like backupd (Time Machine), mds or mdworker (Spotlight), photolibraryd or photoanalysisd (Photos), or kernel_task or WindowServer (core macOS functionality). You can't (or at least shouldn't) quit those processes manually, but at least you'll know that things are slow due to a Time Machine backup running, Spotlight indexing new files, or Photos analyzing the images in your library. If one of these processes has gone nuts, the best solution is to restart your Mac. You might need more memory. To see how your memory is being utilized you would go to the Memory tab of Activity monitor where you can see the amount of system memory being used on your Mac. The Memory pane displays how much memory your Mac is using, how often it is swapping memory between RAM and your startup disk, and the amount of memory provided for an app and how much of it is compressed memory. When your computer approaches its maximum memory capacity, inactive apps in memory are compressed, making more memory available to active apps. The Compressed Mem column indicates the amount of memory being compressed for an app. The key to understanding whether you need RAM is the Memory Pressure graph. The Memory Pressure graph lets you know if your computer is using memory efficiently. If memory pressure is yellow, red, or has spikes, check to see if an app is using up memory and causing the memory pressure to increase. If you no longer need to have the app running, you should quit the app. Your computer's memory pressure is accurately measured by examining the amount of free memory available, the swap rate, and the amount of wired and file cached memory to determine if your computer is using RAM efficiently. Activity Monitor is a powerful tool and we will talk about Energy, Disk and Network panes in a future issue. But if you are finding yourself staring at the beach ball a lot your first step should be to check out CPU and Memory panes in the Activity Monitor. Mac Pro Revisedby Don Mayer, smalldog.com 
Apple has announced some revisions to the Mac Pro. The former $3,999 model is now the $2,999 base model, while the previously built-to-order 8-core model with dual D700 GPUs is now the high-end stock configuration for $3,999. Both models are equipped with 256GB PCIe-based flash storage, four USB 3.0 ports, six Thunderbolt 2 ports, and dual Gigabit Ethernet ports. The former quad-core model with dual AMD FirePro D300 GPUs and 12GB of RAM now has 6-cores with dual D500 GPUs and 16GB of RAM, while the 6-Core model with dual AMD FirePro D500 GPUs is now 8-cores with dual D700 GPUs and 16GB of RAM. There are no other hardware changes—not even Thunderbolt 3 ports. This is the first revision in 3 years and came with an apology of sorts from Apple for neglecting the Mac Pro. Surprisingly, and unlike Apple, they also indicated that all new Mac Pros will be coming in 2018 that will be modular, a common complaint about the current model is that it is not modular. They also announced that there will be new Apple displays to accompany the new Mac Pro. They also hinted that new iMacs would be coming that would cater more to the "pro" market. We thank Apple for this peak at the future. Knowing the roadmap does help us serve our customer's needs better. Big Brother is Watching Youby Don Mayer, smaldog.com Okay this article is admittedly partially a soapbox but I think most of you will agree. I believe that our congress sold out to the large internet providers like Comcast, AT&T, Verizon and others when both houses passed legislation to strip away internet privacy rules that prevented these same internet providers from SELLING your personal browsing history and personal information to anyone that wants to pay for it. And who might want it? All those guys with pop-ups and advertisements that mysteriously try to sell you whatever you might have been looking up on the internet. How did they know I was looking at Chicken shoes for Grace? Our elected representatives are charged with looking out for our best interests. In this case, they abandoned that and sold out to these companies. It is no accident that the same congress-people that voted for this bill, which btw, was written by those same internet company lobbyists, received huge campaign contributions from these companies. So, rest assured, it was not a big national emergency that required a new law to allow them to sell your information, nope, it was, as usual, money. There is no reason whatsoever that these companies should be selling your data, it is not in your interest and not in the national interest. It was a complete sell-out. But this is going to be the law and you need to be informed about how it may impact your internet usage and what you can do to protect your data. When I learned about this, one of the first things I did was to contact my internet service provider in Vermont, Green Mountain Access. I got an immediate response from my friends there saying not only were they not ever going to sell my data but that they reiterated their long standing privacy policy. They even posted a notice on their web site: Recent news has prompted many to reach out regarding changes in Internet privacy protection. Please be assured that Waitsfield and Champlain Valley Telecom/Green Mountain Access has stood for customer privacy from the beginning. We have no intention of selling or freely distributing private information. So, one of the best ways to prevent your browsing history from being sold is to know your ISP and check into their privacy policy. If they do not explicitly say they will not sell your information, assume that they will. Okay, so I have Comcast down here in Key West so I am pretty sure they are on the other side of this discussion and would love to sell my boring web browsing history. Well, I don't want them to regardless of how boring it is because, well it is mine, not theirs to sell. So, one way is to use a VPN connection. Fortunately, Small Dog Electronics maintains a VPN network and our ISP believes in privacy so using VPN makes sense. Even if you do not have a company VPN network there are many VPN networks that will give you access for a monthly fee. Do NOT use free VPN services — there really is not a free lunch! There are more secure browsers to try if you do not want to use a VPN network, such as Opera or Tor but they come with trade-offs in terms of ease of use and speed. Those are really the only options I can think of besides making your internet browsing really really boring. But the most important thing you can do is to write or phone your congressperson and express your outrage that they would sell you out and remind them that they work for you. This is not a little minor hiccup it is a major shift in privacy that certainly reminds me of Orwell's 1984.  Apple's 1984 Macintosh Advertisement Wizard asks: Anyone remember this? How to fix Safari when popups block usage in iOS and macOSby Glenn Fleishman, Macworld iOS 10.3 fixed a mobile Safari pop-up issue that plagued users who were unfortunate enough to visit a site that served an ad containing malicious JavaScript. The folks at security firm Lookout wrote up the scope of the problem and confirmed Apple repaired it in 10.3. However, Lookout told me that the problem Jason Snell wrote about at Macworld in November 2016 wasn't part of the macOS update. Older versions of macOS remain more susceptible than El Capitan and Sierra than Yosemite and previous releases, but I've still had sketchy sites I visit in researching security stories try a variety of techniques to fill windows with ads or scams and prevent them from closing. 
If you're still using an older version of iOS, which might be because you have a device too old to update to iOS 10, here's how you break out of the Safari-scam capture loop:
This will lose the list of URLs you've visited recently, cookies, and data cached locally by Web sites on your browser. A warning, however: If you're signed into the same iCloud account in multiple places and have Safari set to sync to any of those other devices, this clear operation also deletes browser history (but not cookies and other data) from all those linked Macs, iPhones, and iPads. The way around that? Disable sync on the other devices in iOS via Settings > Your Account Name > iCloud in iOS and flipping the Safari switch to off, and on macOS via the iCloud system preference pane by unchecking the Safari box. Then re-enable after performing step 2 above. With macOS, Jason details a few options in his column linked above, but the simplest method (and the one that ultimately worked for him) was as follows: How to set up two-factor authentication for your Apple ID and iCloud accountby Susie Ochs, Macworld If you aren't using two-factor authentication to protect your Apple ID and iCloud account, you really should do it today. Hackers who claim to have millions of stolen iCloud credentials are demanding Apple pay a ransom or they'll release them—and ZDNet obtained a sample set of credentials and determined they're real. But guess what? Using two-factor authentication should protect you completely. It's easy to set up, so take a minute and do it now. You used to be able to set up two-factor on the account settigs page at appleid.apple.com, but now this has to be done on a Mac or iOS device. (Apple ID users who don't have a compatible device can still use an older two-step verification system—see below for more.) iOS Follow these steps on an iPad, iPhone, or iPod touch running iOS 9 or later. The iOS device must be protected with a passcode (Settings > Touch ID and Passcode). 
Mac Setting this up on a Mac is nearly the same steps as on an iOS device. The Mac must be running OS X 10.11, El Capitan or later. 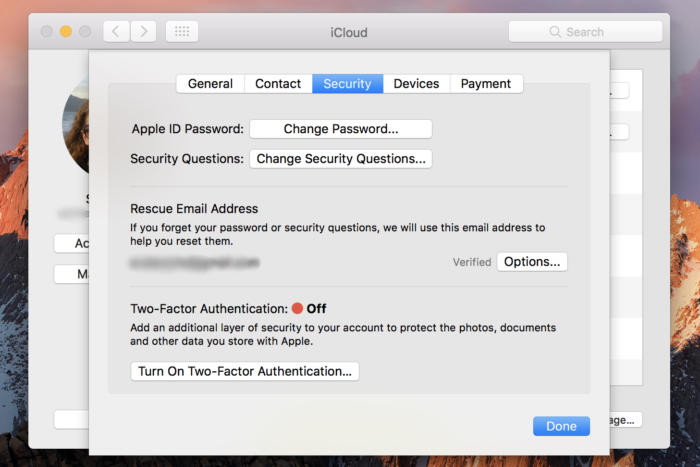 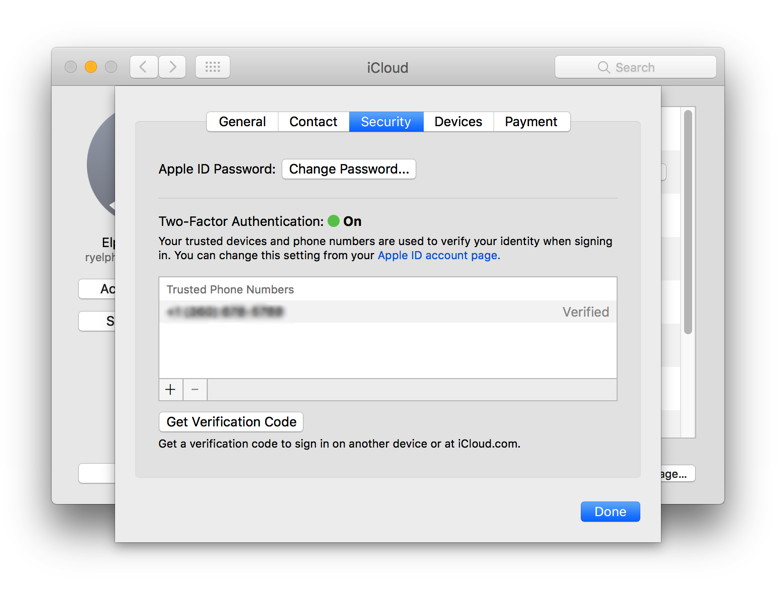 Wizard Sez: Here it is in Sierra
What if my device is too old? If your Mac isn't running El Capitan, or your iOS device isn't running iOS 9, you can still use two-step verification, which is slightly different than two-factor authentication, mostly because it relies on a text message being sent to a phone number, while the newer "authentication" is baked more seamlessly into the OSes. Plus, the older verification method requires you to hold onto a Recovery Key in case you ever lose your password. 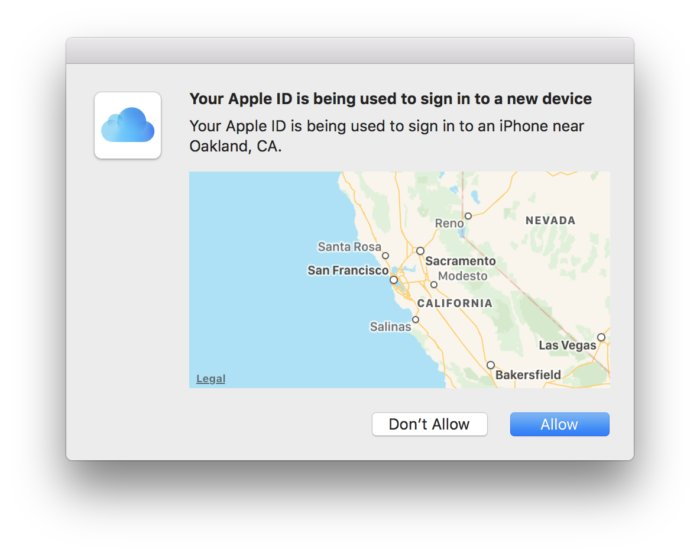
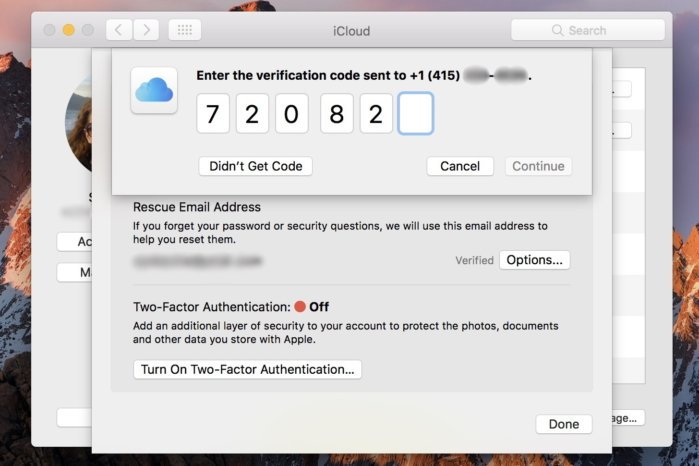
Two-step verification always sends you a text message. With the newer two-factor authentication, you'll get this cool pop-up on nearby trusted devices signed in to the same iCloud account. Apple still provides a way to enable two-step verification, by following this link, signing in, and following the instructions. 
iOS 10.3 is ready to install with Find My AirPods, the new Apple File System, and moreby By Oscar Raymundo, Macworld Developers and beta testers have already had a field day with iOS 10.3, and today it's your turn to try the new software update. After seven beta releases, iOS 10.3 is finally here. This dot-release brings with it the ability to track your AirPods from the Find My iPhone app and the switch from the outdated HFS+ system to the new Apple File System. In addition, iOS 10.3 lets you leave reviews in-app and will give developers the chance to reply to your reviews in the App Store. It's always important to back up your iOS device before attempting to install any new software, but because iOS 10.3 switches to a new file format, you might run into some unexpected compatibility issues. So, it's extra important to create a backup this time. Back up You can back up your device to your computer or to iCloud. Back up to iCloud by going to Settings > iCloud > Storage & Backup and turning on iCloud Backup. Back up to your computer by connecting your iPhone and launching iTunes. Select your device in the upper-left corner of the iTunes window, then click on the Summary tab. Under Backups, choose Back Up Now. Check the "Encrypt" box if you want the backup to store your passwords and Health data, which we recommend. Install iOS 10.3 Here's how to install the iOS update on your device through a Wi-Fi or mobile connection:
The device will need to automatically restart to complete the installation. You can also install iOS 10.3 via iTunes by connecting your device to your computer. If an iTunes popup doesn't ask you right away to update, click on your device and choose Summary. Then, click on Check for Update. That should kickstart the installation process. Security check: Which apps have permission to access your online accounts?by Glenn Fleishman, MacWorld Recently, hundreds of accounts - from Forbes to Amnesty International to Starbucks Argentina - started spewing swastikas and slogans in Turkish labeling the Netherlands "Nazi Holland." The propaganda arises from a dispute in advance of a Turkish referendum to grant its president more power, and the Dutch refusal to allow Turkish officials to speak at rallies of Turkish people living in the Netherlands. Political issues aside, the accounts were hijacked through a weakness many people forget exists until it strikes: third-party app permissions in social networks and other platforms. These integrations are part of the power of many services, which pitch themselves as platforms. Developers can create software that talks to the service's API and reads information from a user who authorizes it. But more critically, these third-party apps can often post on behalf of a user, delete messages, or engage in other behavior. In this case, Twitter Counter was responsible. Its servers were hacked, and credentials stolen. This kind of break-in affects even those who have enabled two-factor authentication, because third-party app approval happens while you're logged in and doesn't disclose a Twitter password. Thus, Twitter assumes that a legitimate user has approved the conduit, and it passes a usage token to the third party, which stores that. Those tokens can be revoked en masse and an application blocked, which is what Twitter did after the hacking was discovered. Two-factor authentication (2FA) remains critical and should probably be a requirement that social-media networks enforce for any account that attracts more than a small amount of followers, likes, or other markers making it a potential target for takeover. A Twitter friend outspoken about Muslim discrimination noted around the same time that she was receiving messages from Twitter about password attempts, but she had two-factor enabled, so the attempts were in vain. Another friend received a quasi-phishing message that her Apple ID had been locked, and found her account was, in fact, inaccessible. She regained access, but the suspicion I have is that phishers bombarded Apple with bad passwords to her account to force it into a lockdown state, and then tried to scam her. She also has 2FA enabled. Depending on the service, you may be able to approve a connection once and never reaffirm it. When you attempt to use a Web app with Twitter, you will likely be asked to re-login on a regular basis, but if you don't use the Web interface, the conduit remains active and you don't have to approve it. Native apps, like Tweetbot, and system integration, as in macOS and iOS, are never reprompted—they request and receive token renewals without your involvement if they're needed. More nooks and crannies to check I wrote a year ago about how to perform a checkup on Facebook, Google, and Twitter, and those details are more relevant today. I'd add to that a few more places to make sure you aren't leaving a vector available that someone can pry open with a digital crowbar. In most of these locations, you can view recent or open sessions, which let you see which hardware and browsers are accessing your account, but that can help you ferret out whether any of that is unauthorized. Facebook open sessions. Via Facebook's Web app, click the downward-pointing arrow to the right of the help (?) button on its toolbar. Choose Settings, click Security in the left navigation bar, and then, next to Where You're Logged In, click Edit. 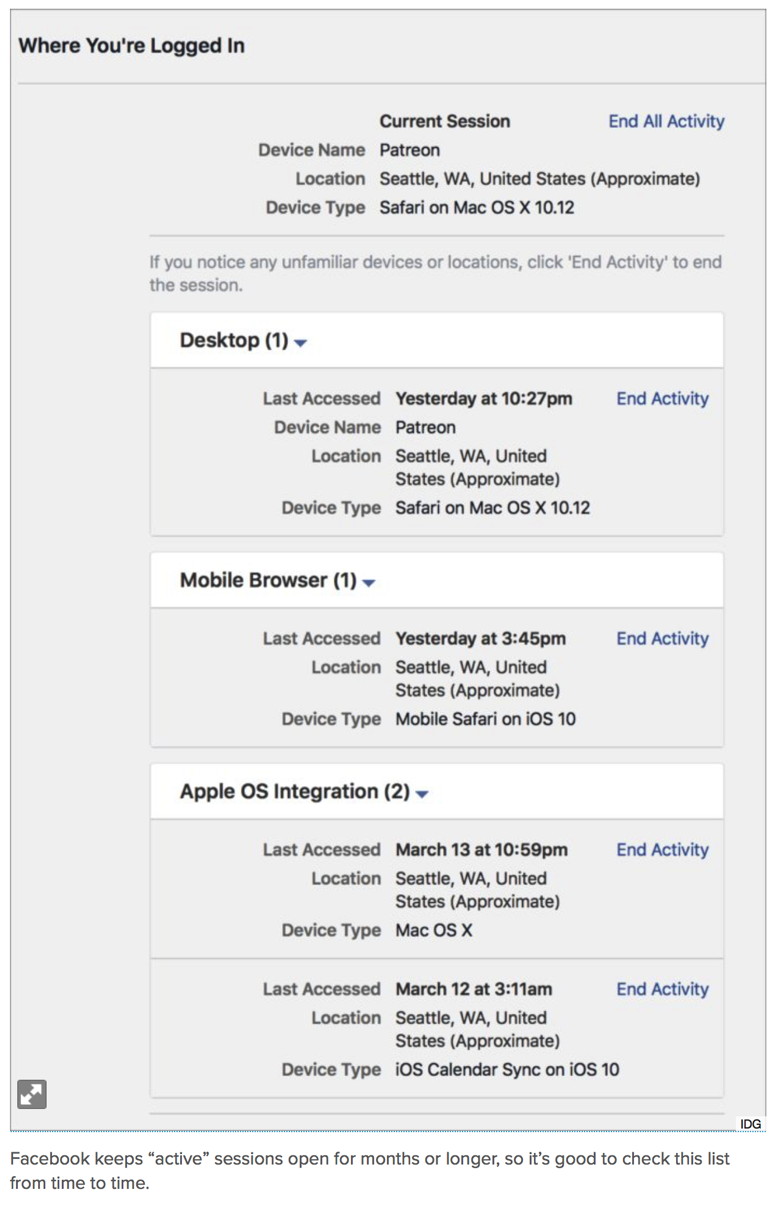
In trying to troubleshoot why both my Macs get about 40 notifications for every new Facebook post, I turned to these section of settings and found that several sessions remained "open" even though the listed service hadn't attempted to access in months or longer. Click End Activity next to each item you don't recognize. This may cause a problem with calendar sync or mobile access, forcing you to re-authenticate or, with 2FA, create a new app-specific password. But it's better than wondering why they remain available, potentially on a computer, device, or via a service you no longer have access to. In my case, my office Mac and laptop MacBook are both identified as "Patreon," a service that I use Facebook authentication with, but which shouldn't be identified with my sessions. That's an issue I have yet to figure out. (On a Mac, you can sever the system-level Facebook connection via the Internet Accounts system preference pane. Click Facebook in the accounts list and then click the minus button at the bottom to remove. This will affect contacts and calendars if you have those boxes checked. It should also remove contacts and delete your Facebook calendar, but contacts may persist.) gDropbox sessions and authorization. Dropbox has seen a big rise in third-party integration, and you may not realize—as I didn't—just how many services and sites can access your Dropbox in different ways. Dropbox shows open Web sessions, linked devices and their last access time, and linked apps all in a Security tab. I found iOS hardware I still own but that remained displayed as linked from a previous system release, as well as devices I no longer own. If you wipe a device before selling it, a new owner can't just connect to Dropbox without your credentials, but it's more effective to not leave that possibility open if you delete settings without erasing a drive or a phone or tablet. Google open sessions. At Google.com, click the avatar for your account and then click My Account. Under Sign In & Security, click Device Activity and Notifications. Google trims access to the last 28 days, which provides fewer clues to problems. 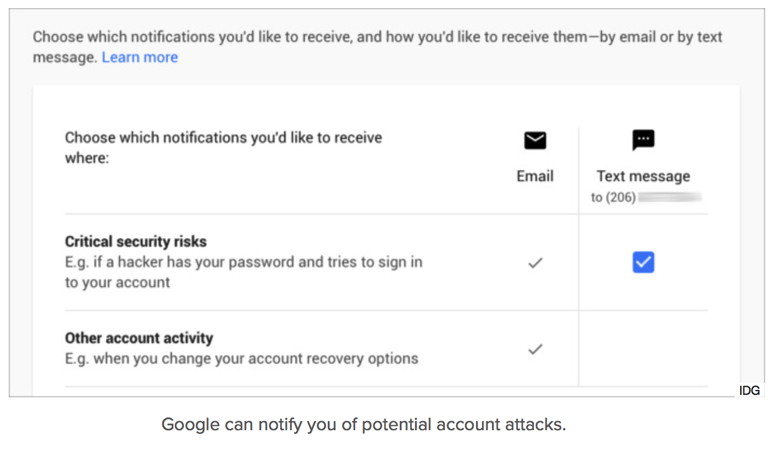
Google can also alert you when it attempts what it believes is an attempt to crack your account. A number of journalists received these alerts just a few weeks ago. Microsoft. If you don't use Microsoft products regularly, you might have authorized and forgotten the permissions you granted: you can check and change those. Re-upping trust Eternal trust is not a good strategy. Networks, services, and sites that let third parties leverage their user platforms with those users' permissions should be considering how to provide a regular review of linked apps and active sessions. Companies are trying to provide a balance between growing their audience, making their services more valuable, and not bothering people to the extent they stop paying attention to security alerts. But the current state of things leaves users who connect any third-party app or system too exposed for too long. New iPad Line-up, PRODUCT (RED) iPhones and Moreby Don Mayer, smalldog.com Apple often adjusts its iPad and iPhone lineup in March, and this year's changes make the selection more attractive and affordable while adding a new way to support the (RED) international charity. Let's take a closer look at what Apple has done and what it means for you. New iPad replaces iPad Air 2 
We haven't quite figured out how to refer to the new 9.7-inch iPad other than "the new 9.7-inch iPad". The most significant of Apple's changes is the replacement of the iPad Air 2 with a new 9.7-inch iPad model called simply "iPad." This latest iPad is extremely similar to the iPad Air 2, and although most of the changes are for the better, Apple cut a few features so as to reduce the price to the lowest ever for a 9.7-inch iPad. Physically, the new iPad is almost identical to the iPad Air 2, apart from being 1.4 mm thicker (which might cause problems for some existing cases). More interesting is that Apple swapped the iPad Air 2's A8X processor for the faster A9 chip, which should improve performance. The cameras remain mostly the same too, though photos taken with the rear-facing camera should be somewhat better, thanks to two improvements over the iPad Air 2's camera: auto image stabilization to help avoid blurry images and a hybrid infrared filter to improve color accuracy and sharpness. On the downside, the new iPad lacks the iPad Air 2's laminated display and anti-reflective coating, which combined to increase screen clarity, particularly in bright light. You'd have to compare the new iPad against the more expensive iPad mini 4 or the much more expensive 9.7-inch iPad Pro to see if the screen change is a major problem for you. The big win with the new iPad is price, which has dropped $70: it's now only $329 for the Wi-Fi-only 32 GB model or $429 for 128 GB. The cellular models cost $459 for 32 GB and $559 for 128 GB. It's now the least expensive iPad and what Apple expects most new buyers to purchase. It's available starting today! Apple reduces iPad mini 4 price, drops iPad mini 2 The new iPad takes over the entry-level iPad spot from the iPad mini because Apple simultaneously dropped both the iPad mini 2, which had been priced at $269, and the 32 GB model of the iPad mini 4, which previously sold for $399. That leaves just the 128 GB iPad mini 4, and Apple slashed $100 off its price to bring it down to $399. Now I am a big fan of the iPad mini and use my iPad mini 4 all the time. I prefer the size for reading and traveling. Making the choice between the iPad mini 4 and the new 9.7-inch iPad will come down to your preference for size and screen clarity. Both are amazing new price points! 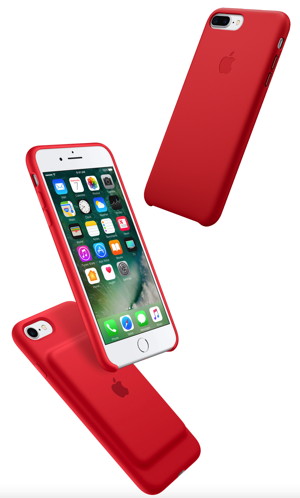
Paint the town (RED) with new iPhone 7 models For more than 10 years, Apple has partnered with the international (RED) charity to raise money for the Global Fund to combat AIDS, tuberculosis, and malaria. By offering products in the licensed PRODUCT color and donating a portion of the proceeds, Apple has raised over $130 million for (RED), making it the charity's largest corporate donor. We applaud Apple for this continued commitment! On March 24th, Apple will start selling the iPhone 7 and iPhone 7 Plus PRODUCT Special Edition models in 128 GB and 256 GB capacities. They're functionally identical to the existing iPhone 7 and 7 Plus models, and are priced the same too, but they come in what Apple calls "a vibrant red aluminum finish." It's a strong color that's a far cry from Apple's almost pastel rose gold color choice and I definitely would have have opted for red but I'll have to be happy with my boring space gray. If you'd like a PRODUCT iPhone, but have a perfectly serviceable iPhone right now that you don't want to replace, Apple now has silicone and leather cases in the (RED) color—they're not quite as snazzy as the red aluminum finish, but they're similarly bright. iPhone SE now holds twice as much Last, but far from least, Apple has doubled the storage tiers for the 4-inch iPhone SE, so you can now purchase a 32 GB model for $399 or a 128 GB model for $499. This minor change is welcome for two types of iPhone users. First, if you're looking for the least expensive iPhone, the 32 GB iPhone SE at $399 is $150 cheaper than the 32 GB iPhone 6s at $549. And second, some people with smaller hands or pockets don't like the extra bulk of even the 4.7-inch iPhone 6s/7, much less the 5.5-inch iPhone 6s/7 Plus. For them, the svelte iPhone SE is a perfect size, and it's helpful that buying it no longer requires living with only 16 GB or 64 GB of storage. One More Thing… Hidden in all these announcements was the fact that Apple has now made its Swift Playground app available in Simple Chinese. This is Apple's app for school kids that teaches them to program in Swift, Apple's new coding language released in 2014. Seems like a minor announcement but coupled with Tim Cook's statement about Apple's commitment to China this is Apple thinking ahead or as my driver's education teacher would say "aim high in steering!". While iPad growth has stagnated in the US, in China and India there is still double-digit growth. 
Why iOS 10.3 requires an extra tap to make a phone callby By Caitlin McGarry, Macworld
When you install iOS 10.3, if you haven't already, you'll notice that there's now an extra step to make a phone call. Before the update, tapping on a phone number would immediately initiate a call. Now, you have to confirm that you want to dial that number before the dialing begins. There's a really good reason for this weird change. According to the Wall Street Journal, an 18-year-old hacker allegedly wrote malicious code that, when tapped, would force your iPhone to dial 911 over and over. The prank led to thousands of 911 calls that overwhelmed emergency response systems in several states. There may have been people trying to reach a 911 operator that couldn't because of the auto-dialing. The code worked by exploiting the iOS auto-dialing feature, which is why Apple had to turn it off. Now you have to confirm that you want to make a call before the phone will initiate one. It turns out that having Apple disable that feature on the iPhone is a whole lot easier than the call centers themselves blocking repeated 911 calls, a form of cyberattacking that could render 911 services unusable. According to the WSJ, each call center is managed by a local authority, not a centralized one, and getting every center on board with a fix would be near impossible. The 18-year-old who coded this particular cyberattack is facing four felony counts of computer tampering. How to back up an iPhone before repair and possible replacementby Glenn Fleishman, Macworld A lot of regular Mac and iOS users assume there's some kind of magic they're missing in running their devices and troubleshooting problems. I would like to assure you that those who have spent their professional lives digging into the innards of OSes and diagnosing problems encounter the very same issues you do. We may have more tricks up our sleeves, but we're not immune. My wife broke the corner of the screen of her iPhone SE recently, and at the time, the Apple Store backlog was so high, it would take a week before she could get an appointment. A little tape helped keep the screen together. Then, one morning, we awoke to her phone's alarm not just playing a jingle but also producing loud static at the same time. Restarting the phone solved the problem, but it seemed like a Sign from On High, and she was able to schedule a Genius Bar appointment the same day. (A side note: We pay for AppleCare+ and AppleCare Protection Plan on iPhones and laptops and never on iPads or desktops. So far, every iPhone and Mac laptop I've had has needed extensive, and otherwise expensive, out-of-warranty repairs. A lot of warranties are overpriced, but AppleCare has paid off.) Before taking her phone in for repair, we went through my usual routine. Her phone (and mine) use iCloud for routine backups, but I also like to make an encrypted local backup via an iTunes sync, because that typically allows a faster restoration if you have to restore your phone or are given a refurbished phone when your device can't be repaired. With the encrypted option in iTunes, you don't have to re-enter most of your passwords. For backup details, see:
I always make sure all iOS apps are updated or downloaded via iTunes to the Mac before I start the backup, because those will all be restored via iTunes (or should be) later. Of course, when we performed the iTunes backup, it initially took over an hour and then failed, possibly because of two outdated apps. We tried again, and it took only a few minutes and completed successfully. Overall, it took about two hours from start to finish because of the lengthy failed first backup, discovering a lack of available storage on her Mac, which had old iOS backups that are gigabytes in size and could be deleted, and realizing her phone wasn't running the very latest version of iOS. To remove old iTunes backups: Open iTunes and go to iTunes > Preferences > Devices. You may be surprised to see backups there you'd forgetting. They can occupy several gigabytes or more and may explain you lack of available storage. Why update before backing up? If you create an iTunes backup with an older version of iOS than the device to which you want to restore the backup (say, 10.2 on the backed-up device and 10.3 on the new), you might be out of luck. Apple has a process to upgrade a device that's not yet set up with a new version of iOS (the backup was made with 10.3 and the hardware runs 10.2), but the opposite—Apple doesn't provide documentation, and I recall losing at least one backup because of this mismatch. Better safe than sorry. My wife took the phone in, and after being told it would take an hour to replace the screen, it took somewhat longer, and they gave her a refurb, because they were unable to calibrate the screen after the repair. You'd think restore would go easy, right? Unfortunately, while the basic restore worked fine, we had a problem I've seen on multiple occasions where not all the apps reloaded. They appear gray in iOS, and even though some appear to be loading, it never completes. We waited a couple of hours with the phone plugged in just to be sure, and then finally unplugged it from USB, plugged it back in, and let it sync automatically. At that point, it almost immediately restored the remaining apps. It only seemed to take minutes. Apple's restore instructions are quite good, and it has good advice when the situation goes south as well. I found with an iPhone 7 Plus that seemed to have bricked, that I was unable to use a 2015 12-inch MacBook with a USB-C to Type-A or USB-C to Lightning connector to put the phone into recovery mode. I had to use a Mac mini with native USB Type-A support to bring the phone back to life. While I hope the specifics help you if you find yourself in these situations, the moral of the story is: it's not your fault. Apple's process for backing up and restoring iOS devices remains flaky and has several positions to fail. 5 handy things the Photos app can do with your iPhone snapshotsby Ben Patterson, PCWorld With its various "Moments," "Collections," and "Memories," the iOS Photos app has become almost as confusing and frustrating to use as Apple Music. (Don't get me started.) But once you get your bearings, there are still plenty of nifty things you can do with your snapshots in Photos. From creating instant, one-tap movies and pasting shapes and captions in your pictures to publishing galleries on the web and undeleting recently trashed images, here are some tips on making the most of Photos. Create an instant photo movie It's no longer enough to send friends and loved ones a photo album of your beach vacation—instead, you're supposed to share a video message, complete with a dynamic slideshow of your snapshots, title cards, and even theme music.  Tap the heading for a Collection or Moment in the iOS Photos app, and you'll find an instant photo-movie waiting for you. Luckily, the Photos app for iOS is ready for the instant photo-movie trend, and it's already done most of the heavy lifting for you. If you open Photos, tap the Photos tab, then tap the heading (usually a date range) for a Collection or a Moment (assuming the Moment includes enough photos), you'll see a pre-made instant movie based on your photos and videos near the top of the screen. Tap the Play button, and the instant movie—basically a Ken Burns-style slideshow, complete with transitions and a soundtrack—will begin. Tap the screen again, and a slider will appear beneath the movie; swipe the slider to change the style and music for the movie, with options ranging from Happy and Uplifting to Epic and Extreme. In the bottom-right corner of the screen is an Edit button; tap it, and you'll get even more editing tools, including the ability to change the movie's title card, tweak the clip's running time, add or remove photos, and pick a new soundtrack (either canned or from your own music collection). Once you're done editing, tap the Action button (the square one with the upward arrow) to save your mini-movie to your iOS device, share it via mail or text message, post it on Facebook, or even upload it to YouTube. Accessibility features in macOS and iOS that everyone should tryby Jason Snell, Macworld The Accessibility menus hold lots of little tweaks to make your Mac, iPhone, and iPad easier to use. If you're someone who doesn't have any specific reasons to go there, you may have never explored the Accessibility settings on your Mac, iPhone, or iPad. While it's true that those settings are there primarily for people who have special physical needs to modify how a device's interface works, the fact is, many people who don't consider themselves in need of any sort of accommodation can find something of value in these settings. Accessibility has become a place where Apple buries some specific, nitpicky details about how its devices behave-and that's why you should take a stroll through those settings sometime just to see if they solve problems you didn't even realize were solvable. Here are some of my favorites: iOS accessibility In iOS, Accessibility settings are located in the Settings app. First tap General, then tap Acessibility. Zoom. If your eyes aren't what they once were, consider turning on the Zoom setting, which lets you magnify the iPhone screen with a gesture-namely, double-tapping three fingers. Magnifier. This setting was just pointed out to me this past weekend at a presentation I was giving to a group of mostly retired people. Activated with a triple-click of the home button, Magnifier looks very much like the interface to the iPhone's camera. But there's an explicit zoom slider and the shutter button is there not to take a picture, but to stabilize the image of whatever you're magnifying so you can study it. If you're frustrated by not being able to read incredibly small type, Magnifier can be the solution. Color Filters. Located within the Display Accommodations menu, Color Filters let people who are color blind differentiate between colors. As someone who is red-green color blind, I've explored these features before. I ended up deciding to leave these settings off because they made my iPhone screen aesthetically unpleasing, but everyone's mileage will vary. There are a variety of settings for different forms of color deficiency. 

by Penny Holland, MAGIC* (An unmatched left parenthesis creates a tension that will last all day. More Signs of the times: 


If you have any pictures, cartoons, or jokes that might be appropriate for this fantastic publication, please send them to Penny at 
Ignore that call from "Apple" about an iCloud breachby Glenn Fleishman, MacWorld Earlier on Monday, my wife let me know that "Apple Support" had called about iCloud security. She was dubious, and rightly so. "Apple" then called five more times (and counting). Suffice it to say, it wasn't Apple, but fraudsters trying to piggyback on reports that a major breach of iCloud credentials could render hundreds of millions of accounts vulnerable. Apple says no such breach occurred, and security researchers, like Troy Hunt of HaveIBeenPwned.com, say the group trying to extort Apple likely has reused credentials from other sites' password leaks. (We recommend turning on two-factor authentication at iCloud regardless.) However, media reporting an potential iCloud security failure makes unsolicited calls claiming to be from Apple more credible. My wife wasn't taken in, but also didn't immediately dismiss the call. She hung up, and then told me about it. We have Apple devices and both use iCloud, and we have regular issues with iCloud not working precisely as we expect. While Macworld readers may already know these sorts of calls are a scam, it's vital to alert friends, family, and colleagues about such calls and help immunize them from falling for it. Many of these services sound and act professional, and have been victimizing Windows users for years. Below are some of the "tells" for me that it was a fraud, and that you can teach others about: Apple called unsolicited: I've never had Apple call me—a consumer—for any reason I can recollect unless I called them first, and it's always a human being calling back. Apple notes this on its phishing tips page: "If you get an unsolicited call from someone claiming to be from Apple, hang up and contact us directly." (Microsoft, Google, and others never place unsolicited calls, either.) The call was automated: The call used a fairly cheap sounding computer-synthesized voice. An Apple automated call would be much higher quality, and probably use a real person (or at worst, a Siri analog). We never give this number out: This is a home line we use effectively as a backup and for outgoing calls only. I can check via the Apple ID site which phone numbers I have provided, too. The message didn't provide details: It offered an unfamiliar 855 toll-free number, and didn't provide an apple.com address at which more details could be found or verified. The message offered to put me through "to a support adviser right now": This is not what Apple calls its staff, nor a likely thing for Apple to offer. The Caller ID number didn't say Apple on it: Caller ID can be faked (there's no verification process), but the number displayed is from Milwaukie, Wisconsin. I also feel bad for the person whose number was impersonated. I found a real person's name associated with the number via a reverse search and his address. The Caller ID number has a shady history: The 855 number provided, when I searched on it via Google, has been used for at least a week with "Apple Support" scams. They called back multiple times: If I wasn't sure at first, the five additional calls throughout the day make it clear it wasn't Apple. A common threat These scams are abundant in a lot of different ways, though they typically target Windows users, either through unsolicited calls or pop-up messages on sites of dubious quality, because of the sheer number of Windows users. They try to get you to let them connect to your computer via a reverse screen share using one of the many free sites that provide person-to-person screen sharing and control. Then, they claim to have scanned your computer, found malware, and ask for payment so they can "fix" your computer. In the process, they install adware and sometimes malware, as well as charge a high or recurring fee on your credit card or both. Try to help those you know train themselves to be alert for scams, whether they come from an unsolicited call or via a pop-up, and call or text you (or, with work, an IT support person) first before they provide any personal information or credit-card details. These scams rely on fear and plausibility. By teaching people what to look for and, most importantly, to confirm details and wait before acting, you can help subvert them. Antivirus software won't save your Mac from future malwareby Glenn Fleishman, MacWorld But a variety of other protective software could prevent incursions by future malicious access attempts, especially from ransomware. 
A long-running debate between Mac owners and those folks who use other platforms is whether or not malware exists for macOS. It does! Mac owners tend to be very defensive (and, sadly, sometimes offensive) about macOS, because of years of slights when Windows was in the ascendance and virus ridden. These days, most malware that attacks computers and mobile systems in the wild comes from visiting a website, receiving and opening an attachment via email or a text message, or following a link in an email that misleads you into thinking you're at a legitimate site, into which you mistakenly enter legitimate credentials. And most of that malware is old. On the desktop, most attacks focus on older versions of Windows, some using variants of malware that are several years old, according to a recent update from the analysis firm Check Point. On the mobile side, 60 percent of attacks come a single 15-month old attack called Hummingbad, which is often delivered as a Trojan horse—malware hidden inside what appears to be a legitimate app. Apple has managed to avoid attacks that first appear in the wild, usually nipping them in the bud either through advance disclosure from security researchers or the sheer difficulty of exploiting a flaw that's revealed before a patch is available. It's also never had a long-running exploit that was known to exist, wasn't fully patched in old releases, and had a large number of users still running those old releases. This makes Apple's OSes seem more invulnerable than they are. But is an anti-virus package the answer? In my view, and that of many security experts, including those who have found vulnerabilities in macOS and iOS, no—in most cases, and I'll describe those that make sense later. Macworld hasn't reviewed anti-virus software for years, which may indicate the larger editorial philosophy as well. The biggest risk to Mac users is the rising tide of a specific kind of malware, called ransomware, which you can defend against using targeted anti-malware software that doesn't rely on virus definitions. Ransomware leading threat We often talk about malware by the vector by which it spreads—how does it insinuate itself into your computer? Malware can distribute itself in several different ways. You may see it...:
These vectors all exist for macOS, but the best recent path for infection has been through a Trojan horse. That's partly because it's easier to convince someone to install software they think is legitimate than to find another path of exploit. We saw this for Macs in 2016 with malware inserted into the BitTorrent client Transmission, and in February 2017 when a different kind of macOS malware appeared. Both of those Trojan horses were ransomware, which isn't a new vector of infection. Rather, it can spread through any of the vectors noted above. But it's proven a vicious problem under Windows and some other desktop OSes, because unlike most previous malware, it affects files only found in "userspace": that is, our documents and settings. Ransomware uses an encryption key to scramble the contents of all of our user data, and puts an executable wrapper around it, so that when you try to open a file, it runs and tells you how to pay a ransom in Bitcoin to obtain the decryption key. The price for individuals is often relatively modest and you can sometimes negotiate a lower payment. Without the key, your files on the drive are lost forever unless you have a backup or archive prior to the encryption. (Time Machine and other backups will dutifully copy the encrypted version, so you have to discover the problem before your oldest good copies have been overwritten.) Because ransomware doesn't need that high a level of permission to run, it's relatively easy to spread it. In mid-2016, researchers found JavaScript-only Windows ransomware that even runs outside a browser. Because it's inexpensive to make or modify, a lot of people apparently distribute it. Check Point estimates that 10 percent of infections in the second half of 2016 across all systems were ransomware variants, and the number keeps climbing. Attackers have many families of ransomware code to choose from, and it's easy to customize it. I assume there will be multiple successful ransomware attacks against Mac users, though likely shut down quickly by Apple through its Xprotect system, which automatically updates with known malware signatures as they become available. However, before these attacks hit you, you can protect yourself. Tools against broad categories of popular attack You can protect yourself against ransomware and network attacks, as well as some categories of Trojan horse that aren't ransomware in nature, by installing a few affordable and inexpensive tools. Ransomware's harm led Jonathan Zdziarski to create Little Flocker ($20 for personal use, up to 5 computers), a macOS tool for detecting and either blocking or permitting access by apps to specific folders. I've been using Little Flocker for months, and Zdziarski made a continuous series of improvements that reduces the amount of training required as you update software to new versions. Once ransomware gets its teeth in, it relies almost entirely on not being watched, and Little Flocker keeps its eyes peeled. It also monitors for apps that capture keystrokes and use mics and cameras. (Zdziarski recently joined Apple, and the future of Little Flocker isn't certain, but it's so useful that I hope it finds a new home.) 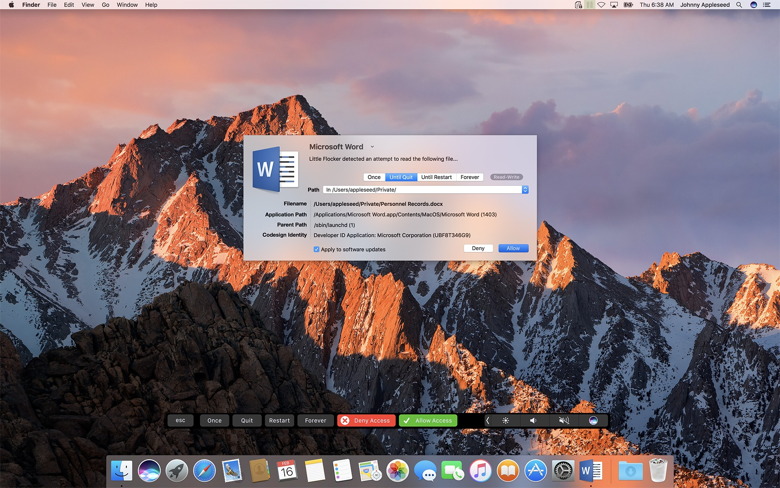
Little Flocker keeps its eyes peeled. WIZARD Warning: Little Flocker has been purchased by F-Secure and is no longer available. The owner has been hired by Apple. Paired with Little Flocker is Block Block, free and still in beta, which monitors for software trying to install files that allow it to launch automatically after a restart or when killed. That can help with adware and other unwanted software, too. Should a macOS ransomware package find effective distribution, Little Flocker plus Block Block should prevent and alert you to something bad happening, at which point you can check in with Macworld and use social networking to find out what's happening—or be the first to report an outbreak. A parallel and effective way to block malicious software from calling home and sharing your information is a firewall and network monitor. We like Little Snitch, a mature app that examines everything coming in and leaving your Mac, and uses rules to permit authorized behavior but alert you to everything else. Malware tries to talk back to centralized servers, and while there are tricks to work around firewalls, an app that isn't supposed to have a network connection that suddenly tries to summon the Internet gets noticed. (We last reviewed Little Snitch in 2015 for the first release of its current version.) Rich Mogull, head of security analysis firm Securosis who has a deep expertise in Apple-related issues, says that he doesn't use anti-virus software at all. He relies on Little Snitch, Little Flocker, and Block Block for network, input, and file monitoring, and expects his email hosting companies to staff the viral barricades. But what about the really bad stuff? You might think the kind of things I'm mentioning above seem very penny ante. If you read Apple's security updates that list of often dozens of security holes patched in every OS release and in built-in software, you might think there's a churning morass of flaws that could reach out and grab you via Safari or your inbox. And that's partly true. A lot of vicious malware for macOS and iOS does exist. It's just that it's too valuable to use against the likes of you and me. The good stuff sells for $100,000s or millions of dollars in gray and black markets, and get used by firms that sell their services to governments, by criminal syndicates, and other murky parties. Those exploits are held close to the vest, rather than pushed into the wild, because of that easily obtain value in existing markets. When they're used, it's sparingly, and often against prime targets. For instance, last summer, a human-right activist in the United Arab Emirates, Ahmed Mansoor, had three separate zero-day (previously unknown) exploits attempted against him. These were for iOS, which doesn't allow anti-virus software the kind of permission it needs to run, but similar weaknesses were also found in macOS. Because these were unknown and subtle, no Mac anti-virus software would have detected and blocked them. Apple immediately patched the flaws in iOS and then shortly after in macOS, rendering them useless. It's not that no risk from a more general category of malware exists for Mac users. Rather, the highest likelihood is that your files will be locked away, and, thankfully, it's also the easiest attack you can protect yourself against. Given that Zdziarski has joined Apple, following in the footsteps in the last year or so of some other prominent researchers, we might hope that these kinds of tools find themselves neatly and seamlessly into future versions of macOS. Malware and Mischiefby Robert Y Elphick, MAGIC * 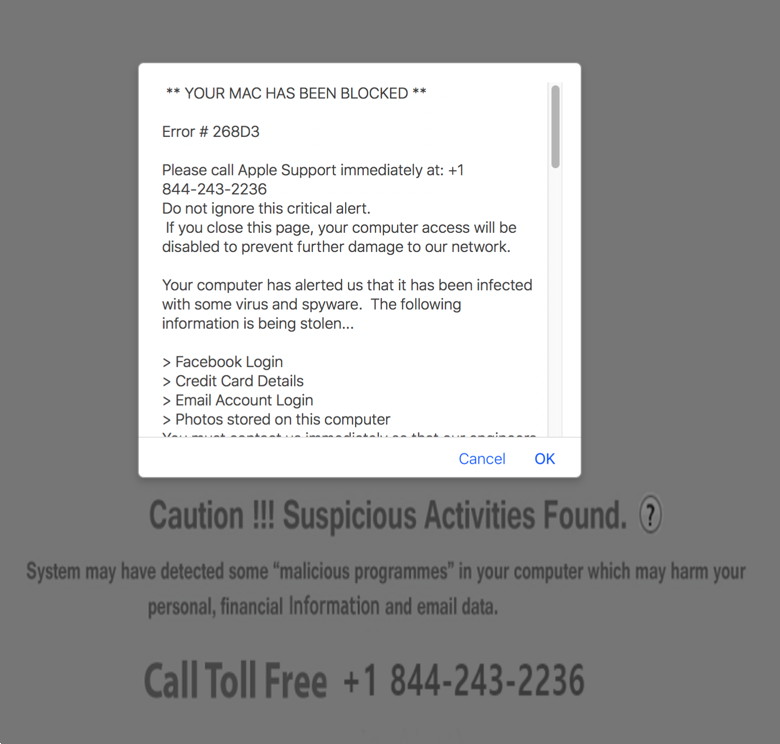 Not True! Do do not call the number. Close this page, shut down the browser and restart it. If the problem persists, get the software at Malwarebytes and run it. Another selection of emails that are up to no good and browser messages that are crooked. Never click on anything in an email that is even only slightly suspicious. Macs are only vulnerable to malware that you invite in by clicking on the links or zip files in these emails. So don't touch them! 

This one includes 'rubish' text at the bottom that is meaningless and is meant to get around spam filters. Some examples have this text in white on a white background so you cannot see them unless you use 'Select All'.  Note that this one is to magic, an account that I never use for internet commerce (big hint that this isn't good). NEVER CLICK ON THESE LINKS! 
Photos and iCloudby Ron Sharp, MAGIC * I've written about using the Photos apps and about iCloud before but there are always questions on how it all works. So I'll try to do an all inclusive explanation without it being too complicated. Ha ha, that was a good one! It helps to understand the relationships of Photos with iOS and Mac OSX with iCloud options. The first thing to realize is that iCloud is designed to keep all your photo apps synced and it is not specifically designed as a backup. Your options are iCloud Photo Stream, iCloud Photo Library, and Photo Sharing. On your iOS device, your main photo album is called Camera Roll. When you take pictures, that's where your photos will go. To sync your photos to your other devices you can turn on iCloud My Photo Stream. When you do this you get a new album called Photo Stream. You will also need to turn on iCloud Photo Stream or iCloud Photo Library on any other device you want your pictures to sync to. And remember that if you delete a photo from your streaming album it will delete from your streaming albums on all your devices. Deleting photos from the Camera Roll album will only delete them on that one album. Only the streaming album is in iCloud and will sync if that's the only option you've enabled on your device. Photo Stream will only keep your photos for 30 days. To keep them longer you need to move them from the Photo Stream album to your Camera Roll album. The same applies to Photos on your Mac OSX. So you might think of the streaming option as semi-automatic since you have to do something with them to keep them more than thirty days. The nice thing is you can save particular photos to your iOS device and then on you Mac OSX Photos app you can save different photos from the streaming album to one of your other albums. Be aware that the Photo Stream Album only saves photos and not videos to iCloud. But iCloud Photo Library saves videos as well. If you enable iCloud Photo Library on your iOS device, it will take over as the iCloud album and you won't have the Photo Stream album. Your Camera Roll album will be the album synced to iCloud. And your photos will sync and be saved until you delete them. Same on your Mac OSX laptop or desktop, when you enable iCloud Photo Library your Photo Stream album is incorporated. Also be aware that when you first enable an iCloud Photo Library it will take a quite a while for it to upload. Possibly a day or longer. With iCloud Photo Library enabled on your iOS device you can choose to have it optimized for storage which means that your photos will only be thumbnails on your device if your memory is low, but clicking on a photo will open the full image from the cloud if you have internet available. If you don't need to access all your photos from your mobile device you can just enable the Photo Stream Album. But you can still save all your photos by turning on iCloud Photo Library on your Mac OSX. If you delete a photo from your iOS device Photo Stream it will also delete from your Mac iCloud Photos Library. Keep in mind that you get 5GB iCloud storage free. The Photo Stream doesn't count toward your 5GB. However, your photo library is most likely over that, so if you use iCloud Photo Library you will have to purchase more iCloud storage. You can get 50GB for 99 cents a month. If you want to backup all your photos to an external drive, a good way to do it is to connect your iOS device to your Mac via USB, then import your photos to your Photos app on the Mac. Connect your external drive, then drag the "Photos Library.photoslibrary" file from the "Pictures" folder to the external drive. The third iCloud option for Photos is iCloud Photo Sharing. You can use this to share photos with anyone you invite to share an album with that uses Apple's Photos app. There is a way to allow people with windows pc's to access the shared album if you set it to the "public" option but they won't be able to add photos to it. If you decide to turn off the iCloud Photo options, just be sure to check the option to "keep photos on this device" when it asks. Then your photos will be saved on your computer or iOS device if there is space. If you do accidentally delete a picture from any iCloud photo album they should be retrievable from the trash folder for 30 days. TechSmart, Message from Joel KennedyWe want you to be the first to know about an exciting opportunity... We just launched a new online learning community, designed specifically for the non-tech-savvy. Membership includes tech tips and advice, as well as instant access to courses, ebooks and audiobooks. But what's really neat is, at the center is an interactive community forum for you to ask tech-related questions and get discussions going with the group. For a limited time we are offering FREE* membership to select groups, and MAGIC members are at the top of the list. If you sign up right away, your membership is free... Forever! Visit: www.techsmart.me and simply sign up with your name and email to take advantage of this opportunity. * Hurry, this FREE Membership offer ends April 30th MAGIC, the Macintosh Appreciation Group of Island County, serves people who use Macintosh computers, software and peripherals. Our goal is to share information and get answers to questions to make us more productive with our use of technology. Our monthly meetings give us a chance to discuss computer problems and share ideas with other Mac users, feature speakers on specific topics, and to keep apprised of Apple news. |