In This Issue:

Meeting information
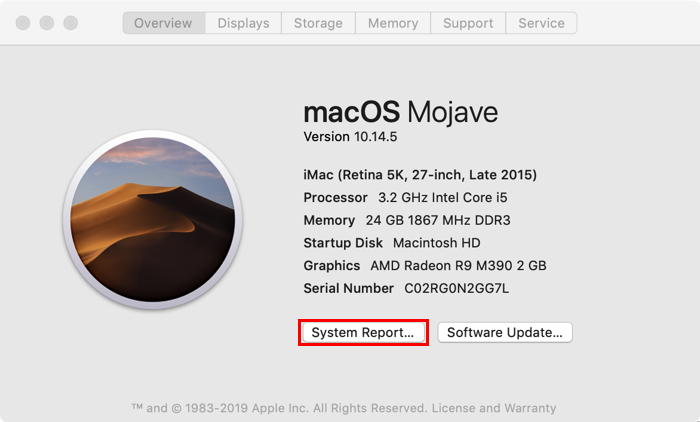
Remember to bring your used ink cartridges for recycling. Thank you to Paul Morris who collects and ships the empties. MAGIC is rewarded with a check for our efforts. Minutes of the Meeting - June, 2019The June 19 meeting of MAGIC was held at the Freeland Unitarian Congregation Meeting House from 4 to 6 PM. There were about 23 people in attendance. President Robert Elphick called the meeting to order at 4:00. PRESENTATION Backups using Time Machine and Super Duper by Robert Elphick The reason we should do regular backups: Ways to do backups: One alternate is to use backups on the cloud. iCloud is one option offered by Apple, but the question is how secure are they. Local backups are done by you. Our major backup program offered by Apple is called Time Machine, which has come free with Macs for the past ten or so years. You can set up an external hard drive to do backups using Time Machine. If you get a large Hard Drive you can partition it for saving different kind of backups, such as Time Machine, photo backups, Super Duper backups, etc. Inside your Applications folder is a Utility folder, where the app Disk Utility is located. (Find Applications Folder via the GO menu in the Finder.) If you double click on the app Disk Utility, it will list the various drives connected to your Mac—for instance, the Macintosh HD, and the external HD. Some people may have more drives than these two. Take a look at your external drive. It needs to be big enough. Time Machine keeps ongoing backups for many years at a time. Pictures and movies take lots of memory - Megabytes for photos and Gigabytes for movies. You need your hard drive to show up on your desktop, if it does not, here is how to get it to show: Go to Finder > Preferences > General and click for all the drives to show up on the desktop. Now that you can see the HD on your desktop, click once on it to select it but not open it. Then from the Finder > File>Get Info. This will open an info window where you can see the capacity of the HD. You want your external HD to be at least THREE times the Capacity of the internal HD, or FOUR times if you are a photographer. EG if your internal HD is 250 GB, you need an external HD 3x250 = 750 GB. (The Disk Utility app also shows the size of your hard drive.) Formatting your new Hard Drive to use for backups: Setting up Time Machine: How to use Time Machine for search for missing data: Open your Desktop Folder. With that open, you can use Time Machine to go back in time. Click on the Time Machine icon in your top menu bar and select Enter Time Machine. In a few seconds you will see a new screen that looks like an almost endless stack of folders. To the right you will see a list of dates on the right side. You can scroll quickly or jump through these dates. Or there is also an up and a down button to go forward and backward slowly in time. There are buttons at the bottom of the screen to CANCEL or to RESTORE. Cancel will take you OUT of Time Machine, but if you find the date or the file you are looking for, RESTORE will restore your missing file. If you go into documents > archives for instance, then click on the TM icon in the top menubar and Enter Time Machine you can scroll through those archives. You can also do searches by using the left sidebar of the window to navigate to another topic. To recap: Open a window (or folder) that contains—or once contained—the item that you want to restore. For example, to restore a file that was deleted from your Documents folder, start by opening the Documents folder. Or if you're using an app that automatically saves versions of documents as you work on them, open any version of that document. Then Enter Time Machine and search through time to find the missing item. Making a backup that is bootable outside of Time Machine: When you open Super Duper, you will see two boxes at the top of the window. You want to select your Macintosh HD in the first box, and in the second box you select the name of the drive you want to be copied TO. 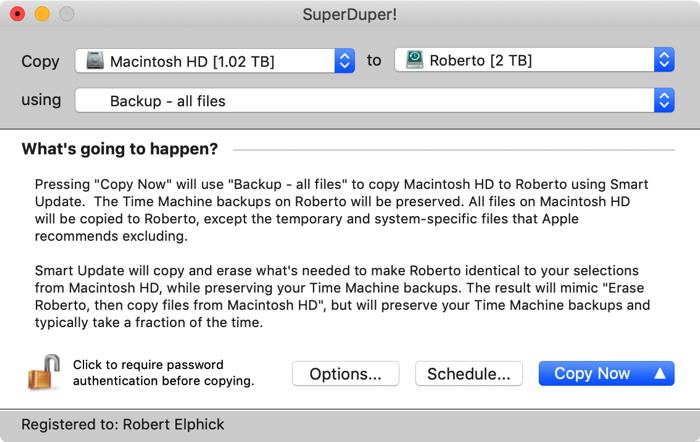
If you get the paid version of SD (costing about $30) you will be able to schedule your backups and SD will do the backups automatically. Also with the paid version of SD, your updating options are to do a Smart Update, which means only items that have changed since the last update will be copied. All others will remain unchanged. When finished, you can tell SD to either sleep or shut down the computer when the copy is complete. With the unpaid version, SD will erase the Copy To disk and recopy everything, taking much longer. Recommendation is to use Jiggler, a free program, that you can open and run while doing large downloads or copies, such as while running Super Duper. This keeps the computer awake and working all the time, rather than accidentally going to sleep and perhaps skipping some of the copying work. (Or you can use System Preferences and set Energy Saver while backing up so the Sleep setting is "Never.") *It helps if you have your HOUSE (home folder) on your dock for easy access when doing searches. If it's not already there, here's how to put your House on the dock. First locate your house in your Users folder. Using the Finder, make sure your house is Viewed as a List, then drag it to the right side of your dock. If it doesn't look like a house, but just a folder, you can click on it and select Display as Folder and View as List. BUSINESS MEETING TREASURER: Gary was absent so there was no balance given. OTHER BUSINESS: Robert is waiting for feedback on what schools to be held. So far nothing has been scheduled. We also need ideas on presentations for our monthly programs. Please send Robert or Trish an email suggesting presentation topics. Penny Holland made a cautionary announcement about her experiences in ordering a new iPhone. When the online purchase didn't go through she telephoned Apple and spoke to a salesman who was supposed to create a two year, interest-free "loan" where the payments were to be included with her Verizon provider. She was also to receive a box in the mail in which to put her old iPhone7 for a $200 buy back. Neither of these things happened. She got the phone when it was supposed to arrive, but no box came for returning the old phone. Eventually she discovered that hadn't been ordered, causing her to have to drive it over to the Apple store at Alderwood Mall. Later she discovered that the salesman had also neglected to arrange for the 2 year purchase plan with Verizon. Instead when she got her Visa bill, she discovered the entire amount was charged in one lump sum. The warning: be careful when you make a large purchase like that to see that you get an email describing the entire purchase agreement. Not all Apple employees are geniuses! Question and Answer Q: I have 5 hard drives connected to my Mac. Every time I turn off my Mac, Time Machine goes off. Should that happen? A: Something is not right. Are the five hard drives you are using daisy chained? Plug in your Time Machine drive directly into your computer to see if it comes works better that way. Also make sure it's a Mac formatted disk. Q: Sometimes my computer tells me I've not ejected the Time Machine drive correctly. Am I supposed to eject it every time I turn my computer off? A: If you unplug any external drive from your computer, you will get an error message that you didn't eject it properly. Before unplugging a hard drive you should drag its icon to the trash, thus properly ejecting it. If you turn off your computer, and then turn it back on, it SHOULD turn the external drive back on automatically. Q: When I try to use the external HD with TimeMachine and click on it to do a backup, it seems like it takes 10 or 15 minutes preparing to do a backup. How long should it take? A: Usually just a couple minutes or less. If it's taking a long time we should take a look at the computer and see what's wrong. Q: When do you partition a drive? A: Thumb drives cannot be partitioned. But External Drives can be partitioned into sub drives of varying sizes using the Disk Utility app. You can partition them into as many external drives as you wish. You select the partitions for different purposes. Some people partition a HD into two parts, putting Super Duper on one partition and using the other partition for Time Machine. This all depends on your circumstances, and the size of your HD Q: Say you've already partitioned your backup. Can you change the partition later if you don't need it. A: Not easily. If you have another hard drive you can back everything up to that, and then repartition your original HD and then re-save your data to that newly partitioned HD. Q: When will you be doing your next talk on the BIG earthquake? A: Sept 4 at 2:00 at the Freeland Library, and Sept. 23 in Coupeville. I taught a bunch of 4H kids to make movies, so we created this presentation. You need at least one month of food and water since we live on this island where it will take some time to get resupplied. Q: Where is the EJECT button on my computer? A: On the top row, last button on the right of your keyboard. If you don't have an eject button, go to Finder>File>Eject. Q: I am scanning a page and want to make it into an editable copy. What is the best program to use? A: Prizmo is the best one I know. Q: I have my Super Duper drive stored off site in a safe in my garage..If I have a scheduled Super Duper backup, will it remind me to connect the backup drive? A: No, but you can have the calendar app remind you prior to the scheduled backup to go get the SD hard drive. Q: How to do a backup of the iPhone? A: Use iTunes for a phone backup. Or you can use the iCloud backup, but you may have to pay for more iCloud memory if you have very many photos oh your phone. Q: When I turn my computer off and then it back on, a Power Point presentation keeps coming on. Why? And how can I prevent that from happening? A: Use the red button on the window to turn it off. Before shutting down the computer turn off all applications. You may also have Power Point set up to open automatically upon starting up our computer. Go to System Prefs and look at Users and Groups> Login Items. If you have something listed there, it will always begin running upon start up. Q: Can you get OUT of Facebook? A: Go to our website and to the newsletters. There is an explanation there on how to get out of Facebook. To find something in the newsletters if you don't know its date, look at the Linked Index. Once there if you hit Command F and type in "Facebook" and it will search for all the articles that contain the word "Facebook." (One of the members found the Jan, 2014 article with this info.) Meeting was adjourned at 5:50. MAGIC MomentsAAUW Tech Trek Committee emailHi Robert and Board, I am pleased to announce that the AAUW raffle of the two iPads donated by MAGIC garnered $1100! This is enough money to send another 7th-grade girl to Tech Trek camp in 2020. That makes a total of 3 Tech Trek campers next year, thanks to the generosity of the MAGIC Board and members. We are so grateful for your support of our Whidbey Island young women! Kind regards, Donna Christensen, on behalf of the AAUW Tech Trek Committee MAGIC website secureThe MAGIC website is and has always been secure with a security certificate thanks to Whidbey Telecom. This means that you can reach the website by using: The old URL will still work so you do not have to change it if you do not know how to edit your Favorites. MAGIC Classes for 2019A continuing schedule of classes is being set up for the year. Any member wishing to see us provide these or any other classes should contact us at Future PresentationsWe are working on a schedule for Meeting Presentations for the rest of the year. What would you like to see? Send me an email and we will try and include it. Have you got some experience or insights with Apple products and uses that you would like to share? Contact me and we will find a slot for you to present it. Swaps and SalesDon't forget to check out the swap page of this website. It includes a nice older iMac that is free and in good working order! 
Note: This Software Update section of the newsletter lists the most relevant Apple updates. Not all updates are listed for all products. Additionally, I'll add other pertinent updates on occasion. If you're using an AirPort, you should upgrade it ASAPby Ed Hardy, cultofmac.com Apple discontinued the AirPort line of wireless routers last year but continues to support them, including efforts to keep out hackers. The US government's Cybersecurity and Infrastructure Security Agency (CISA) released a statement urging users of networking equipment to install a new firmware patch to block attacks. Even though Apple stopped selling the AirPort line in 2018, and quit designing new models well before that, there are doubtless many still in use around the world. These should all get the new security patch. 
A warning from the US federal government "The Cybersecurity and Infrastructure Security Agency (CISA) encourage users and administrators to review the Apple security page for AirPort Base Station Firmware Update 7.8.1 and apply the necessary updates." Apple's own description of this update is couched in general terms, just saying that version 7.8.1 "improves the security of your base station." The company's support website has instructions on how to install this firmware update. This update doesn't bring any new features, but one released last year surprisingly added AirPlay 2 support to the AirPort Express. Apple updates iWork for iOS and macOS with new style options, Apple Pencil customization, moreby Chance Miller, 9to5mac.com Apple has released notable updates to its Keynote, Pages, and Numbers applications across both iOS and macOS. The updates add new features including additional style options, face detection, and more. 
One of the most notable updates across the board is that Apple is now using face detection to "intelligently" position subjects in photos in placeholders and objects. Furthermore, many of the apps are adding new style options for text, enhanced Apple Pencil customization on iOS, and more. Here are all of the updates for each platform. Here's the full change log for Pages for Mac, which is available on the Mac App Store for free.
And Pages for iOS, which adds many of the above features, as well as its own unique features such as new customization options for Apple Pencil. Pages is available as a free download on the App Store.
As for Numbers, Apple is focusing on improving cacluations with an enhanced version of the 128-bit calculation engine. There are also new style options for text, and more. Here's the full change log for Numbers on Mac:
Numbers for iOS is adding many of the same features:
Last but not least, Keynote for iOS and macOS has also been updated. Both updates add support for editing master slides while collaborating on a presentation, as well as new style options. The iOS update Universal:
iOS-only:

What's with All These Dialogs Saying, "SomeApp is not optimized for your Mac"?from smalldog.comc 
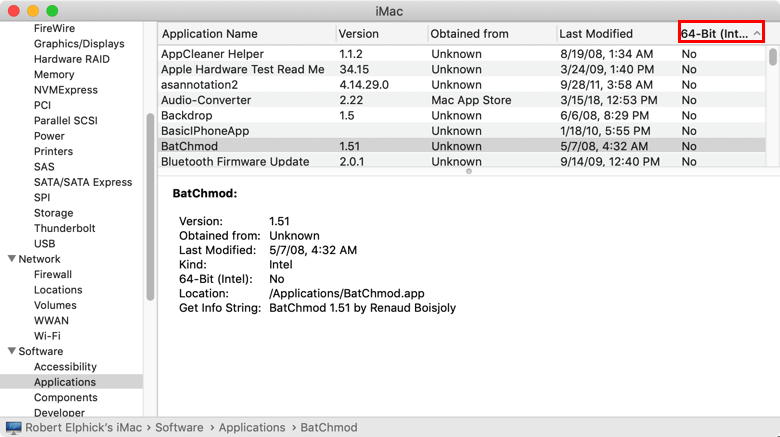
If you're running macOS 10.13.4 High Sierra or macOS 10.14 Mojave, you may have seen a dialog that says an app isn't optimized for your Mac. The message differs slightly between High Sierra and Mojave, with the High Sierra version telling you the developer needs to update the app to improve compatibility whereas Mojave saying bluntly that the app won't work with future versions of macOS. What's going on here, what should you do, and when should you do it? What's Going On: 32-bit and 64-bit Apps Over a decade ago, Apple started to transition all the chips used in Macs, along with macOS itself, from a 32-bit architecture to a 64-bit architecture. Without getting into technical details, 64-bit systems and apps can access dramatically more memory and enjoy significantly faster performance. Apple knew it would take years before most people were running 64-bit hardware and 64-bit-savvy versions of macOS, so it allowed macOS to continue running older 32-bit apps. However, maintaining that backward compatibility has a cost, in terms of both performance and testing, so at its Worldwide Developer Conference in 2017, Apple warned developers that High Sierra would be the last version of macOS to support 32-bit apps "without compromise." At the next WWDC in June 2018, Apple announced that macOS 10.14 Mojave would be the last version of macOS to run 32-bit apps. Happily, the only "compromise" for 32-bit apps in Mojave is the warning dialog, which appears every 30 days when you launch an older app. But the writing is on the wall: 32-bits apps will cease working in macOS 10.15. How Do You Identify 32-bit Apps? Apple provides a tool to help you find 32-bit apps. Follow these steps:
This technique works in both High Sierra and Mojave, but in Mojave, System Information includes a better-formatted section, called Legacy Software, that also provides a list of 32-bit apps. However, this list may be smaller because it includes only those apps that you've launched. Since it's likely that you open old 32-bit apps only occasionally, you can't trust the Legacy Software list to be complete. If you find System Information's Applications list overwhelming, check out the free 32-bitCheck utility from Howard Oakley. It performs exactly the same task but lets you focus on a particular folder and save the results to a text file for later reference. What's Your Next Step? Once you know which apps won't work in macOS 10.15, you can ponder your options. Luckily, you have some time. We expect Apple to release macOS 10.15 in September 2019, but you don't need to upgrade right away—in fact, we recommend that you wait a few months after that to allow Apple time to fix bugs. That said, we do encourage upgrading eventually, and if you buy a new Mac after September 2019, it will come with macOS 10.15. So you need to establish a plan—it's better to know what you're going to do than to be forced into action if you have to replace your Mac on short notice. For each 32-bit app on your Mac, you have three options:
Latest Mac malware OSX/CrescentCore hides from security researchersby Ben Lovejoy, 9to5mac.com No fewer than six examples of Mac malware were discovered last month, including one which exploits a vulnerability in macOS Gatekeeper. The latest example - dubbed OSX/CrescentCore - takes steps to hide from security researchers. Security company Intego says it has found CrescentCore on multiple websites, posing as, you guessed it, a Flash Player updater... The company reported on it in a blog post. The team at Intego has observed OSX/CrescentCore in the wild being distributed via numerous sites. Mac users should beware that they may encounter it, even via seemingly innocuous sources such as Google search results. The new malware was first observed linked from a site purporting to share digital copies of new comic books for free—one of many shady sites that flagrantly violates U.S. copyright laws […] A high-ranking Google search result was also observed redirecting through multiple sites, eventually leading to a page (hosted at any of a large number of domains) with flashy warnings about Adobe Flash Player supposedly needing to be updated—which in reality is a malware distribution site. As the company notes, sketchy sites claiming to offer free versions of movies, TV shows, music and books are an extremely common source of malware. How CrescentCore hides from security researchers CrescentCore takes two steps to hide itself from security researchers. If a user opens the .dmg disk image and opens the Player app (which has a Flash Player icon), the Trojan horse will first check to see whether it is running inside a virtual machine (VM). Malware analysts often examine malware inside a VM to avoid unintentionally infecting their own computers while working with dangerous files, so malware authors sometimes implement VM detection and behave differently to make it more difficult to analyze the malware's behavior. The OSX/CrescentCore Trojan app also checks to see whether any popular Mac antivirus programs are installed. If the malware determines that it's running within a VM environment or with anti-malware software present, it will simply exit and not proceed to do anything further. We'd echo the advice from Intego about Flash. Nobody should be installing Flash Player in 2019—not even the real, legitimate one. Nearly all sites have stopped relying on Flash, as Adobe is discontinuing it; the company plans to no longer release security updates for Flash after 2020. Once again, the malware is signed by Apple, using developer IDs which have now been reported to the company, but it's likely that new IDs will be used soon. Apple plays a constant game of whack-a-mole with developer IDs which have been hacked or misused. WIZARD SEZ": get help here to uninstall Flash Player. Apple finds issue with logic board in some 2018 MacBook Airs, offers free repairby Jordan Kahn, 9to5mac.com Apple has confirmed in an internal document to repair staff that it's identified an issue with the main logic board in what it says is a "very small number" of MacBook Air models. Apple Stores and authorized repair staff have been informed to replace the main logic board in affected machines at no cost to customers, according to the document obtained by 9to5Mac. Apple's memo to repair staff notes that it has identified "an issue" with the main logic board specifically in Retina, 13-inch, 2018 MacBook Air models with certain serial numbers. Apple will be emailing customers with machines with the serial numbers they've identified as being affected, otherwise customers can take their machine to Apple Stores or authorized repair staff to have their devices checked out. Apple's documents list symptoms as issues with "power," but do not elaborate on what problems users are experiencing exactly. A quick search online for problems with the 2018 MacBook Air logic board shows reports back to when the device first launched with some users' machines not able to power on at all. Apple has not yet publicly announced the program or listed it on its "Exchange and Repair Extension Programs" webpage where it lists recall and service programs. In some cases Apple doesn't list programs that only affect a small number of devices, but it's not clear what criteria it uses to decide to publicly announce a repair or recall program. For affected machines, Apple will offer the program for four years from the original purchase date. Users that think they might be experiencing the issue can take their MacBook Air to Apple Stores or an Apple authorized service provider. How To Automatically Delete Browsing History in Safariby Arch, techjunkie.com Browsing history in Safari is there to help you quickly navigate to a specific page. In addition, Safari can remember the pages you frequently visit and display them in the main window as top sites. However, there is one downside to the browsing history. The more pages you visit, the more data gets cached in the browser. This might slow down the overall browser performance and affect your user experience. On the other hand, browsing history is easily accessible to anyone using your Mac. So you might want to set the browser to automatically delete the history after some time. Whatever the reason, it's pretty straightforward to do, even if you are not tech-savvy. Check out the methods below. DELETING THE BROWSING HISTORY Launch Safari and press Cmd + Comma to access "Preferences". You can also do it by selecting Safari, then Preferences in the menu bar. Click or tap on the "General" button and select the pop-up menu next to "Remove history items". By default, the history automatically gets deleted after a year. You can change the settings to after a day, week, two weeks, or a month. Of course, there is also an option to do it manually. HOW TO MANUALLY REMOVE SAFARI HISTORY Select "History" from the menu bar and click on "Clear history" at the bottom of the drop-down window. A pop-up window appears in Safari, and again, you get to choose the time frame - last hour, today, today and yesterday, or all history. Once you make the selection hit "Clear History" to confirm. SAFARI PREFERENCES TIPS AND TRICKS Aside from automatic history removal, you can customize the new window's behavior and change the homepage. To change the homepage, click on the bar and insert a link http://www.techjunkie.com/, for example. Then confirm by tapping/clicking on "Set to Current Page". By default, the files you download go to the Downloads folder, but you can change it to any destination of your liking. The downloaded files are automatically removed after day, but you can also change it to "manually", "after quitting", or "upon successful download". The "Tabs" button reveals a menu with a few options to tweak Safari tab performance. There are also a few useful shortcuts that can make your browsing experience faster. If you want to block all cookies, click or tap the "Privacy" button and check the box next to Cookies and website data. CAN YOU DO IT ON YOUR IPHONE? Sure you can, and the same method applies for your iPad and iPod Touch. That said, iOS on mobile devices doesn't feature automatic scheduling and there is no option to select the time frame. In other words, you need to do it manually and the action deletes all the history and website data. Tap on the Settings app, swipe up and select Safari. Once inside the Safari menu, navigate to "Clear History and Website data" and tap on it. 
Note: Deleting Safari history via a mobile device affects all other devices signed into the same iCloud account. On the other hand, this action doesn't affect the AutoFill data, so you'll be able to easily log into websites you frequently use. CAN YOU AUTOMATICALLY DELETE HISTORY IN CHROME? Unfortunately, there is still no way to automatically remove browsing history and cache in Chrome. However, you can delete cookies automatically. Take the following path to access the option: Chrome > Settings > Advanced > Content settings (under Privacy and Security) > Cookies Toggle on the button next to "Keep local data only until you quit your browser". If you are really annoyed by cookies, you can also toggle the button next to "Block third-party cookies". HOW TO DELETE HISTORY IN CHROME To access your browsing history, press "Cmd + Y" on your keyboard and select the "Clear browsing data" option. The pop-up window allows you to select the time frame and type of data. It's advisable to keep Passwords, Autofill, Hosted apps, and Media licenses unchecked. Once you are done with the selection, click/ tap the "Clear Browsing Data" button to confirm This process is very similar on your iPhone. Launch Chrome and tap the three dots to access the "More" menu. Select "History" and tap "Clear Browsing Data" at the bottom of the window. You can choose the type of data to delete - tapping on "Edit" allows you to pick the websites you want to delete or keep. UNLEASH THE COOKIE MONSTER By now, you know how easy it is to set automatic history removal in Safari on your Mac or PC. The automatic removal is not possible on your iPhone/iPad. However, it shouldn't take you more than 10 seconds to reach the "Clear History and Website Data" section. Whichever method you prefer, it's advisable to get rid of the browsing history at least once a week to make sure your browser run smoothly. 
How to Save Items to the Files App on Your iPhoneby Hallei Halter, iphonelife.com Saving items like notes, documents, and photos to the Files app on your iPhone can help you view and manage several things from one app. Here's how to save items to the Files app, which will help you stay organized. If you use Finder on your Mac, you'll notice that the Files app works in a similar way for your iPhone. By saving items to the Files app, you can use Files as a hub to view or share multiple things from this single app. With the Files app, you'll be able to save items to your iCloud Drive (after you've set up iCloud Drive) or a folder under On This iPhone. I'll be using a note from the Notes app for this example. To save an item to the Files app: When you want to save an item to Files, tap the Share icon (which looks like a box with an arrow on top). 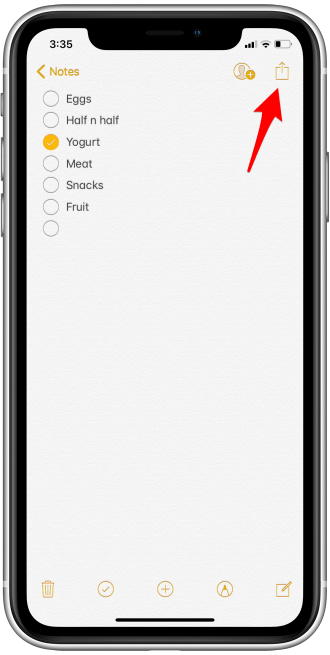 This opens the Share tab, next select Save to Files. You may have to tap the More icon (which has three dots on it) to select Save to Files. A screen will pop up and you can choose to store the item to iCloud Drive or On My iPhone. If you previously created folders in iCloud Drive, they will appear after tapping iCloud Drive and you can then select the folder. Then tap Add. If you tap On This iPhone, you'll only be able to save the item to any folders already available (new folders can't be created under On This iPhone), then tap Add. Now when you go to the folder in the Files app, you'll see your item has been stored. Now you can save notes, documents, and photos to folders or the iCloud Drive in the Files app! WIZARD SEZ: You know that all clouds are unsafe, right? iPhone Basics: How to Navigate the iOS Safari App Using the Webpage Iconsby Hallei Halter, iphonelife.com
Are you wondering how to use the Safari app because you're not quite sure what the icons mean? Here's a brief overview of the main icons in the iOS Safari app and how to use them. All the icons reviewed can be found along the bottom bar after you open the Safari app on your iPhone. The icons do the same thing in the iPad Safari app, but may be located in a different part of the screen. Download Maps & Navigation Routes for Offline Use in Apple Mapsby Amboy Manalo, gadgethack.com About four years after its last update, the iPod touch gets a refresh with Apple adding an A10 Fusion processor. Whether due to spotty cellular reception or just data that you want to save, popular navigation apps like Google Maps and Waze offer an offline feature that lets you navigate from one location to another in the absence of internet service. Apple Maps also lets you use its service offline on your iPhone, though the feature is not as straightforward as it is on its competitors. While it doesn't offer an obvious option for offline navigation outright, Apple Maps nonetheless has this feature built in, as it caches your current destination and saves it until you end your route. This means that even if you enter an area with poor cellular service, navigation will still go relatively smoothly as long as you have "Location Services" enabled. You can also pull up basic maps for locations offline. Getting Offline Navigation To get directions, while connected to the internet, input the address you'd like to go to as you normally would in Apple Maps. Tap on "Go" once you've chosen the best route, then wait for the route to load and navigation to fully commence. With the route saved on Maps, you're free to turn off both your cellular and Wi-Fi connections. Navigation, along with alternate route selection (that saved) will still work as normal as long as "Location Services" is turned on, though, you won't be able to get additional services that require an internet connection, such as adding pit stops, in addition to traffic data and other information. 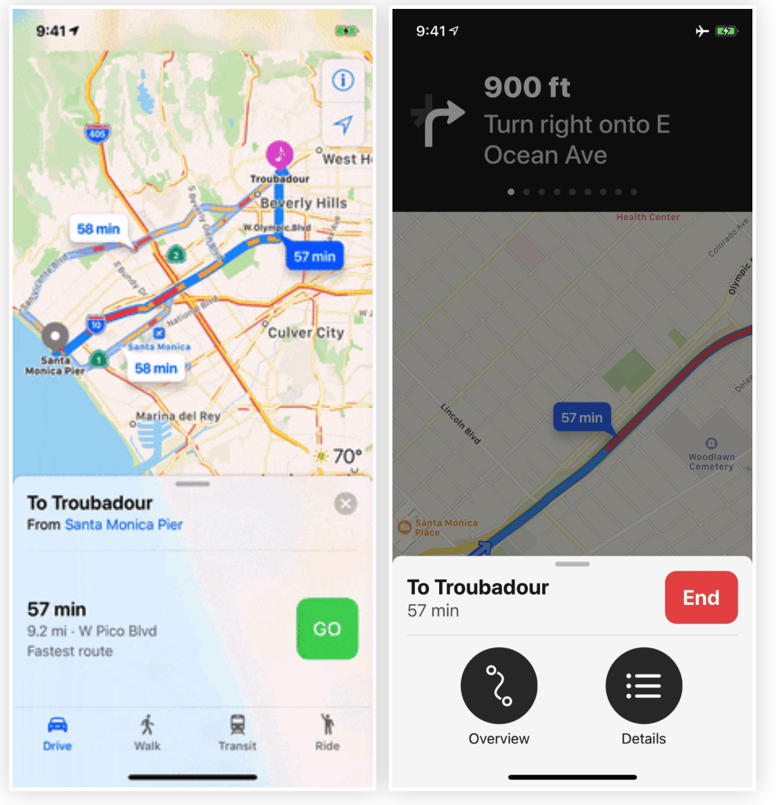
Viewing Maps Offline Any navigation you have going will come to a standstill if both the internet connections and "Location Services" are disabled together, but you'll still be able to access the map along with any saved routes that you can use for reference. You'll still also have the ability to view points of interest like restaurants that saved within the general area of your route. If you just want to create an offline map without getting directions, all you have to do is be connected to the internet, then load the area you want in Apple Maps. I suggest zooming into as far as you can in all the areas you want to make sure it saves all of the local details. If you don't, you may be left with streets and no names or worse, blank zones. Once you go offline, a lot of the basic details will still remain depending on how much you zoomed into the map to load details. The more you zoom in before going offline, the more details will be saved. That can't be stressed enough since you may end up lost without the proper amount of details present. Apple Maps will remember these offline maps even if you force-close the app, clear your RAM, and even if your device restarts. Continue reading and see animations.... How to use the QR scanner on iPhone and iPadby By Brian Wolfe and Mika Sargent, iMore 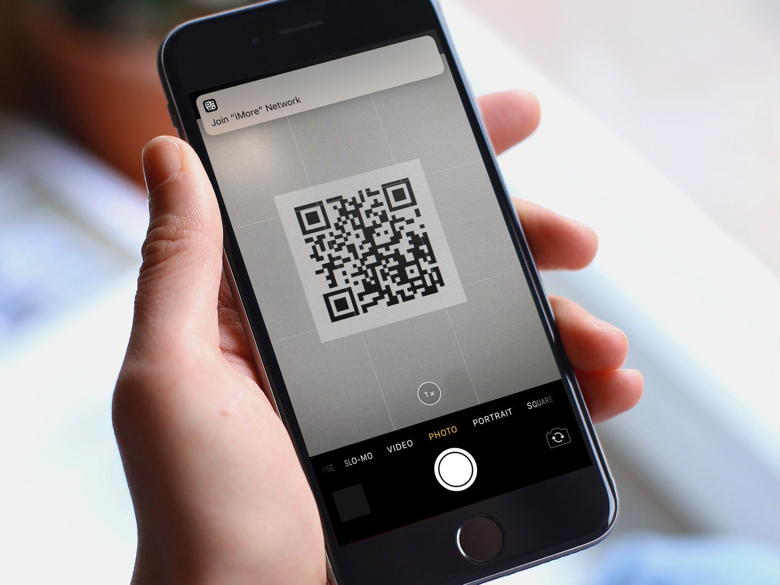
Native support for QR code scanning via the Camera app means it's easier than ever to use these types of codes in your daily life. Previously, you needed to download a third-party app to do so. That's not the case anymore! Contents include:
Continue reading and see animations.... Customize your iOS Control Centerfrom smalldog.com Your iPhone or iPad has a control center that can quickly give you access to some of your most frequently used features. My control center screen is almost full as I have the usual items there like Airplane mode, Bluetooth, and Music control, but I have added things like hearing aid control, magnifier, QR code reader, wallet and Do Not Disturb While Driving.  iOS Control Center You can easily customize your control center:
Once you are there you will see a list of all the features you can add or subtract from the control center simply by pressing on the + or - next to the feature. Here's a list of all of them:
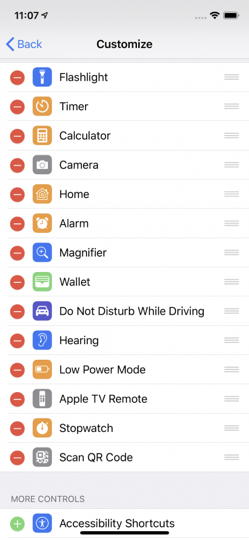 iOS Control Center options 
Apple starts to roll out support to play 100,000 radio stations with Siri on iPhone and HomePodby Benjamin Mayo, 9to5mac.com As announced at WWDC, Apple is bringing live radio stations from several online providers for Siri users on iPhone, iPad and HomePod. Although marketed as a fall iOS 13 feature, Siri live radio is already partly working on the HomePod, and for iPhones and iPads running the iOS 13 beta. Apple said that it will be sourcing from TuneIn, iHeartRadio and Radio.com — touting a total figure above 100,00 stations. This should mean there is a decent selection of top stations available to play. It's not clear if all integrations are live yet but many stations are now accessible on the HomePod, running the existing OS. Macerkopf reported that many German stations are also available now through the HomePod, suggesting a global deployment. For instance, asking my HomePod to "play radio station BBC Radio One" results in the Siri response "Playing BBC Radio One, provided by TuneIn." and the audio starts playing. You can also start other radio stations just by saying their name. Obviously, this is finding internet radio streams rather than real terrestrial radio. Nevertheless, audio quality of the stream was very high on the stations we tested, and it sounded great on the HomePod's speakers. Siri is a bit picky about the phrasing of your request; without key words like 'radio station' in the question, Siri algorithm falls back to Apple Music searches. However, if you are careful to phrase it appropriately, many stations are now available. Of course, Apple could tweak the voice recognition understanding by the 'official' fall launch. 
In addition to current HomePod OS software, this also works on iOS 13 devices. The radio playback is controllable through the Music app, and you can search for stations by name in the Music app's search tab. Played stations appear as items in Recently Played section of the Music app, though, if you want to find them again quickly. (Up to now, Apple Music has offered Beats 1 radio, as well as a limited number of other 'real' stations in select countries. You can find these by going to Radio tab in Apple Music and searching the genre list and ignoring the algorithmic stations.) This fall, the HomePod will receive a handful of software improvements including easier music handoff, just by bringing your phone close to the HomePod, and support for multiple users with each user receiving contextually relevant music recommendations and access their own data for Personal Requests like messages, reminders and calendars. The HomePod will be able to detect up to 6 different voice profiles. What Does the Red Dot Icon on Apple Watch Mean?by Ben Lovjoy, 9to5mac Have a new Apple Watch and want to get to grips with it? See icons on the screen but don't know what they mean? Want a plain English guide to deciphering those status notifications? This tutorial is going to walk you through all the status icons currently used on the Apple Watch. The Apple Watch has one of the best designs out there right now second only to the Samsung Galaxy Watch. The Samsung uses Android so if you're an iOS user Apple Watch is going to be a no-brainer. It is slightly less intuitive than an iPhone and has a couple of new features to get used to but once you do get used to them, the Apple Watch is actually quite easy to live with. Build quality and usability are real strengths of the Apple Watch and is where it shines. It isn't able to do anything other watches cannot but what it does do, it does with typical Apple style. That makes it an excellent purchase if you're in the market for a smart watch. One key area of the Apple Watch is the notifications. Usually sitting above the 12 o'clock marker, these icons can change depending on what's going on with the phone. That's where you'll see the red dot icon and some others. If you're seeing these notifications, here is a quick overview of what they mean. RED DOT ICON ON THE APPLE WATCHThe red dot icon means you have an unread notification. To read it, swipe down from the top of the screen and the notification pane will appear. Once read, the red dot will disappear. GREEN LIGHTNING ICON The green lightning icon means the Apple Watch is charging. RED LIGHTNING ICON The red lightning icon means your watch battery is running low and will require charging soon. YELLOW AIRPLANE ICON The yellow airplane icon means you have your watch set to Airplane Mode. If you have your watch currently paired and within reach of your iPhone, the phone may also be in Airplane Mode. Turning it off on the watch does not turn it off on the phone. PURPLE MOON ICON The purple moon icon means you have your Apple Watch set to Do Not Disturb. You will still get alarms but will not be bothered by calls, texts or notifications. ORANGE MASKS ICON The orange masks icon is Theater Mode. This is essentially silent mode with some do not disturb thrown in. The watch will not alert you to notifications or calls and the screen will remain dark. Disable through the Control Center. WIFI ICON The WiFi icon is for when your Apple Watch is connected directly to a wireless network rather than through the phone. FOUR GREEN DOTS Four green dots means your watch is connected to a cell network. Four green dots means a strong signal while three is not so strong and two is not very strong at all. RED PHONE ICON WITH A LINE THROUGH The red phone icon with a line through it means your Apple Watch cannot reach your iPhone. It signifies not having a connection and could be down to range or having Airplane Mode enabled on the other device. RED X ICON The red X icon means your Apple Watch has lost connection to the cell network. This icon will disappear as soon as it gets a connection again to be replaced with the green dots as above. BLUE DRIP ICON The blue drip icon signifies the Water Lock function. The screen will not respond to input while you see this icon so don't worry if it seems your watch isn't working properly. To disable Water Lock, turn the Digital Crown to unlock it. As soon as the icon disappears, you're good to go. BLUETOOTH ICON The blue Bluetooth icon tells you that you are currently paired with something using Bluetooth. That could be speakers or headphones or something else. PURPLE ARROW ICON The purple arrow icon indicates your watch or an app on it is using location services to pinpoint your location. This remains until you turn off the app or location. BLUE PADLOCK ICON The blue padlock icon on your Apple Watch means the watch is locked and will require the PIN number to be entered to unlock. There are a few icons to get to grips with on the Apple Watch but Apple's design genius means they are mainly self-explanatory and will be easy to remember once you get used to the watch. You can see a manual describing these icons if you select My Watch, General and About. Select View the Apple Watch User Guide for a list of what each icon means. How to Track Calories with the Apple Watchby By Melissa Holt, techjunkie.com For those of us with an eye on body weight, tracking calorie intake and output can be a crucial component in reaching our weight, health, and fitness goals. The Apple Watch can help you reach your goals in a number of ways, including serving as a handy calorie counter. So what's the best way to get an idea of how many calories you should consume in a day? Well, you could use a TDEE (Total Daily Energy Expenditure) calculator, which lets you plug in your stats to get an estimate of how much you should eat to maintain your weight (or change it!). 

by Penny Holland, MAGIC* 


How to remove Kuklorestby Robert Y Elphick, MAGIC * Some MAGIC members have found that Kuklorest has been downloaded onto their Macs. This application is potentially dangerous and should be removed if you have it. It is an alternative search engine for your browser and will feed you adverts that you do not want. It can also feed you malware. Removing it is a bit tricky but fully described in this article. Malware Examplesby Robert Y Elphick, MAGIC * Below is another selection of emails and browser popups that are up to no good. Never click on anything in an email that is even only slightly suspicious. Macs are only vulnerable to malware that you invite in by clicking on the links or zip files in these emails. So don't touch them! 
This is Phishing. 
This is a scare tactic to get you to click on an evil link. DO NOT CLICK on the links. Internet CrimeAny one bothered by internet criminal activity should report it to the Federal Bureau of Investigation Internet Crime Complaint Center (IC3) at this web page. This includes phishing, malware, spoofing, any demand for money. 

Music & Streamingby Ron Sharp, MAGIC * One dark and stormy night, when I couldn't sleep, I decided to use headphones and listen to music on my iPod. The iPod is a sixth generation iPod Classic with 80 GB storage. They say that's about 20,000 songs. I can't imagine having that much music but it works good and the battery life is still pretty amazing. I made a funky pocket for it that hangs right on my headboard. I can even turn the iPod on and off or skip to the next song without even taking it out of the pocket. The only thing that was a bit inconvenient was that I had to use wired headphones because, unfortunately, the iPod doesn't have bluetooth. So when I start to fall asleep and turn over, or get up out of bed and forget about the headphones they are unpleasantly ripped off my head. Therefore I switched over to using my old iPhone as my music player so that I can use wireless headphones. It's working well although there is one weird thing about it. When I turn on the bluetooth headphones, I noticed that my MacBook laptop would wake from sleep. When the headphones turn on it seems to activate bluetooth on any device I've used them with. It's not really a problem, the headphones connect with the last device they were connected to and the MacBook goes back to sleep. Sometimes I'll even remember to turn the laptop Bluetooth off or even shut down the laptop and then no problems. During the day, I often stream music to my home stereo via…the old Apple Airport Express router. Unfortunately Apple has eliminated their line of routers. Now they sell Linksys routers. The first unfortunate part of this is that Apple used to included a router setup application with each operating system. They were very easy to to setup with the Airport Utility. Now you have to get the Linksys application to set it up that is only available for smart phones. The app is free but comes with "in app purchases" which means ads..don't get me started! The second unfortunate part is that it's more difficult to stream music to a stereo. The Apple Express routers had headphone jacks on them so that any music player could be connected to it and enable streaming from any Apple music player. (For some reason the Apple Extreme routers never had the headphone jack, only the Airport Express) At any rate, with the Apple Express router I can stream music from my iPhone, iPad and MacBook to my home stereo system. Now I suppose you'd need a stereo system with either wi-fi or bluetooth to be able to stream music to it. Or, you can get an Apple Home Pod. With a Home Pod, you can use the Home app on your iPad, iPhone, or Mac to Allow Speaker Access to stream your music to the Home Pod. It does seem like it cost more these days to do some of the things that used to come with computers. I find it particularly interesting how expensive routers have become. In the early days they cost a bit but like most electronic things the prices dropped and you could pick up a good router for $50. Now, for some reason routers start around $200. And if you happen to have a big house you may need more than one. So many internet connected devices are employed today that we need internet available in every room. As for music services, I personally don't use one so I'm not an expert on them. But Apple Music, as well as Spotify and Pandora will stream to a Home Pod or other internet enabled music players. No more streaming to a home stereo that doesn't have its' own internet connection or Bluetooth. MAGIC, the Macintosh Appreciation Group of Island County, serves people who use Macintosh computers, software and peripherals. Our goal is to share information and get answers to questions to make us more productive with our use of technology. Our monthly meetings give us a chance to discuss computer problems and share ideas with other Mac users, feature speakers on specific topics, and to keep apprised of Apple news. |